# Maestro Documentation — Full Dump
> Every page of the Maestro docs concatenated into one file for LLM ingestion.
---
# Documentation
Source: https://www.maestrobots.com/docs.md
Section: Overview
> Pick a product to get started.
Pick the product you'd like to learn about. Each manual walks through setup, day-to-day use and the full feature set.
- [Sniper Bot](/docs/sniper) — The flagship Telegram trading bot — wallets, global settings, trade monitor, limit orders, signals, copytrade, auto snipe, bridge, referrals and more.
- [Scraper](/docs/scraper) — Cross-platform desktop app that scrapes Telegram channels in real-time and forwards detected contract addresses to Maestro.
- [Wallet Bot](/docs/wallet) — Wallet tracking in Telegram with blazing-fast price alerts. Docs coming soon.
- [Whale Bot](/docs/whale) — Instant notifications on whale wallet movements directly in Telegram. Docs coming soon.
- [Buy Bot](/docs/buy) — Group buy/sell/price notifications for up to two tokens. Docs coming soon.
---
# Group Bot
Source: https://www.maestrobots.com/docs/buy.md
Section: Group Bot
> Automated buy, sell, and burn alerts in your Telegram group for every token you track — with per-token thresholds, custom emojis, and large-swap GIFs.
**Group Bot** is a Telegram companion that lives inside your group chat and posts on-chain swap activity for every token you track, in real time. Group admins add tokens, tune each one's threshold and style, and the bot handles the rest — posting every buy, sell, and burn that crosses your floor, complete with size, taxes, market cap, and a block-explorer link. Even if you only intend to track a single token, we recommend you go through the entire document — otherwise you'd be missing out on features like *large-swap GIFs*, custom emojis, and optional *price alerts* that give your group a louder signal when it matters.
## Admin vs Members
- **Group admins** configure the bot — adding tokens, setting thresholds, choosing emojis, and tuning the format. See [Getting Started](/docs/buy/getting-started).
- **Regular members** do not need to do anything. The bot posts alerts in the chat as swaps happen.
See [Admin vs Members](/docs/buy/admin-vs-members) for the full capability split.
## Sections
| Section | What it covers |
| --------------------------------------------------------------------------- | ----------------------------------------------------------------------------------- |
| **[Getting Started](/docs/buy/getting-started)** | Adding the bot to your group, granting admin, and opening the admin panel. |
| **[Adding a Token](/docs/buy/adding-a-token)** | Picking a chain, pasting a contract address, and choosing a symbol. |
| **[Configuring a Token](/docs/buy/configuring-a-token)** | Per-token settings — TX threshold, price alert, emoji, GIF, and mono mode. |
| **[Swap Notifications](/docs/buy/swap-notifications)** | What a buy, sell, burn, or price-move alert looks like in your group. |
| **[Managing Tracked Tokens](/docs/buy/managing-tracked-tokens)** | Opening the token list, editing settings, and removing tokens. |
| **[Admin vs Members](/docs/buy/admin-vs-members)** | Who can do what in a group where the bot is installed. |
| **[Privacy](/docs/buy/privacy)** | What the bot stores, what it reads, and — importantly — what it does not. |
| **[Troubleshooting](/docs/buy/troubleshooting)** | The admin panel won't show, alerts aren't firing, GIFs won't save, and more. |
| **[FAQ](/docs/buy/faq)** | Quick answers to the questions admins ask most often. |
## Supported Networks
| Chain | Notes |
| -------------- | ---------------------------------------------------------------------------- |
| *Ethereum* | EVM-compatible. Full buy / sell / burn / price coverage. |
| *Base* | EVM-compatible. Full buy / sell / burn / price coverage. |
| *BNB Chain* | EVM-compatible. Full buy / sell / burn / price coverage. |
| *Solana* | Non-EVM. Full buy / sell / burn / price coverage for SPL tokens. |
> **INFO**
>
> **Group Bot** only reads public on-chain data for tokens you explicitly add. It does **not** read your group's messages — it simply reacts to commands sent to it and posts alerts into the chat.
---
# Adding a Token
Source: https://www.maestrobots.com/docs/buy/adding-a-token.md
Section: Group Bot
> From the admin panel — choose a chain, paste the contract address, and give the token a symbol.
**Adding a token** takes three small steps, and it is one of the only flows reserved for group admins. Once the token is in, the bot immediately starts listening for swaps on it.
## The Flow
1. In the group chat, send **`/start`** to open the admin panel.
2. Tap **+ Add Token**.
3. **Choose the chain** — *Ethereum*, *Base*, *BNB Chain*, or *Solana*.
4. **Paste the token's contract address.** The bot validates the format and checks that the contract actually exists. If something is off, it will ask you to try again.
5. **Choose a symbol.** 1–20 characters. This is what appears in every alert for this token — pick something short and recognisable, typically the token's ticker (for example `PEPE`).
Once submitted, the bot confirms with a short message like `Token PEPE added [1/10]`. The new token joins the tracking list with **default configuration**:
- **TX Threshold** — **$100**.
- **Price Alert** — off.
- **Emoji** — default (🟢 for buys, 🔴 for sells).
- **GIF** — none.
- **Mono** — off (rich, formatted messages).
Tune any of these from the token's configuration screen — see [Configuring a Token](/docs/buy/configuring-a-token).
## The Ten-Token Cap
Each group can track up to **10** tokens. The cap applies per group, so two separate groups can each track ten tokens of their own. If you try to add an eleventh, the bot explains the cap and prompts you to remove a token first — see [Managing Tracked Tokens](/docs/buy/managing-tracked-tokens).
> **INFO**
>
> If you try to add a token with a contract address the bot cannot enrich with on-chain data, it refuses and asks you to try another. The most common causes are the wrong chain selected, a brand-new deployment the data provider has not indexed yet, or a typo in the address.
---
# Admin vs Members
Source: https://www.maestrobots.com/docs/buy/admin-vs-members.md
Section: Group Bot
> Who can do what in a group where Group Bot is installed.
**Group Bot** has two user classes, based on whether you are an admin of the Telegram group. The bot reads the group's administrator list directly from Telegram — there is no separate permission list to maintain.
## Group Admins
Any admin of the Telegram group where the bot lives is automatically a bot admin.
Admins can:
- Open the admin panel by sending **`/start`** inside the group.
- Add and remove tracked tokens (up to **10** per group).
- Edit every per-token setting — *TX Threshold*, *Price Alert*, *Emoji*, *GIF*, and *Mono*.
- Change the admin panel's language.
## Regular Members
Anyone else in the group.
Members do not interact with the bot directly. They simply see the alert messages — buy, sell, burn, and optional price-move alerts — as they are posted in the chat.
- Sending **`/start`** in the group returns a short note saying the bot is configured by admins.
- Sending **`/start`** in a private chat with the bot returns a *"this bot is designed for groups"* message.
- Members cannot open the admin panel, add tokens, or change any setting.
## Switching Admin Status
Telegram admin status is inherited automatically:
- Promote a regular member to admin, and the next time they send **`/start`** in the group they see the admin panel.
- Demote an admin, and the admin panel disappears the next time they try.
No separate "refresh permissions" step is required.
## A Note for Group Owners
Removing the bot from a group ends all tracking for that group. If the bot is removed and later re-added, the tracking list starts empty — there is no automatic restore.
> **WARNING: Only add admins you trust**
>
> Any Telegram admin can change thresholds, disable alerts, add tokens that spam the chat, or point *GIF URLs* somewhere unwanted. Keep the admin list tight — the bot will honour whatever any admin configures, so admin trust is essential.
---
# Configuring a Token
Source: https://www.maestrobots.com/docs/buy/configuring-a-token.md
Section: Group Bot
> Per-token settings — TX threshold, price alert, emoji, GIF, and mono mode.
Every tracked token has its own configuration, and each setting can be changed at any time. Open the admin panel, tap **Tracked Tokens**, then tap a token's symbol to open its configuration screen. The settings are categorised into ***TX Threshold***, ***Price Alert***, ***Emoji***, ***GIF***, ***Mono***, and ***Remove***.
## ***TX Threshold***
The USD minimum for a swap to trigger an alert in the group.
- **Default:** **$100**.
- For a high-volume token, raise this to **$1,000** or **$10,000** to reduce noise.
- For a low-volume token, lower it so that routine trading is visible.
Tap **TX Threshold** and enter a number. The change applies to the next swap.
## ***Price Alert***
An optional alert that fires when the token's price moves by a percentage you choose — independent of any individual swap.
- Tap **Price Alert** → enter a percentage (for example, `5` for a 5% move).
- Once enabled, the bot posts a short price-move message in the group whenever the token has moved at least that much since the last alert.
- To turn it off again, tap **Price Alert** and send `off`.
The default is **off**, at **5%** when first enabled.
## ***Emoji***
The emoji used in the buy alert — the sell alert automatically uses a complementary one. Default is **🟢** for buys and **🔴** for sells.
- Tap **Emoji** → send any emoji.
- To reset to the default pair, send `reset`.
## ***GIF***
Optional. When a swap is **10 or more times** the token's *TX Threshold*, the bot can post an animated GIF with the alert caption instead of a plain text message — a visually loud signal that something big just happened.
- Tap **GIF** → paste the GIF's URL (a direct link, for example `https://example.com/whale.gif`).
- To remove a GIF, send `clear`.
The button label reflects the current state: **GIF: Set** or **GIF: None**.
> **INFO**
>
> The bot verifies the URL returns a real media file before saving. Static image URLs work too, but animated GIFs give the best result.
## ***Mono***
Two formatting options for alerts:
- **Mono: Off** (default) — rich format: bold labels, tappable token symbol, explorer link.
- **Mono: On** — monospace block: plain text inside a `code` block, which copies cleanly for sharing elsewhere.
Tap **Mono** to toggle between them.
## ***Remove***
At the bottom of the configuration screen, tap **🗑 Remove** and confirm to delete the token from the group's tracking list.
- All future swap, burn, and price alerts for the token stop immediately.
- Previously posted alert messages remain in the chat history — the bot never deletes anything it has already sent.
- The `[n/10]` count drops by one, freeing a slot for a new token.
> **WARNING: Removal clears the token's configuration**
>
> Re-adding the same token later starts fresh with the defaults. Your old *TX Threshold*, *Price Alert*, *Emoji*, *GIF*, and *Mono* settings are **NOT** restored.
---
# FAQ
Source: https://www.maestrobots.com/docs/buy/faq.md
Section: Group Bot
> Quick answers to the questions admins ask most often about Group Bot.
A short list of the questions that come up most often. If your question is not here, skim the [Troubleshooting](/docs/buy/troubleshooting) page — most operational issues are covered there.
### Do I Have to Be an Admin to Use the Bot?
Only to **configure** it. Any member of the group automatically sees the alerts once an admin has set it up.
### How Many Tokens Can My Group Track?
Up to **10** per group. You can always remove one and add another later — only the current slate counts.
### What Chains Are Supported?
Four: *Ethereum*, *Base*, *BNB Chain*, and *Solana*.
### Why Does My Group Need to Make the Bot an Admin?
To reliably post messages without running into Telegram's strict rate limits for non-admin bots. **Group Bot** does **NOT** need the ability to delete messages, ban members, or change group info — just the right to post and send media.
### What Does the Bot Actually Read From My Group?
Nothing except commands sent directly to it (a **`/start`**, a button tap). It does **NOT** process normal conversation, and it does **NOT** store group messages.
### Can Two Groups Track the Same Token?
Yes. Each group has its own independent tracking list and configuration. A **$100** threshold in one group and a **$10,000** threshold in another work side by side without interference.
### Will Members Get DMs From the Bot?
No. **Group Bot** only posts inside the group it is configured in. If you want DMs for whale-transfer activity, use **Whale Bot** instead — it is the DM-based sibling in the same family.
### Can I Change the Symbol Shown in Alerts?
Not directly. Remove the token and re-add it with the new symbol. Remember that re-adding resets every other setting to its default.
### What Counts as a "Large Swap"?
Any swap that is **10 or more times** the token's *TX Threshold*. When a *GIF URL* is configured, large swaps post the GIF instead of a plain text alert.
### Can the Bot Alert on Liquidity Changes, Holder Counts, or Other On-Chain Metrics?
Not currently. It alerts on buy, sell, and burn swaps, and — optionally — on price-percentage moves.
### What Languages Are Supported in the Admin Panel?
Eight: *English*, *Türkçe*, *中文*, *العربية*, *Русский*, *Français*, *हिन्दी*, and *فارسی*. Language is auto-detected from your Telegram profile and can be changed from **⚙️ Settings**. Alerts themselves use symbols, numbers, and a small set of labels that render identically across languages.
---
# Getting Started
Source: https://www.maestrobots.com/docs/buy/getting-started.md
Section: Group Bot
> Add Group Bot to your Telegram group, grant it admin, and open the admin panel.
**Group Bot** runs inside a Telegram group chat. A group admin adds the bot, grants it admin rights, and opens the configuration panel; regular members simply see the alerts appear.
## Adding the Bot to a Group
1. Open the **Group Bot** chat on Telegram.
2. Tap the bot's profile → **Add to Group** (or, from inside a group, use the **Add Members** flow and search for the bot).
3. Choose the group you want it to join.
## Granting Admin
**Group Bot** needs to be a group administrator to post alerts reliably. Once it is in the group:
1. Open the group's **Administrators** list.
2. **Add** the bot as an admin.
3. Default permissions are enough — the bot needs permission to post messages and, for *large-swap GIFs*, to send media. It does **NOT** need permission to delete messages, ban members, or change group info. Do not grant more than is needed.
> **WARNING: Without admin rights the bot may be rate-limited**
>
> In non-admin mode, Telegram tightly limits how often a bot can post. **Group Bot** will technically work, but you may see delayed or dropped alerts during busy swap activity. Grant admin rights to get reliable, low-latency posting.
## Opening the Admin Panel
Once the bot is in the group, any group admin can open the configuration panel:
- In the group chat, send **`/start`**. The bot replies with the admin panel.
- Non-admin members who send **`/start`** in the group get a short note explaining the bot is configured by admins.
- Sending **`/start`** in a **private chat** with the bot returns a *"this bot is designed for groups"* message.
From the admin panel you can tap:
- **Tracked Tokens** — open the paginated list of tokens the group is watching.
- **+ Add Token** — start tracking a new token. See [Adding a Token](/docs/buy/adding-a-token).
- **⚙️ Settings** — change the admin panel's language.
> **NOTE**
>
> Regular members never need to open the panel. They simply see the buy, sell, and burn alerts in the group as they happen.
---
# Managing Tracked Tokens
Source: https://www.maestrobots.com/docs/buy/managing-tracked-tokens.md
Section: Group Bot
> Open the list, edit settings, and remove tokens your group no longer wants to track.
Every tracked token is one row in the admin panel's token list. Tap a token to edit its configuration; tap **🗑 Remove** from within its configuration screen to delete it.
## The Tracked-Tokens List
From the admin panel, tap **Tracked Tokens** to see every token the group is currently watching. Each entry shows the token's symbol, paginated at five per page. Tap any symbol to open its configuration screen.
## Editing a Token
Everything configurable lives inside the token's configuration screen:
- **TX Threshold** — USD minimum for a buy / sell alert.
- **Price Alert** — enable, disable, or change the percentage.
- **Emoji** — custom buy emoji (sell uses the complementary one).
- **GIF** — *large-swap GIF* URL, or none.
- **Mono** — rich or monospace output.
Each of these is covered in detail in [Configuring a Token](/docs/buy/configuring-a-token).
## Removing a Token
From the token's configuration screen, tap **🗑 Remove** and confirm.
Once confirmed:
- The token is deleted from the group's tracking list.
- The `[n/10]` count drops by one.
- All future buy, sell, burn, and price alerts for the token stop immediately.
- Previously posted alert messages remain in the chat history — the bot never deletes anything it has already sent.
You can re-add the token at any time; its old configuration is **NOT** restored, so it starts fresh with the defaults.
## Changing the Symbol
The symbol you chose when adding a token is not separately editable. If you need to change it, remove the token and re-add it under the new symbol. Remember that re-adding resets every other setting to its default.
---
# Privacy
Source: https://www.maestrobots.com/docs/buy/privacy.md
Section: Group Bot
> What the bot stores, what it reads on-chain, and — importantly — what it does not read from your group.
**Group Bot** lives in Telegram group chats and monitors **public on-chain activity** for the tokens you ask it to track. It does **NOT** read or store normal conversation in the group.
## What the Bot Stores
For each group:
- The group's Telegram ID, so the bot can post to the right chat.
- The list of tracked tokens with their chain, contract address, symbol, and per-token configuration — *TX Threshold*, *Price Alert*, *Emoji*, *GIF* URL, *Mono* mode.
- A log of recent swap events it has already posted about, so restarts do not cause duplicate alerts.
For each admin (for the admin-panel language):
- Your Telegram user ID and your detected or chosen language.
## What the Bot Does Not Store
- **Group messages.** The bot only processes commands sent directly to it — a **`/start`**, a button tap. Normal conversation is invisible to the bot.
- **Member lists or membership history** beyond what Telegram tells it at the moment of a command.
- **Private keys, seed phrases, or signatures** — the bot never asks for these.
## What On-Chain Data the Bot Reads
Only for the tokens you have added to your group:
- **Swap events** — buy, sell, and burn transactions involving the tracked token on its configured chain.
- **Market data** — price, market cap, liquidity, and tax figures for the tracked token from public sources.
It does **NOT** read activity for any token that is not in your group's tracking list, and it does **NOT** follow wallets of individual members.
> **WARNING: GIFs you set become public**
>
> The *GIF URL* you configure is posted to the group chat during large swaps, which means every member — and anyone who joins later and scrolls up — can see it. Use links only from sources you trust, and avoid hosts that may change what they serve at the same URL.
## Where Data Lives
All of the above is stored on the bot's server. It does **not** include anything that could move funds, impersonate users, or authenticate anyone anywhere other than the bot's own conversation. Removing the bot from the group, or removing a tracked token from the list, clears the per-group records completely.
---
# Swap Notifications
Source: https://www.maestrobots.com/docs/buy/swap-notifications.md
Section: Group Bot
> What the bot posts in your group for buys, sells, burns, price moves, and large swaps.
Every tracked token can generate four kinds of alerts — **buy**, **sell**, **burn**, and optional **price moves**. Alerts are posted in the group chat (not as DMs) by the bot.
## Buy Alert
A formatted buy alert includes the direction emoji, the symbol, the USD size, and the key market context:
```
🟢 BUY | PEPE | $5,234.56
Maker: 0xabcd…ef12
Tax: 1.2% / 1.5% • MCap: $1.2M
View TX:
```
- **Direction emoji** — **🟢** by default, or whatever you configured. See [Configuring a Token](/docs/buy/configuring-a-token).
- **Symbol** — the symbol you chose when adding the token.
- **USD amount** of the swap.
- **Maker** — the wallet that bought, shortened.
- **Tax** — buy tax and sell tax, where on-chain data is available.
- **MCap** — the token's current market cap.
- **View TX** — opens the transaction on the chain's block explorer.
## Sell Alert
Identical layout, with **🔴** (or your custom sell emoji) and the label **SELL**.
## Burn Alert
When tokens are sent to a burn address, the bot posts a burn notification with **🔥**. Because burns have no USD counterpart, the amount is shown in tokens instead of dollars.
```
🔥 BURN | PEPE | 10,000,000 PEPE
```
## Large-Swap GIF
When a swap is at least **10 times** the token's *TX Threshold* and a GIF URL has been configured, the bot posts an animated GIF with the alert caption instead of a plain text message. The caption still includes the full swap details, so nothing is lost compared to the text version — just with a visually loud cue that something big happened.
## Mono Format
When **Mono: On** is enabled for a token, the same information renders inside a monospace code block. Useful in groups where plain text copies more cleanly for sharing elsewhere:
```
🟢 BUY | PEPE | $5,234.56
Maker: 0xabcd…ef12
TX: 0xabc123…
```
## Price Alert
If the token's **Price Alert** is enabled, the bot posts a short message in the group whenever the price moves by your configured percentage since the last price alert — independent of any individual swap.
```
📈 PEPE | +5.2% to $0.0000123
```
## Anti-Spam
To keep a single token from flooding the group during rapid swap activity, the bot coalesces alerts for the same token within a short window. Back-to-back swaps appear as a single combined message rather than a cascade, and the aggregate picture is still accurate.
> **INFO**
>
> Anti-spam applies per token, per chat. A busy token in one group does not hold up alerts for a different token in the same group, or for the same token in another group.
---
# Troubleshooting
Source: https://www.maestrobots.com/docs/buy/troubleshooting.md
Section: Group Bot
> Common symptoms and how to resolve them — admin panel not showing, silent alerts, rejected GIFs, noise.
Most issues with **Group Bot** come down to a handful of patterns. Work through the symptoms below in order — each one ends with the single action most likely to fix it.
## I Sent `/start` and the Admin Panel Didn't Appear
Two things to check, in order:
- **Are you a group admin?** Only Telegram admins of the group see the admin panel. Ask a current admin to promote you, then try again.
- **Did you send `/start` in the group chat?** Sending **`/start`** in a **private chat** with the bot returns a *"this bot is designed for groups"* message instead.
## Swap Alerts Aren't Arriving in the Group
Check in this order:
- **The bot is not an admin of the group.** Without admin rights, Telegram rate-limits the bot and alerts can be delayed or dropped. Grant admin with default permissions — see [Getting Started](/docs/buy/getting-started).
- **The TX threshold is too high.** Open the token's configuration and lower **TX Threshold**.
- **No swaps of that size have happened yet.** Check the token on a block explorer — if every recent trade is genuinely below your threshold, nothing is missing; the bot is doing exactly what it was asked to.
- **The token is not in this group's tracking list.** Open **Tracked Tokens** and confirm the symbol is there.
## Alerts Are Posting but Without Market Cap or Taxes
Tax and market-cap figures come from public data sources that do not cover every token. For very new tokens, or tokens on exotic markets, those fields may be blank. Buy / sell amount and the **View TX** link will always be shown.
## My GIF URL Was Rejected
The bot verifies the URL returns a real media file before saving. Try each of these in order:
- Open the URL in a browser — does it directly load a GIF, without taking you to a web page where the GIF is embedded? Embedded GIFs will not work; use a direct link to the media file itself.
- Check for redirects — some hosts redirect bots differently than browsers. Use a direct CDN link.
- Try a different host, or re-host the GIF somewhere simpler.
## A Swap Happened But I Only Got One Alert
This is the anti-spam behavior. The bot coalesces alerts for the same token within a short window to avoid flooding the chat during rapid swap activity. The aggregate picture is still accurate — the *USD size* in the alert reflects the combined swap.
## Too Much Noise — How Do I Quiet the Bot?
Any of these helps, combined as needed:
- Raise the **TX Threshold** for noisy tokens.
- Turn off **Price Alert** for tokens that move a lot.
- Remove tokens the group no longer cares about from the tracking list.
## The Bot Left the Group
If the bot was kicked or removed from the group, it stops posting immediately. Re-add it, grant admin, and re-add the tokens — group configuration is **NOT** restored automatically.
## Something Else Is Wrong
Send **`/start`** in the group to re-open the admin panel. Your tokens, configurations, and admin panel language are all persisted; only the current dialog state resets. If a problem reproduces after that, try removing the token and re-adding it with the defaults.
---
# Introduction
Source: https://www.maestrobots.com/docs/scraper.md
Section: Scraper
> Maestro Scraper is a cross-platform desktop application that scrapes your Telegram channels and groups in real-time, automatically detects cryptocurrency contract addresses, and forwards them to Maestro trading bots.
Maestro Scraper is a cross-platform desktop application that scrapes your Telegram channels and groups in real-time, automatically detects cryptocurrency contract addresses, and forwards them to Maestro trading bots.
## What It Does
- Connects to your Telegram account and listens for messages in channels you choose
- Scans every incoming message for crypto addresses (ETH, SOL, TON, TRON)
- Automatically forwards detected addresses to the Maestro trading bot
- Skips duplicates so you never forward the same address twice
- Logs all activity so you can review what was detected and forwarded
## Key Features
- **Real-Time Scraping** - Scrapes new messages, edits, and pinned posts as they happen
- **Multi-Chain Detection** - Detects EVM, Solana, TON, and TRON addresses
- **Flexible Filtering** - Choose exactly what to scrape per channel: admin posts, user messages, bot messages, or pinned messages
- **Duplicate Detection** - Automatically skips addresses that have already been seen in the same chat
- **Bot Forwarding** - Forwards detected addresses to Maestro ([`@maestro`](https://t.me/maestro)) or Maestro Pro ([`@maestropro`](https://t.me/maestropro))
- **Encrypted Storage** - Your Telegram session is encrypted using your operating system's keychain
- **Persistent Stats** - Scraping statistics and activity logs survive app restarts
- **Forward to Maestro** - Experimental feature to manually resend any detected address to the bot
---
# Activity Page
Source: https://www.maestrobots.com/docs/scraper/activity-page.md
Section: Scraper
> The Activity page shows a real-time log of scraping activity and address detection. Scraping runs independently in the background regardless of which page you're on — this page simply gives you visibility into what's happening.
The Activity page shows a real-time log of scraping activity and address detection. Scraping runs independently in the background regardless of which page you're on — this page simply gives you visibility into what's happening.
## Starting & Stopping
- Scraping is **on by default** — it starts automatically when you're logged in and have scraped channels, regardless of which page you're on
- Use the **Start Scraping** / **Stop Scraping** button to control scraping manually
- Stopping scraping requires confirmation to prevent accidental stops
- The status indicator in the top-right shows the current state:
- **Green (pulsing)** - Scraping is active
- **Gray** - Idle (scraping is stopped)
## Live Statistics
Four stat cards are displayed at the top of the page:
| Stat | Description |
| ---------------------- | ----------------------------------------------------------------------------------------------------------------- |
| **Messages Scanned** | Total number of messages that passed your scraping filters and were scanned for addresses |
| **Addresses Found** | Number of unique crypto addresses detected |
| **Duplicates Skipped** | Number of addresses skipped because they were already seen in the same chat (when duplicate filtering is enabled) |
| **Forwarded to Bot** | Number of times addresses were successfully forwarded to the Maestro bot |
Stats persist across app restarts.
## Activity Log
Below the statistics, the activity log shows a real-time feed of all scraping events. Each entry is color-coded:
| Color | Type | Meaning |
| ---------- | ------------- | --------------------------------------------------------- |
| **Green** | Address Found | A new crypto address was detected |
| **Yellow** | Duplicate | An address was skipped because it was already seen |
| **Blue** | Forwarded | An address was successfully sent to the Maestro bot |
| **Red** | Error | Something went wrong (e.g., failed to forward) |
| **Gray** | Message | An informational message (e.g., scraping started/stopped) |
Each log entry shows:
- **Timestamp** - When the event occurred
- **Source** - The channel or group where the message came from (clickable - opens the channel in Telegram)
- **Message** - A description of what happened
- **Address** - The detected address (if applicable, click to copy)
## Activity Log Features
- **Search** - Filter log entries by message content, channel name, or address
- **Copy** - Click the copy icon on any log entry to copy the full entry text
- **Copy Address** - Click on any displayed address to copy it to your clipboard
- **Forward to Maestro** - When enabled in Settings, a "Forward to Maestro" button appears on entries with detected addresses, allowing you to manually resend them
- **Clear Log** - Remove all log entries and reset statistics
- **Infinite Scroll** - Scroll down to load more entries (50 loaded at a time)
## How Scraping Works
When a new message arrives in a scraped channel:
1. The app checks if the chat is in your scraped list
2. It checks if the message type matches your filters (admin, user, bot, or pinned)
3. The message text and any embedded links are scanned for crypto addresses
4. If duplicate detection is enabled, previously seen addresses are skipped
5. New addresses are formatted and forwarded to the Maestro bot with encrypted metadata
6. All events are logged in the activity log
> **NOTE: Note on edits**
>
> Messages that are edited more than 30 seconds after the original post are ignored to prevent spam from old edits.
---
# Channels Page
Source: https://www.maestrobots.com/docs/scraper/channels-page.md
Section: Scraper
> The Channels page is where you select which Telegram channels and groups to scrape. After logging in, your Telegram dialogs are automatically loaded. Scraping begins as soon as you enable scraping on a channel — there is no need to navigate to the Activity page first.
The Channels page is where you select which Telegram channels and groups to scrape. After logging in, your Telegram dialogs are automatically loaded. Scraping begins as soon as you enable scraping on a channel — there is no need to navigate to the Activity page first.
## Viewing Your Channels
The page displays a table of all your Telegram chats with the following columns:
| Column | Description |
| ------------ | --------------------------------------------------- |
| **Name** | The display name of the channel, group, or user |
| **Username** | The `@username` if available |
| **Type** | One of: `channel`, `group`, `user`, `bot`, `self` |
| **ID** | The unique Telegram ID for this chat |
| **Admins** | Toggle to scrape messages from channel/group admins |
| **Users** | Toggle to scrape messages from regular users |
| **Pinned** | Toggle to scrape pinned messages |
| **Bots** | Toggle to scrape messages from bots |
## Selecting What to Scrape
For each channel or group, you can independently enable or disable scraping for different message sources by checking the corresponding checkboxes:
- **Admins** - Scrape messages posted by admins (including posts made by the channel itself). Not available for direct user chats.
- **Users** - Scrape messages from regular (non-admin) users
- **Pinned** - Scrape pinned messages. Not available for direct user chats.
- **Bots** - Scrape messages sent by bots
A channel is considered "scraped" when at least one checkbox is enabled.
> **INFO: Tip**
>
> For most crypto alpha channels, you'll want to enable **Admins** only, since the important calls typically come from channel admins.
## Toolbar Actions
- **Search** - Filter channels by name, username, or ID
- **Scraped Only** - Toggle to show only channels that have at least one scraping option enabled
- **Clear All** - Disable all scraping on all channels at once
- **Refresh** - Re-fetch your channel list from Telegram (useful if you joined new channels)
## Sorting & Pagination
- Click any column header (**Name**, **Username**, **Type**, **ID**) to sort by that column
- Click the same header again to reverse the sort order
- Scraped channels always appear at the top of the list
- Use the pagination controls at the bottom to navigate through your channels
- Change the number of rows displayed per page (10, 20, 50, or 100)
---
# FAQ
Source: https://www.maestrobots.com/docs/scraper/faq.md
Section: Scraper
> Answers to common questions about using Maestro Scraper.
**Q: Do I need to keep the app open for scraping to work?**
A: Yes. Maestro Scraper scrapes messages in real-time and must remain running. If you close the app, scraping stops. When you reopen it, your stats and logs are preserved, and scraping resumes automatically once you have scraped channels.
**Q: Can I scrape multiple channels at once?**
A: Yes. You can scrape as many channels and groups as you want simultaneously. Enable scraping on each channel from the Channels page.
**Q: Will this get my Telegram account banned?**
A: Maestro Scraper uses the official Telegram API. As long as you use it normally, your account should be safe. Avoid running excessive operations in short periods.
**Q: What happens if I join a new channel?**
A: Click **Refresh** on the Channels page to update your channel list. The new channel will appear, and you can enable scraping on it.
**Q: Can I use this with multiple Telegram accounts?**
A: Currently, you can only be logged in with one account at a time. To switch accounts, log out and log in with different credentials.
**Q: What's the difference between Maestro and Maestro Pro?**
A: Maestro ([`@maestro`](https://t.me/maestro)) is the standard trading bot. Maestro Pro ([`@maestropro`](https://t.me/maestropro)) offers premium features. You can switch between them in Settings. The forwarding works the same way for both.
**Q: How does duplicate detection work?**
A: When an address is detected, the app stores a record of `address + chatId`. If the same address appears again in the same chat, it's skipped. Addresses from different chats are treated as separate. You can clear the history in Settings to reset this.
**Q: Are my messages or private chats read?**
A: The app only processes messages from chats you explicitly choose to scrape on the Channels page. It does not read any chats you haven't selected. Note that you can scrape private chats (user and bot conversations) if you enable the "Users" toggle on them.
**Q: Where is my data stored?**
A: All data is stored locally on your computer. Your Telegram session is encrypted via the OS keychain. No data is sent to external servers besides Telegram's own API and the Maestro bot.
---
# Installation
Source: https://www.maestrobots.com/docs/scraper/installation.md
Section: Scraper
> Download and install Maestro Scraper on macOS, Windows, or Linux.
Follow these steps to download and install Maestro Scraper on your platform.
## Download
Download the latest release ([v1.1.0](https://github.com/MaestroBots/MaestroScraper/releases/tag/v1.1.0)) for your platform:
| Platform | File |
| ------------------------- | ----------------------------------------------------------------------------------------------------------------------------------- |
| **Windows** | [`maestro-scraper-1.1.0-x64.exe`](https://github.com/MaestroBots/MaestroScraper/releases/download/v1.1.0/maestro-scraper-1.1.0-x64.exe) |
| **macOS (Intel)** | [`maestro-scraper-1.1.0-x64.dmg`](https://github.com/MaestroBots/MaestroScraper/releases/download/v1.1.0/maestro-scraper-1.1.0-x64.dmg) |
| **macOS (Apple Silicon)** | [`maestro-scraper-1.1.0-arm64.dmg`](https://github.com/MaestroBots/MaestroScraper/releases/download/v1.1.0/maestro-scraper-1.1.0-arm64.dmg) |
| **Linux (x64)** | [`maestro-scraper-1.1.0-amd64.deb`](https://github.com/MaestroBots/MaestroScraper/releases/download/v1.1.0/maestro-scraper-1.1.0-amd64.deb) |
| **Linux (arm64)** | [`maestro-scraper-1.1.0-arm64.deb`](https://github.com/MaestroBots/MaestroScraper/releases/download/v1.1.0/maestro-scraper-1.1.0-arm64.deb) |
## Install
### macOS
Since the app is not signed with an Apple Developer certificate, macOS will show a warning:
> **WARNING: macOS will show a warning**
>
> **"Maestro Scraper" was blocked to protect your Mac.**
>
> Apple could not verify "Maestro Scraper" is free of malware that may harm your Mac or compromise your privacy.
To install:
1. Open the `.dmg` file and drag the app to Applications
2. When the warning appears, click **Open Anyway** — or go to **System Settings → Privacy & Security**, scroll down, and click **Open Anyway** next to the Maestro Scraper message
3. You only need to do this once — subsequent launches will work normally
### Windows
Windows Defender SmartScreen may show a warning:
> **WARNING: Windows SmartScreen will show a warning**
>
> **Windows protected your PC**
>
> Microsoft Defender SmartScreen prevented an unrecognized app from starting.
To install:
1. Run the `.exe` installer
2. When the SmartScreen warning appears, click **More info**
3. Click **Run anyway**
4. Follow the installer prompts to complete the installation
### Linux
```bash
sudo dpkg -i maestro-scraper-*.deb
```
---
# Logging In
Source: https://www.maestrobots.com/docs/scraper/logging-in.md
Section: Scraper
> When you first open Maestro Scraper, you'll be taken to the login screen. The login process has up to 4 steps:
When you first open Maestro Scraper, you'll be taken to the login screen. The login process has up to 4 steps:
## Step 1: API Credentials
- Enter your **API ID** (the number from my.telegram.org)
- Enter your **API Hash** (the 32-character string)
- Check **"Remember credentials"** if you want the app to save your API credentials for next time
- Click **Continue**
> **NOTE**
>
> If you uncheck "Remember credentials" later, the app will clear all saved credentials and your Telegram session. You will need to log in again.
## Step 2: Phone Number
- Enter your phone number **with country code** (e.g., `+1 234 567 8900` for US)
- Click **Send Code**
- A verification code will be sent to your Telegram app
## Step 3: Verification Code
- Open your Telegram app on your phone or desktop
- Find the login code message from Telegram
- Enter the **5-6 digit code** in Maestro Scraper
- Click **Verify**
- If you didn't receive the code, click **Resend code**
## Step 4: Two-Factor Authentication (if enabled)
If you have Two-Factor Authentication (2FA) enabled on your Telegram account:
- Enter your **cloud password** (the 2FA password you set up in Telegram)
- Click **Sign In**
After successful login, you'll be redirected to the Channels page.
> **NOTE**
>
> Your session is saved securely. You won't need to log in again unless you explicitly log out or uncheck "Remember credentials."
---
# Security & Privacy
Source: https://www.maestrobots.com/docs/scraper/security-privacy.md
Section: Scraper
> How Maestro Scraper stores your data and communicates with external services.
Maestro Scraper runs entirely locally. Your Telegram session is encrypted with your OS keychain; other app data is stored in plaintext on your computer.
## Encrypted Storage
Your Telegram session is encrypted using your operating system's native keychain:
- **macOS**: Keychain
- **Windows**: DPAPI (Data Protection API)
- **Linux**: libsecret or kwallet
This means your Telegram session is protected by your OS login credentials. Other app data (channel preferences, address history, activity logs) is stored locally but not encrypted.
## What Data Is Stored
- **Telegram session** - An encrypted session token that keeps you logged in
- **API credentials** - Only if "Remember credentials" is checked
- **Channel scraping preferences** - Which channels you're scraping and filter settings
- **Address history** - Previously detected addresses (for duplicate detection)
- **Activity logs** - A log of scraping events
- **App settings** - Your preferences (duplicate filtering, bot selection, etc.)
## What Data Is NOT Stored
- Your Telegram password is never stored
- Message content is not persisted (only processed in memory)
- No data is sent to external servers except the Maestro bot, Telegram's own API, and Sentry for error tracking
## Bot Communication
When forwarding addresses to Maestro, the app sends a formatted message containing:
- The detected address(es)
- A link to the source message (if available)
---
# Settings
Source: https://www.maestrobots.com/docs/scraper/settings.md
Section: Scraper
> Configure general preferences and manage stored data for Maestro Scraper.
The Settings page is divided into two sections: **General** and **Data Management**.
## General Settings
### Ignore Duplicates
When enabled, the app skips addresses that have already been detected in the same chat. This prevents forwarding the same contract address multiple times from the same source.
- **Default**: Enabled
- Duplicate detection is per-channel - the same address from different channels will still be forwarded
### Use Maestro Pro
Toggle between the standard Maestro bot and Maestro Pro:
- **Maestro** ([`@maestro`](https://t.me/maestro)) - The standard trading bot (default)
- **Maestro Pro** ([`@maestropro`](https://t.me/maestropro)) - The premium trading bot
The currently active bot is shown with a green "Active" badge.
### Forward to Maestro (Experimental)
When enabled, a "Forward to Maestro" button appears on activity log entries that contain detected addresses. This allows you to manually resend any address to the Maestro bot at any time.
## Data Management
### Log Retention Period
Controls how long activity logs are kept before being automatically cleaned up:
- **7 days** / **14 days** / **21 days** / **30 days**
- Expired entries are removed automatically when the app starts
- Maximum of 10,000 log entries are stored regardless of retention period
- When the limit is reached, the oldest entries are automatically dropped to make room for new ones
### Clear Activity Logs
Permanently delete all activity log entries. Requires confirmation. This action cannot be undone.
### Clear Address History
Permanently delete the duplicate detection history. After clearing:
- Previously detected addresses may be forwarded again
- The duplicate counter resets
- Requires confirmation
### Address History Limit
The address history is capped at **10,000 entries**. When this limit is reached, the oldest 20% of entries are automatically removed to make room for new ones. You can see the current usage on the Settings page (e.g., "3,500 / 10,000 addresses"). A warning appears when usage exceeds 50%.
> **NOTE**
>
> Both activity logs and address history automatically remove the oldest data when their limits are reached, so you don't need to manage them manually. However, if the app feels slow, you can clear them from this page to free up space.
---
# Supported Blockchains
Source: https://www.maestrobots.com/docs/scraper/supported-blockchains.md
Section: Scraper
> Maestro Scraper detects addresses for the following blockchains:
Maestro Scraper detects addresses for the following blockchains:
| Blockchain | Address Format | Example |
| ---------------- | -------------------------------------------------- | ----------------- |
| **EVM** | Starts with `0x` followed by 40 hex characters | `0x1234abcd...` |
| **Solana (SOL)** | Base58 encoded, 32-44 characters | `7xKXtg2CW87...` |
| **TON** | Starts with `EQ` or `UQ` followed by 46 characters | `EQAbCdEf123...` |
| **TRON** | Starts with `T` followed by 33 characters | `TAbCdEf12345...` |
The app scans both the message text and any embedded URLs/links for these address patterns.
---
# System Requirements
Source: https://www.maestrobots.com/docs/scraper/system-requirements.md
Section: Scraper
> OS, Telegram account, and API credentials needed to run Maestro Scraper.
Maestro Scraper runs on modern desktop operating systems and requires a Telegram account with API credentials.
| | Requirement |
| ---------------------------- | ------------------------------------------------------------------------ |
| **Operating System** | Windows (x64), macOS (x64, Apple Silicon), or Linux (x64, arm64) |
| **Telegram Account** | An active Telegram account |
| **Telegram API Credentials** | API ID and API Hash from [my.telegram.org](https://my.telegram.org/apps) |
---
# Getting Your Telegram API Credentials
Source: https://www.maestrobots.com/docs/scraper/telegram-credentials.md
Section: Scraper
> Before you can use Maestro Scraper, you need to obtain API credentials from Telegram. These allow the app to connect to your Telegram account.
Before you can use Maestro Scraper, you need to obtain API credentials from Telegram. These allow the app to connect to your Telegram account.
1. Open [https://my.telegram.org/apps](https://my.telegram.org/apps) in your browser
2. Log in with your phone number
3. Click **"API development tools"**
4. Fill in the form:
- **App title**: Any name (e.g., "Maestro Scraper")
- **Short name**: Any short name (e.g., "mscraper")
- **Platform**: Desktop
5. Click **Create application**
6. You will see your **API ID** (a number) and **API Hash** (a 32-character string)
7. Save these - you will need them to log in
> **WARNING: Important**
>
> Never share your API ID and API Hash with anyone. These credentials provide access to the Telegram API on your behalf.
---
# Troubleshooting
Source: https://www.maestrobots.com/docs/scraper/troubleshooting.md
Section: Scraper
> Solutions for common issues with connection, channels, addresses, and login.
If you're running into issues, start here. Check the Activity page log for error messages first.
## "Not connected to Telegram" error
- Make sure you have an active internet connection
- Try logging out and logging back in
- Verify your API credentials are correct at [my.telegram.org/apps](https://my.telegram.org/apps)
## No channels showing up
- Click the **Refresh** button on the Channels page
- Make sure you're connected to Telegram (check the connection status)
- If you just joined new channels, it may take a moment for them to appear
## Addresses not being detected
- Verify that the channel is being scraped (at least one checkbox enabled on the Channels page)
- Check that the correct filter is enabled (e.g., if the address comes from an admin, make sure "Admins" is checked)
- The address format must match one of the supported patterns (see [Supported Blockchains](/docs/scraper/supported-blockchains))
- Check the Activity page log for any error messages
## Addresses not being forwarded
- Make sure the Maestro bot ([`@maestro`](https://t.me/maestro) or [`@maestropro`](https://t.me/maestropro)) is accessible from your Telegram account
- Start a conversation with the Maestro bot on Telegram first if you haven't already
- Check the activity log for "error" entries that may explain the failure
## Duplicate addresses being skipped
- This is expected behavior when "Ignore Duplicates" is enabled in Settings
- Duplicates are detected per channel - the same address from a different channel will still be forwarded
- To reset duplicate detection, go to Settings and click **Clear Address History**
## App feels slow
- Check Settings for warnings about large activity logs or address histories
- Clear your activity logs and/or address history
- Lower the log retention period
## Login issues
| Error | Solution |
| -------------------------------- | --------------------------------------------------------------- |
| "API ID must be a valid number" | Enter only the numeric API ID from my.telegram.org |
| "API Hash must be 32 characters" | Copy the full API Hash string from my.telegram.org |
| "Invalid phone number format" | Include your country code (e.g., +1 for US, +44 for UK) |
| "Invalid verification code" | Double-check the code from your Telegram app |
| "Verification code expired" | Click "Resend code" to get a new one |
| "Incorrect password" | This is your Telegram 2FA cloud password, not your app password |
| "Too many attempts" | Wait a few minutes before trying again |
| "This phone number is banned" | Contact Telegram support |
## "Keychain access is unavailable" warning (macOS)
If you see this warning when enabling "Remember credentials":
- You previously denied Keychain access when macOS prompted you
- Go to **System Settings → Privacy & Security** and allow Keychain access for Maestro Scraper
- Restart the app and try again
Without Keychain access, your credentials and session cannot be saved — you will need to log in again each time you restart the app.
---
# Introduction
Source: https://www.maestrobots.com/docs/sniper.md
Section: Sniper
> Welcome to the Maestro Bot Manual. Over the course of this document, we will outline the bot’s vast set of powerful yet accessible functionalities.
## **The document is structured as follows:**
**Section** [**1**](/docs/sniper/getting-started)**: Getting Started.** This section will detail how you can start the bot and enable chains of interest. It also provides the list of chains supported by Maestro as well as the corresponding list of supported DEXs and launchpads.
**Section** [**2**](/docs/sniper/wallet-setup)**: Wallet Setup.** This section details how you can import your own wallet, or generate a new wallet through the bot.
**Section** [**3**](/docs/sniper/global-settings)**: Global Settings.** This section details how you can configure the general settings of the bot as well as the settings of your buys, sells and approves. This includes gas, slippage and various other functionalities provided through the bot.
**Section** [**4**](/docs/sniper/pasted-contracts)**: Pasted Contracts.** This section details how you can manually buy and sell through the bot by simply pasting a valid contract address into your DM with the bot.
**Section** [**5**](/docs/sniper/trade-monitor)**: Trade Monitor.** Trade Monitor is a powerful tool which allows you to monitor the status of your portfolio in real time while capitalizing on market dips and fluctuations by setting automated sell and buy limit orders to manage your assets effortlessly. Furthermore, the Trade Monitor allows you to manually buy and sell from multiple wallets simultaneously while automatically updating your position for each wallet.
**Section** [**6**](/docs/sniper/positions)**: Positions.** This section details how you can access and monitor your positions.
**Section** [**7**](/docs/sniper/limit-orders)**: Limit Orders.** This section details how you can check, edit and add limit buy and sell orders for your tokens.
**Section** [**8**](/docs/sniper/signals)**: Signals.** This section details how you can configure auto-buys for signals. It's a unique feature that allows you to auto-buy tokens called by signals of your choice.
**Section** [**9**](/docs/sniper/copytrade)**: Copytrade.** This section details the bot modality which allows you to copy the buys and sells of tracked wallets at amazing speeds. When applicable, you can also frontrun the tracked wallet's transactions to secure better entries.
**Section** [**10**](/docs/sniper/auto-snipe)**: Auto Snipe.** This section details how you can auto-snipe token launches with our exhaustive and revolutionary toolkit that covers every possible token launch situation.
**Section** [**11**](/docs/sniper/funds-management)**: Funds Management.** This section details how you can disperse funds from one wallet to many, or collect funds from many wallets into one, in a single flow.
**Section** [**12**](/docs/sniper/bridge)**: Bridge.** This section details how you can swap, send or bridge cryptocurrencies on the same or different blockchains — either using the fast deBridge-powered route, or the privacy-focused Houdini-powered route.
**Section** [**13**](/docs/sniper/referral-program)**: Referral Program.** This section details Maestro's showstopping Referral Program through which you can earn up to 25% commission for any user that trades on the bot using your referral link.
**Section** [**14**](/docs/sniper/cashback)**: Cashback.** This section details how Cashback continuously rebates a portion of the trading fees you've paid through the bot.
**Section** [**15**](/docs/sniper/rewards)**: Rewards.** This section details how to claim one-off or time-limited reward pools that Maestro distributes to active users.
**Section** [**16**](/docs/sniper/campaigns)**: Campaigns.** This section details how you can claim limited-time promotional perks — like a boosted Cashback tier or a free Premium period — from Maestro campaigns.
**Section** [**17**](/docs/sniper/mvp)**: MVP.** This section details the MVP loyalty tier and the perks tied to your MVP holdings.
**Section** [**18**](/docs/sniper/competition)**: Competition.** This section details how to pull up the current Maestro trading competition — its rules, prize pool, and how to enter.
**Section** [**19**](/docs/sniper/monetization)**: Monetization.** This section details monetization and the process of fee collection in the bot.
**Section** [**20**](/docs/sniper/premium-subscription)**: Premium Subscription.** For hardcore users and day-traders that require a bit more out of their trading experience, Maestro offers a Premium subscription that bolsters the bot’s extensive features. The Premium-exclusive benefits are detailed throughout this section.
**Even if you intend to use Maestro Bot for one specific function, we recommend you go through the entire document. Otherwise, you’d be missing out on unique money-making opportunities that don’t come by everyday. Enjoy!**
---
# ⚡ Auto Snipe
Source: https://www.maestrobots.com/docs/sniper/auto-snipe.md
Section: Sniper
> The bot provides an exhaustive toolkit that covers every possible token launch situation. This feature is only available for Ethereum, BSC, Base and Solana.
If you wish to snipe a token’s launch, the bot offers a complete auto-sniping solution through _Auto Snipe_. If you do not have the contract address ahead of time, it is best to forward or copy/paste the contract and do an auto-buy using the steps described in Section [4.3](/docs/sniper/pasted-contracts/auto-buy-on-pasted-contract).
## Auto Snipe on Ethereum, BSC and Base
On Ethereum, BSC, and Base, the bot offers a complete auto-sniping solution that includes the following features:
1. **Completely Automated Sniping:** You don't need to simulate or go through complex contracts to figure out the right method or approach for sniping. _Auto Snipe_ completely automates this process by identifying the right transaction to snipe in mempool (possible for Ethereum and BSC), all in Block-0. When the launch transaction cannot be detected in mempool either because it was sent privately or because the chain does not have a public mempool (the case for Base), the bot will detect the correct launch transaction on the mined side and immediately activate your snipe to secure early entries. On Ethereum only, Block-0 snipes can be paired with **Block-0 Tipping** to secure extremely early entries. This new approach to sniping allows you to cooperate with other Maestro users to dominate a launch block, all while competing amongst each other for better entries. Further details are provided [below](/docs/sniper/auto-snipe#block-0-snipes-on-ethereum).
2. **Dynamic Deadblock Detection:** Deadblocks are blocks in which you should avoid buying the token as you could get blacklisted, or suffer a significant buy and/or sell tax either temporarily or permanently. Today, many contracts can change deadblocks within their launch functions, which hinders even the most experienced snipers. However, _Auto Snipe_ can dynamically detect and adjust to any deadblock specifications, even for the most complicated contracts and launch methods.
3. **User-controlled Tax Thresholds:** Many tokens are initially launched with high buy and/or sell taxes. _Auto Snipe_ gives you the ability to select the maximum buy and sell taxes that you're willing to accept for your snipe. If a token launches with taxes that you don't approve of, _Auto Snipe_ will notify you that the contract violates your preferences and will wait until taxes are lowered before buying.
4. **Dynamic Max Buy Adjustment:** When sniping a token launch, many users would like to secure the contract's max buy. In these cases, attempting to buy beyond the token's max buy will have your transaction rejected by the token contract. However, _Auto Snipe_ completely addresses this by making sure that your buy never violates a contract's max buy. If you try to buy 2% of the supply when max buy is 1%, the bot will auto-adjust your buy. This will apply even when your snipe is targeting Block-0.
### Block-0 Snipes on Ethereum
Block-0 snipes on Ethereum use _Block-0 Tipping_, which is the process of tipping or bribing the blockbuilder with high gas prices to secure better entries on Block-0 snipes. You will essentially bribe the blockbuilder to place your buy transaction immediately after the launch transaction through the use of bundles. A bundle is built by grouping all Block-0 buys of Maestro users into one big powerful bundle that can easily overwhelm the competition. The blockbuilder will then choose the most valuable bundle to mine.
While you cooperate with other Maestro users to create extremely lucrative bundles, you'll also be competing to secure a better place within those bundles. Basically, the higher your ETH tip or bribe amount, the better place you'll receive in the bundle, and the more valuable the bundle will become. **As such, the higher the tip you use, the better spot you'll get within the Maestro bundle, and the higher the chance of the bundle succeeding.**
_What if our bundle doesn't go through?_
Along with the bundle, the bot will also send an independent Backup snipe for every single user, so even if you don't get included in the winning bundle, you'll still buy right after it. This can be enabled or disabled based on your preference, and it will never cause you to buy twice. It is important to note that both the bundle and the backup snipes are always sent privately, so getting sandwiched/MEV'd is not a concern.
## Auto Snipe on Solana
On Solana, the bot offers a complete and automated sniping solution for all tokens launched on Raydium V4 pools, guaranteeing you early entries every time.
In the following sub-sections, we detail how you can add, configure and activate your auto-snipes.
---
# Activating Auto Snipe
Source: https://www.maestrobots.com/docs/sniper/auto-snipe/activating-auto-snipe.md
Section: Sniper
In addition to the configuration, each added Auto Snipe will have its own settings which can be further customized **to override the values specified in the configuration**. This allows you to uniquely tailor your experience based on the token that you're sniping.
There are two ways through which you can add, activate and customize an auto-snipe:
1. In the _Auto Snipe_ Menu, click on _Add Snipe_. The bot will then prompt you to insert the address of the token you want to snipe. Once this is set, you will be redirected to the Auto Snipe Settings where you can further customize and activate the snipe.
2. Paste the contract or the chart of the token in the bot to access the Token Report Buy Menu similar to the one shown in the image below. In this menu, you will see a new row which only appears for tokens that are not currently tradable and which is labelled "🎯 _Snipe Now_". Once you click on this button, the bot will ask you to set the amount that you would like to snipe with, and then you will be redirected to the Auto Snipe Settings where you can further customize and activate the snipe. Alternatively, you could directly click on "**⚙️ Snipe**" button shown in the image below to directly expose the Auto Snipe Settings.
.jpg)
In the following sub-sections, we explain how you can further configure and activate an auto-snipe.
---
# Ethereum, BSC & Base
Source: https://www.maestrobots.com/docs/sniper/auto-snipe/activating-auto-snipe/ethereum-bsc-and-base.md
Section: Sniper
The image below shows the Auto Snipe Settings of a random token on Ethereum. BSC and Base will have similar menus minus _Backup TX_ and _Block-0 Tip_ which are exclusive to Ethereum.
.jpg)
Clicking on the ⚙️ _Advanced_ button will reveal some additional settings as shown below. The same settings will also exist for BSC and Base with the exception for _Block-0 Only_ which is irrelevant for Base.
We will now go over the options provided in Auto Snipe Settings:
### 🕵️♂️ _Simulate -_ ⭐️ Premium Exclusive
This ⭐️ Premium feature allows you to simulate contract launches directly through the bot. Our launch simulations will automatically identify **deadblocks**, **launch taxes**, **launch methods**, and the contract's **max buy BEFORE** launch. This feature is mainly informational as Auto Snipe automatically handles all the above when sniping.
As detailed [earlier](/docs/sniper/auto-snipe/auto-snipe-configuration/ethereum-bsc-and-base), the values for _Block-0 Tip_, _Multi Buy_, _Backup TX, Gas Delta, Block-0 Only, Skip High Tax, Buy Tax_ and _Sell Tax_ will mirror the ones specified in your [Auto Snipe Configuration](/docs/sniper/auto-snipe/auto-snipe-configuration/ethereum-bsc-and-base). However, you have the option to change these values directly in the Auto Snipe Settings of the token.
### Max Buy
This represents the maximum amount (in ETH or BNB) that you're willing to spend for this snipe. The way Auto Snipe uses this value will be detailed below.
### Slippage Mode
There are three possible Slippage modes that you can select for an auto-snipe, and you can only enable one of them:
1. 🟢 | 🔴 Slippage: By default, this will use the _Slippage_ set in your [Auto Snipe Configuration](/docs/sniper/auto-snipe/activating-auto-snipe/ethereum-bsc-and-base). Once you enable 🟢 "**Slippage**", the bot will prompt you to insert a slippage value in case you'd like to use a different one.
2. 🟢 | 🔴 Min Token: Select the minimum percentage of supply (example: 1%) or minimum token amount (example: 1k) that you're willing to accept for your auto-snipe. Before triggering your auto-snipe, if Auto Snipe notices that you cannot afford this amount with your "**Max Buy**" then your auto-snipe will be automatically deactivated.
3. 🟢 | 🔴 Max TX Only: If enabled, Auto Snipe will ONLY trigger your auto-snipe if you can afford max TX at the time with your _Max Buy_. If not, then your auto-snipe will be deactivated. This is particularly useful if you're interested in getting max Tx or nothing.
### ✍️ _Pre-Approve_
As mentioned [previously](/docs/sniper/global-settings/approve-settings), in order to sell tokens, you NEED to send a suitable approval transaction beforehand. When _Auto Approve_ is enabled in your [_Approve Settings_](/docs/sniper/global-settings/approve-settings), the bot will immediately and automatically send an _Approve_ transaction after a successful auto-snipe, which allows you to sell whenever you want to from that point onwards. However, in case you'd like to initiate a sell **immediately** after a snipe, it's best to pre-approve the token before sniping it. All you need to do is click on "✍️ **Pre-Approve**" and the bot will send the _Approve_ transaction for this token.
Now that you've configured the Auto Snipe, the last remaining step is to activate the snipe by clicking on the "🔴 **Auto Snipe**" button which will then become "🟢 **Auto Snipe**" as depicted in the image above.
With this set, the bot is now ready to automatically snipe the token as soon as it becomes "tradable", as defined by your configurations.
---
# Solana
Source: https://www.maestrobots.com/docs/sniper/auto-snipe/activating-auto-snipe/solana.md
Section: Sniper
The image below shows the Auto Snipe Settings for a random Solana token:
%20(1).jpg)
With "**Buy Amount**_"_, you can specify the SOL amount that you would like to snipe the token with.
As detailed [earlier](/docs/sniper/auto-snipe/auto-snipe-configuration/solana), the values for _Tip_, _Slippage_, _Anti-MEV_ and _Multi Buy_ will mirror the ones specified in your [Auto Snipe Configuration](/docs/sniper/auto-snipe/auto-snipe-configuration/solana). However, you have the option to change these values directly in the Auto Snipe Settings of the token.
Now that you've configured the Auto Snipe, the last remaining step is to activate the snipe by clicking on the "🔴 **Auto Snipe**" button which will then become "🟢 **Auto Snipe**" as depicted in the image above.
With this set, the bot is now ready to automatically snipe the token as soon as it becomes tradable.
---
# Auto Snipe Configuration
Source: https://www.maestrobots.com/docs/sniper/auto-snipe/auto-snipe-configuration.md
Section: Sniper
> Select default configuration for newly added auto-snipes.
Before setting up a snipe, it is recommended to specify the default configuration that will be used for newly added auto-snipes. This will save you time by having your added snipes pre-configured to the settings of your preference, such as for gas price, slippage and _Auto Sell_.
To access the Auto Snipe Configuration, head to the `/start` menu, select "Auto Snipe" followed by your chain of preference to reveal the Auto Snipe Menu shown below:
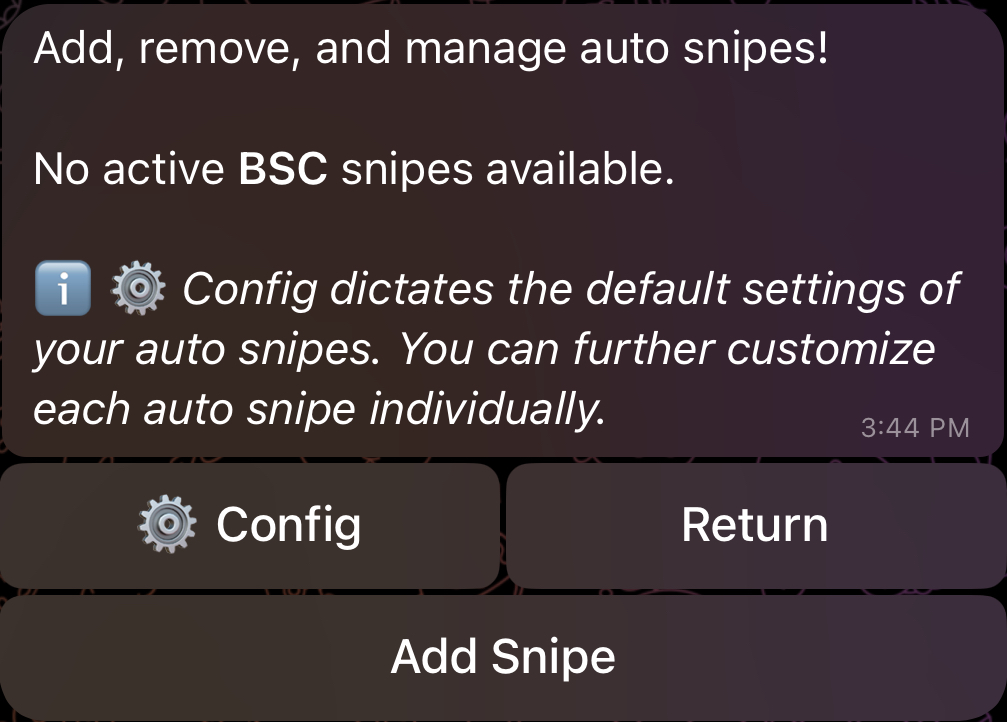
Next, click on "⚙️ Config", and you will be redirected to the Auto Snipe Configuration Menu. This menu will be explored in detail in the following sub-sections.
---
# Ethereum, BSC & Base
Source: https://www.maestrobots.com/docs/sniper/auto-snipe/auto-snipe-configuration/ethereum-bsc-and-base.md
Section: Sniper
The image below shows the Auto Snipe Configuration Menu on Ethereum. BSC and Base will have similar menus with some differences that will be highlighted throughout this page.
.jpg)
Before we go through the configuration options, we point out a few important things:
* On Ethereum, Block-0 snipes from all Maestro users are gathered in one big bundle, and tips or bribes are offered to the blockbuilder through Block-0 Tipping in exchange for having the bundle placed right after the launch or target transaction. In this case, you will also have the option to initiate a backup transaction for your auto-snipe to guarantee an entry in case the bundle doesn't go through. When Auto Snipe is targeting a Block 1+ snipe, either due to deadblocks detection or due to a private launch, auto-snipes transactions will be sent individually, and without any tipping or bribing since there's effectively no launch or target transaction. In this case, no backup transactions will be sent as there's no risk of having the bundle rejected. Finally, it is important to note that if the token launched, but Auto Snipe is waiting for a transaction that lowers the Buy and/or Sell Tax to your set limits, then it will be considered a Block-0 snipe. In other terms, your transaction will be part of a bundle and tips or bribes will be offered to the blockbuilder in exchange for having the bundle placed right after the tax-lowering transaction. If you have the option enabled, a backup transaction will also be sent to guarantee you an entry should the bundle fail to go through.
* For BSC, there's no concept of bundling or tipping, and by extension, no backup transactions. Auto Snipe will initiate your auto-snipe as soon as it is safe to do so, while considering deadblocks, and tax limits. Consequently, you could end up sniping in Block-0 or Block-1+ depending on the case.
* For Base, there's no mempool where we can monitor launch transactions, and hence, Block-0 sniping is not possible. By extension, the concept of bundling, tipping and sending backup transactions doesn't apply here. Auto Snipe will watch for the launch or target transaction on the **mined** side, and will initiate your auto-snipe as soon as it is safe to do so, while considering deadblocks, and tax limits.
Now that we've laid out how Auto Snipe works on each of Ethereum, BSC and Base, we turn our attention to the options of the Auto Snipe Configuration:
### Block-0 Tip
_Exclusive to Ethereum_
This is the amount of ETH that will be tipped or bribed to the blockbuilder. Use values above 0.05 ETH to guarantee good entries. This will make the bundle more powerful against competing ones. As a reminder, Block-0 Tipping is not activated for Block 1+ snipes. More details on this advanced system can be found [here](/docs/sniper/auto-snipe#block-0-snipes-on-ethereum).
### 🟢 | 🔴 Slippage
Choose the slippage to be used **for your auto-snipe and for your Backup Transaction when you have the option enabled (Exclusive to Ethereum)**.
### 🟢 | 🔴 Max Tx Only
If enabled, Auto Snipe will ONLY trigger your auto-snipe if you can afford max TX at the time. If not, then your auto-snipe will be deactivated. This is particularly useful if you're interested in getting max Tx or nothing.
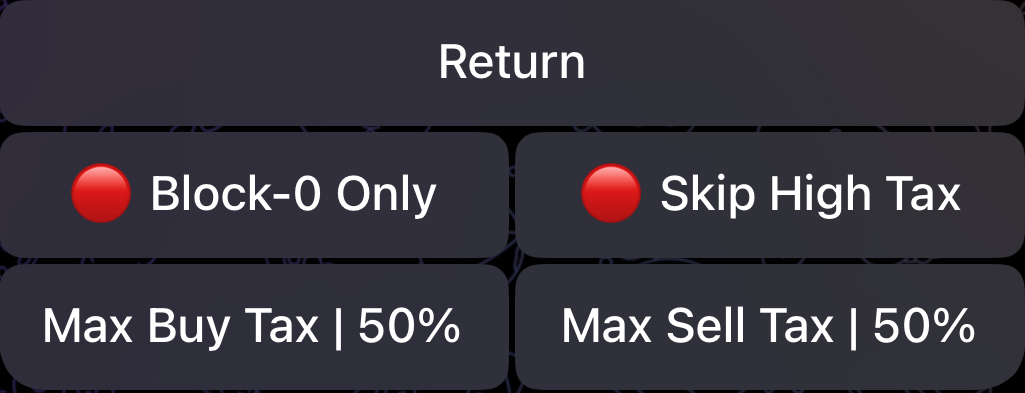
### ⚙️ Advanced: Block-0 Only
_Exclusive to Ethereum and BSC_
This setting should be enabled if you are ONLY looking for a Block-0 snipe. In other terms, if Auto Snipe is set to trigger on Block-1+ either due to deadblock detections or due to a private launch, then your auto-snipe will not trigger. Please note that if Auto Snipe is waiting for a transaction in mempool that lowers taxes to your set thresholds, then this is considered a Block-0 snipe and your auto-snipe will be triggered normally, even with _Block-0 Only_ is enabled. However, if the tax lowering transaction was sent privately, your auto-snipe would not trigger since this qualifies as a Block-1+ snipe.
If you instead wish to completely halt the snipe when the launch taxes are not within your set thresholds, you should use _Skip High Tax Launch_ which is detailed below.
### ⚙️ Advanced: Skip High Tax Launch
If enabled and the buy and/or sell tax of the token **at launch** did not satisfy your set limits, then Auto Snipe will deactivate your auto-snipe. In other terms, Auto Snipe won't wait for a transaction that lowers the buy and/or sell taxes to a value that is within your set limits.
### ⚙️ Advanced: Buy and Sell Tax
Through _⚡️Buy Tax_ and _⚡️Sell Tax_, you can set the maximum buy and sell tax that you're willing to accept for your auto-snipe to trigger. If, at launch, the buy and/or sell tax of the token don't satisfy your threshold, Auto Snipe will wait for a transaction that lowers the taxes to an acceptable value and then trigger your auto-snipe. Specifically on Ethereum, this is paired with bundling your auto-snipe to the tax lowering transaction along with _Block-0 Tipping_. This is considered a Block-0 snipe where tipping or bribing is provided to the blockbuilder, and a Backup Transaction is simultaneously sent if you have the option enabled.
By default, both _⚡️Buy Tax_ and _⚡️Sell Tax_ are set to 50%.
### 🟢 | 🔴 Backup Tx
_Exclusive to Ethereum_
As mentioned previously, Block-0 snipes on Ethereum can be paired with a simultaneous Backup Transaction to guarantee you an entry in case the main bundle fails to go through. **This option is ONLY available for Block-0 snipes** and hence can only be enabled when _Block-0 Tip_ is also enabled. Backup Transactions can only be mined if the main bundle fails, and could still catch Block-0 if your _Gas Delta_ is sufficiently high.
### Gas Price/Delta
For ETH, this will be the gas delta used for Block 1+ snipes and for backup transactions. As mentioned earlier, Block-0 snipes will use tipping or bribing and their gas delta will be defaulted to 0.1 gwei.
For BSC, this will be the gas price used for all snipes, whether Block-0 or Block-1+. For Block-0 snipes, the bot will automatically ensure that your gas price is not above the gas price of the launch transaction to avoid frontrunning it. As mentioned earlier, there's no bundling, tipping nor backup transactions on BSC.
For Base, this will be the gas delta used for all Block 1+ snipes since Block-0 snipes are not possible. Similarly to BSC, there's no bundling, tipping nor backup transactions on Base.
### 🟢 | 🔴 **Auto Sell**
If enabled 🟢, the bot will automatically create the sell limit orders defined in "**⚙️ Sell Limit**" following an auto-snipe. If _Auto Sell_ is disabled 🔴, no sell limit orders will be automatically added following an auto-snipe, even if you have them defined in "**⚙️ Sell Limit**". Initially, "**⚙️ Sell Limit**" will inherit the same limits defined in your [_Global Sell Settings_](/docs/sniper/global-settings/sell-settings#sell-limits-presets), but you can further customize these limits directly from your Auto Snipe Configuration Menu. **In such cases, the sell limits specified in the Auto Snipe Configuration Menu will take priority over the ones specified in your** [_**Global Sell Settings**_](/docs/sniper/global-settings/sell-settings#sell-limits-presets)_**.**_
Now that you've set the default configuration, you can proceed to add, activate and further customize your auto-snipe, as detailed [here](/docs/sniper/auto-snipe/activating-auto-snipe/ethereum-bsc-and-base).
---
# Solana
Source: https://www.maestrobots.com/docs/sniper/auto-snipe/auto-snipe-configuration/solana.md
Section: Sniper
The image below shows the Auto Snipe Configuration Menu on Solana:
.jpg)
We now go over the options in the Auto Snipe Configuration menu:
### Tip
Specifies the _Gas Delta_ for your auto-snipe. Higher values of _Gas Delta_ will boost your transaction and achieve quicker execution times.
### 🟢 | 🔴 Slippage
Sets the slippage for your auto-snipe.
### 🟢 | 🔴 Anti-MEV
If enabled 🟢, the bot will route your auto-snipe through private relays. This technique will guard against MEV/sandwich bots.
### 💳 Multi Buy | 1
_Multi Buy_ can be used to select the wallets that will participate in the auto-snipe. Initially, _Multi Buy_ is defaulted to your "[Default](/docs/sniper/wallet-setup#manual-and-default-wallet)" wallet, but you can further customize this to set any selection of wallet.
### 🟢 | 🔴 **Auto Sell**
If enabled 🟢, the bot will automatically create the sell limit orders defined in "**⚙️ Sell Limit**" following an auto-snipe. If _Auto Sell_ is disabled 🔴, no sell limit orders will be automatically added following an auto-snipe, even if you have them defined in "**⚙️ Sell Limit**". Initially, "**⚙️ Sell Limit**" will inherit the same limits defined in your [_Global Sell Settings_](/docs/sniper/global-settings/sell-settings#sell-limits-presets), but you can further customize these limits directly from your Auto Snipe Configuration Menu. **In such cases, the sell limits specified in the Auto Snipe Configuration Menu will take priority over the ones specified in your** [_**Global Sell Settings**_](/docs/sniper/global-settings/sell-settings#sell-limits-presets)_**.**_
Now that you've set the default configuration, you can proceed to add, activate and further customize your auto-snipe, as detailed [here](/docs/sniper/auto-snipe/activating-auto-snipe/solana).
---
# ↔️ Bridge
Source: https://www.maestrobots.com/docs/sniper/bridge.md
Section: Sniper
> Bridge or swap tokens across chains — either the fast, deBridge-powered route, or the private, Houdini-powered route.
Maestro ships with two separate cross-chain flows, each optimised for a different priority:
* **`/bridge`** — powered by **deBridge**. The default, fast option for moving tokens between chains. Use this for everyday bridging.
* **`/private`** — powered by **Houdini Swap**. The privacy-focused option that unlinks the sending and receiving addresses. Use this when you want transactional anonymity.
Both flows are also accessible from the Main Menu: tap **↔️ Bridge** for the deBridge flow, or send the **`/private`** command directly for the Houdini flow.
## `/bridge` — Fast Cross-Chain Swaps (deBridge)
Send **`/bridge`** in your DM with the bot, or tap **↔️ Bridge** in the Main Menu, to open the deBridge panel. From here, you pick the sending chain and token, the receiving chain and token, the amount, and the receiving wallet. The bot returns a quote with the expected output, and clicking **⇔️ Bridge** initiates the transfer.
deBridge routes the order through its own validator network, so your funds stop briefly on the deBridge side before being delivered on the destination chain. This is the route to reach for when speed matters more than unlinkability.
> **INFO**
>
> The receiving wallet can be any of your connected wallets on the destination chain, or an external address that you paste manually. If Maestro supports the destination chain and you have wallets connected there, they will show up in the selection list automatically.
## `/private` — Private Cross-Chain Swaps (Houdini)
Send **`/private`** in your DM with the bot to open the Houdini Swap panel. Unlike **`/bridge`**, Houdini orders route through a one-time deposit address, so the originating wallet and the receiving wallet cannot be linked on-chain by an outside observer.
In what follows, we provide a step-by-step guide on how to _privately_ swap (same chain, different tokens), send (same chain, same token) or bridge (different chains) through the bot.
### Step 1: Select Chain and Token
The first step is to select the chain and token both on the sending and receiving ends. For example, the image above indicates that we will be sending ETH from Ethereum and, in return, we would like to receive BTC on Bitcoin. To change this default configuration, simply click on "🔗 ETH" and the bot will display a list of chains from which you need to select the target chain that you want to bridge, send or swap from, as shown below:
You can cycle through the pages and select the chain of interest, or use the _Search_ button to look for it. Once the chain is set, the bot will display the list of tokens that are supported for the selected chain, and will prompt you to select one, as shown below. This will represent the token that you would like to bridge, send or swap on the selected chain.
Once the token is selected, you will be redirected to the Bridge Menu with your selection of chain and token reflected on the sending end. The same exact process can be followed to select the chain and token of the receiving end (initiated by clicking on "🔗 BTC" in the Bridge Menu).
The middle button with the double arrow can be used to switch the selected chain and token for the sending and receiving ends.
### Step 2: Select Privacy and Rate Modes
The following step is to specify the Privacy and Rate modes of your order:
* _Privacy Mode:_ If you click on "👁🗨 Semi-Private", it will turn to "👁🗨 Private".
* **Private:** Provides transactional anonymity. In other terms, you will have exclusive knowledge of the originating wallet address and the recipient address since you select both, but this information will not be identifiable by the receiver nor by external parties. **Note that it is required to select Private Mode if you're sending AND receiving the same token on the same chain.**
* **Semi-Private:** Provides a practical blend of privacy and efficiency by offering an enhanced privacy when compared to regular transactions, but they are not completely anonymous and can potentially be traced back to the originating wallet address with some technical expertise. **However, Semi-Private transactions are about 10 times faster than Private ones and cost approximately 50% less.**
* **Rate Mode**: If you click on "📉 Variable Rate", it will turn to "📌 Fixed Rate".
* **Variable Rate:** Variable rates adjust with the market and are recommended for most transactions.
* **Fixed Rates:** Fixed rates are ideal for exact payment amounts like invoices, and are higher cost.
### Step 3: Get Quote
Now that your order details are set, click on 🧾 _Get Quote_, and the bot will prompt you to insert the amount of tokens that you want to send, swap or bridge. Please note that there is a minimum acceptable amount that will be displayed to you if your inserted amount was too low. With the amount set, the bot will display a quotation that shows how many tokens you'll be approximately receiving in return for the amount that you're sending. An example quote is show below:

If you'd like to change anything in your order, click on _Return_ to get back to the Bridge Menu. Otherwise, you can click on "_⇔_ Bridge" to effectively initiate the process. Please note that a quote will only be valid for 5 minutes. After this time, clicking on "_⇔_ Bridge" will automatically refresh the quote.
### Step 4: Specify the Receiving Wallet
After clicking on "_⇔_ Bridge" for a valid quote, the bot will ask you for the address of the wallet that will be receiving the tokens. In case the receiving chain is one that Maestro supports and you have wallets connected on it, the bot will also display these wallets for you to select if you wish to send, swap or bridge to one of your connected wallets, as shown below:
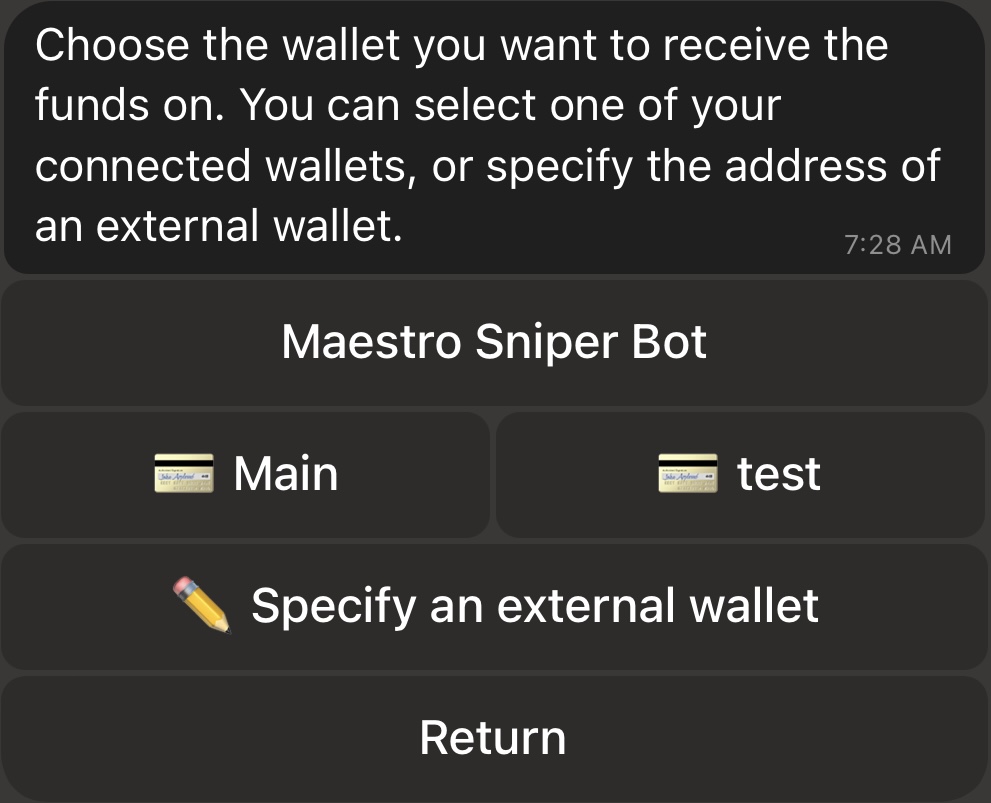
### Step 5: Initiate the Transfer
Now that you've selected the receiving wallet, the bot will create your Houdini order. An example is shown in the image below. The Houdini ID of your order will also be shown towards the end of the message.
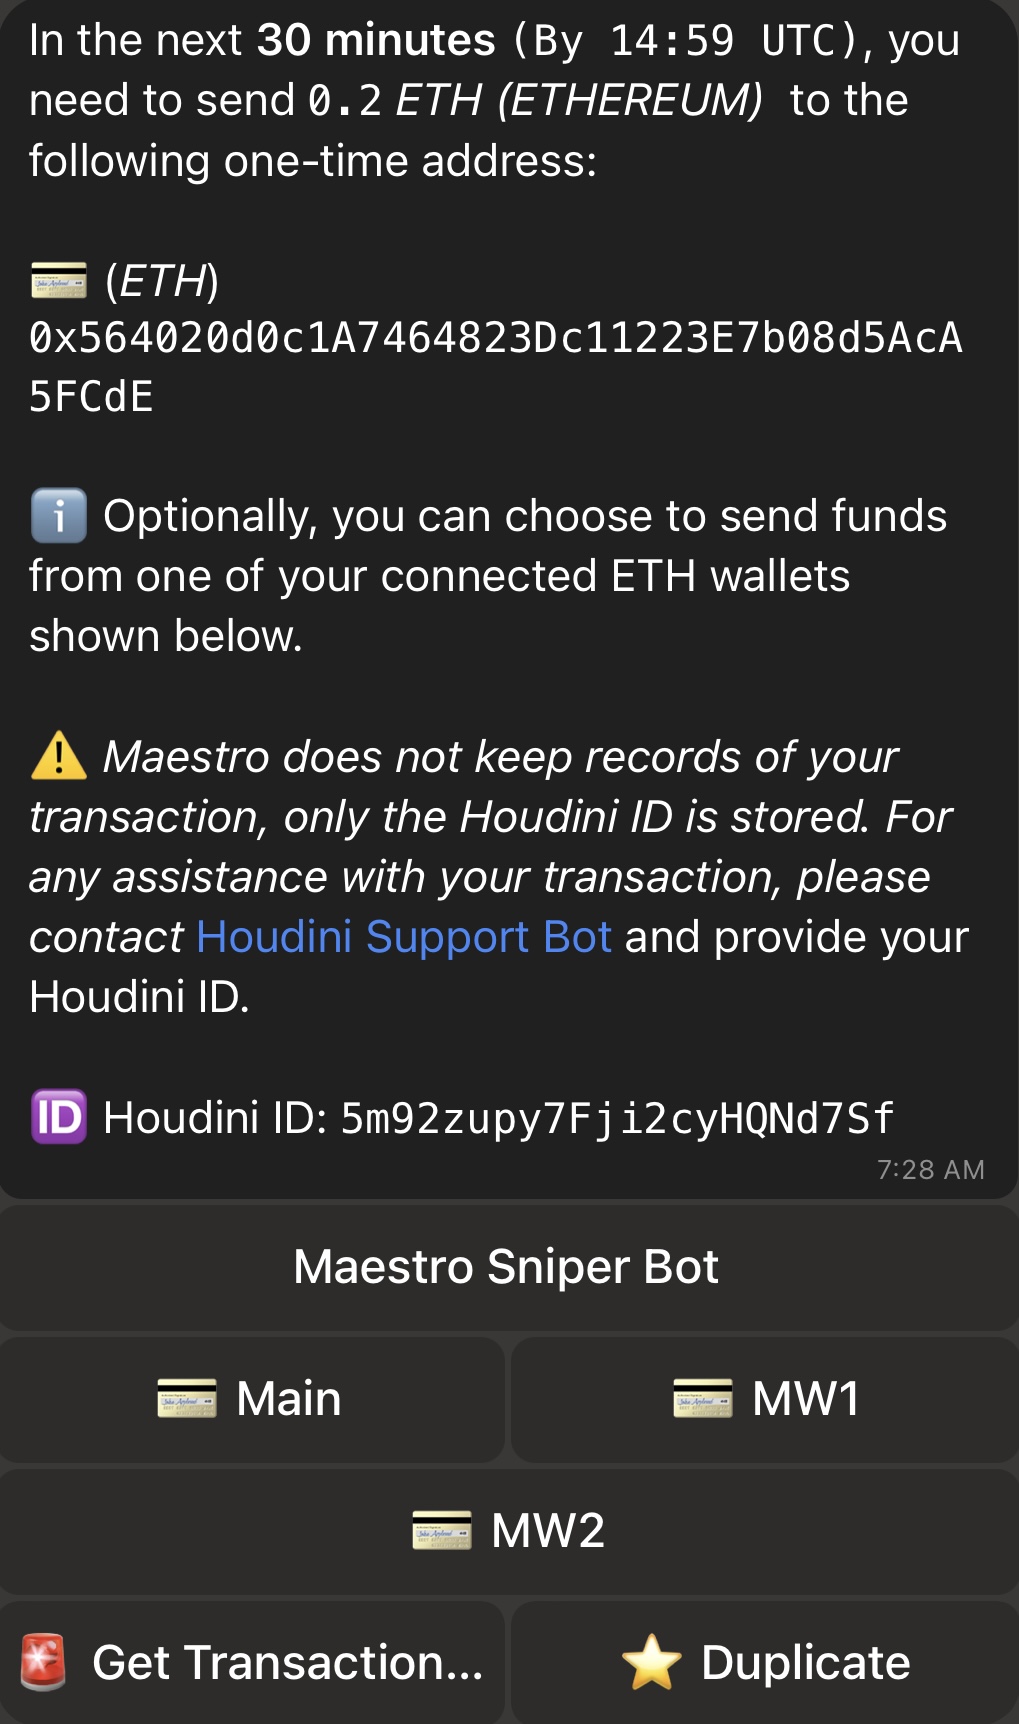
The order will include a one-time address to which you need to send the tokens in the coming 30 minutes. You can send funds to the one-time address from any wallet. If the chain that you're sending, swapping or bridging from is one that Maestro supports and you have wallets connected on it, the bot will also display these wallets for you to select if you wish to send, swap or bridge the tokens directly from one of your connected wallets, as shown in the image above. For example, if we click on either on "Main", "MW1" or "MW2", the bot will automatically initiate a transfer of 0.2 ETH from the selected wallet to the provided one-time address. Once your funds are received on the one-time address, the receiver wallet that you've selected will receive the equivalent funds after a while (the actual time will mostly depend on the privacy mode of your order and the congestion on the concerned chains).
If you click on "🚨 Get Transaction Status", the bot will redirect you to a menu that shows the summary and the status of your order.
The "⭐️ Duplicate" option is a ⭐️ Premium-only feature which allows you to duplicate the exact same order with the same settings and receiving wallet. Clicking on it will spawn another menu similar to the one shown in image above, but with a different one-time address and Houdini ID. This is particularly useful if you wish to send, swap or bridge tokens with a worth exceeding 50,000$ as this is the maximum allowed limit per order.
Finally, please note that Maestro does not keep records of your transaction, only the Houdini ID is stored. If you face any issues with your order beyond Step 5, please contact [Houdini Support Bot](https://t.me/HoudiniSwapSupport_bot) and provide your Houdini ID for assistance.
---
# 🎉 Campaigns
Source: https://www.maestrobots.com/docs/sniper/campaigns.md
Section: Sniper
> Claim limited-time rewards — like a boosted Cashback tier or a free Premium period — from Maestro campaigns.
From time to time, Maestro runs **campaigns** — limited-time promotions that grant eligible users a bonus perk, such as a boosted [Cashback](/docs/sniper/cashback) tier, a free Premium period, or another one-off reward.
## Spotting a Campaign
A campaign surfaces as a message in a Maestro-related Telegram channel or group — or, if you're individually eligible, as a direct message from the bot. The message describes the perk and includes a **Claim** button.
## Claiming Your Reward
Tap the **Claim** button in the campaign message. The bot will immediately confirm whether you're eligible and, if so, apply the reward to your account — for example, upgrading your Cashback tier for the duration of the campaign, or extending your Premium subscription.
> **INFO**
>
> Each campaign message can only be claimed once per eligible user. If you tap **Claim** again after a successful claim, the bot will reply that you have already claimed this reward.
## If You're Not Eligible
If your account doesn't meet the campaign's eligibility criteria — for example, insufficient recent trading volume, or you're not on the selected recipient list — the bot will reply with _"You are not eligible for this campaign"_. In that case, there is nothing to do; keep trading and watch for the next campaign.
## Related Programs
- [Cashback](/docs/sniper/cashback) — continuous rebate on your trading fees.
- [Rewards](/docs/sniper/rewards) — one-off or time-limited reward pools for active Maestro users.
---
# 💸 Cashback
Source: https://www.maestrobots.com/docs/sniper/cashback.md
Section: Sniper
> Earn a rebate on the trading fees you've paid through the bot, and claim it directly from the Cashback menu.
**Cashback** is a rebate program that returns a portion of the 1% trading fee you pay to the bot on every buy and sell. It runs in the background — you don't need to opt in — and you can check your accrued rebate at any time from a dedicated menu.
## Opening the Cashback Menu
To access the menu, send **`/cashback`** in your DM with the bot, or tap **💸 Cashback** in the main menu when the program is active.
For tokens traded on the Pump.Fun launchpad, you can also jump directly to the Pump.Fun rebate panel by sending **`/pumpfun`**. This is the same Cashback flow, scoped to your Pump.Fun trades.
## Checking Your Earnings
The Cashback menu shows your accrued rebate per chain, along with the equivalent USD value at the current price. The amount grows automatically as you trade — there is nothing to activate.
> **INFO**
>
> Cashback is awarded on the Maestro trading fee, not on the tokens you buy or sell. Simple transfers, bridge orders and external transactions are not eligible.
## Claiming Your Rebate
When your accrued balance crosses the minimum claim threshold, the _Claim_ button becomes active. Tap it and the bot will send your rebate directly to your connected wallet on the selected chain.
If the _Claim_ button is greyed out, your accrued rebate is still below the claim threshold for that chain — keep trading, or switch to a different chain where you have more accrued.
## Related Programs
- [Rewards](/docs/sniper/rewards) — one-off or time-limited reward pools for active Maestro users.
- [Campaigns](/docs/sniper/campaigns) — promotional drops that temporarily boost your Cashback tier or grant other perks.
---
# 🏅 Competition
Source: https://www.maestrobots.com/docs/sniper/competition.md
Section: Sniper
> See the current Maestro trading competition — its rules, prize pool, and how to enter — without leaving your DM with the bot.
Send **`/competition`** in your DM with the bot to pull up the current trading competition. The bot will post the official competition announcement — with its rules, prize pool, and entry terms — directly into your chat.
If no competition is running, the bot will reply with _"No active competition at the moment. Stay tuned!"_ — check back later or watch the Maestro updates channel for announcements.
---
# 🤝 Copytrade
Source: https://www.maestrobots.com/docs/sniper/copytrade.md
Section: Sniper
> This modality allows you to copy the buys and sells of tracked wallets at amazing speeds. It's available on every EVM-compatible chain and on Solana.
Our bot allows you to immediately copy the buys and sells of up to **5** wallets per chain (**12** for ⭐️ Premium users). Before we delve into the details of this powerful functionality, always remember:
* **Always track the wallet RECEIVING the tokens. Do not follow wallets that start transactions. Instead, follow the wallets that receive the purchased tokens at the end of a transaction.**
## Copytrade Speed
Copytrade speed is determined by multiple factors. Depending on the scenario and chain, the bot will either frontrun the tracked wallet, match its gas, or simply buy/sell after it. We outline these scenarios below:
1. **The bot detects a transaction before it’s mined (mempool).**
_This scenario is only valid on Ethereum and BSC._ After adding a tracked wallet, the bot starts scanning mempool for any **swap transactions** that would deposit (remove) tokens into (from) the tracked wallet. If it spots any such transactions, it accounts for two possible cases:
* _The tracked wallet is sniping a launch_: This is mostly exclusive to buys. If the bot detects that the tracked wallet is sending a transaction towards a contract that hasn’t launched yet, it will assume that said wallet is sniping the launch. In that case, the bot will match the gas settings of the tracked wallet to ensure that you don’t frontrun the transaction that will render the token tradable. You will end up buying the token in the same block, but it will most likely be after the tracked wallet, as you’re using the same gas settings as them.
* _The tracked wallet is buying/selling a tradable token_: If the bot detects that the tracked wallet is sending a transaction towards a contract that is currently tradable, the bot will adjust its gas settings to frontrun (if _Frontrun_ is enabled in the next sub-section) or match (if _Frontrun_ is disabled) the tracked wallet. This allows you to buy and sell BEFORE the tracked wallet (if _Frontrun_ is enabled), thus securing higher profits.
**If either of those cases (matching gwei or using frontrun gwei) requires more gwei than the** [_**Max Gas Price**_](/docs/sniper/global-settings/general-settings#max-gas-price) **set in your** [_**Global General Settings**_](/docs/sniper/global-settings/general-settings)**, then the bot will block your auto-buy/sell and protect you from high gas fees.**
2. **The bot detects a transaction after it’s mined.**
This is the usual scenario for every chain other than Ethereum and BSC. For Ethereum and BSC, the bot can detect most transactions in mempool before they’re mined, but some more complicated transactions (contract buys for example) are harder to spot. In this case, we can still detect the transaction after it’s mined. For this scenario, the bot will buy/sell in the next block after the copytrade wallet, and the transaction will use **your** gas settings for that copytrade wallet, as we explain in the following sub-section.
- [Setting up Copytrade Buys](/docs/sniper/copytrade/copytrade-buys)
- [Setting up Copytrade Sells](/docs/sniper/copytrade/copytrade-sells)
---
# Copytrade Buys
Source: https://www.maestrobots.com/docs/sniper/copytrade/copytrade-buys.md
Section: Sniper
To enable this modality, we first need to add and configure the copytrade wallet(s), then we need to enable Copytrade. This should be done per chain.
## Adding a Copytrade Wallet
From the `/start` menu, click on _Copytrade_ and select the chain of interest. You will be redirected to the Copytrade Main Menu shown in the image below:
.jpg)
To add a wallet, simply click on "**Add Wallet**". The bot will first prompt you to select a name for the copytrade wallet and then provide the wallet address. Base users can copytrade up to **5** wallets per chain, while ⭐️ Premium users can add up to **12**. For the sake of demonstration, we will add a wallet and name it "CT1". After adding the wallet, the Copytrade Main Menu will have a new row, as shown in the image below:
.jpg)
At this point, we have added a wallet, but we still need to activate auto-buys or tracking for the copytrade wallet. To do so, simply click on the wallet name to open the _Copytrade Wallet Settings_.
## Copytrade Wallet Settings
You might notice that the menu looks very similar to the [_Signals Settings_](/docs/sniper/signals/signals-settings), except for the added **Copy Sell** button.
.jpg)
For a more detailed explanation of what the buttons in the image above correspond to, please consult Section [5](/docs/sniper/signals). However, we will highlight five buttons: **Max Buy** and **Buy %** buttons, as they are vital to the functioning of our automated copytrade modalities, the _**Copy Sell**_ button, which we will explain in the next section, the **Frontrun** and the **Blind Follow** buttons.
As usual, if you want to enable auto-buys for this copytrade wallet, you need to select a suitable _Max Buy_ and click on "**Inactive**" to activate the copytrade as shown in the image above. As discussed earlier, automated buys will not trigger unless "**Allow Auto Buy**" is enabled in your [_Global Buy Settings_](/docs/sniper/global-settings/buy-settings#or-allow-auto-buy). The bot will warn you if this is not the case once you activate a signal.
### 🟢 | 🔴 Track Only
When _Track Only_ is enabled 🟢, the bot will not auto-buy when the copytrade wallet buys. Instead, it will only notify you of the copytrade wallet's buy by printing the corresponding Token Report where you can manually buy. It is important to note that a copytrade wallet cannot be active for auto-buys and enabled for tracking at the same time as only one option can be selected at a time.
### ⚙️ Auto Buy Checks
_Auto Buy Checks_ can be used to set optional checks and limits for _Auto Buy_, such as Min/_Max MC_, _Min/Max Liquidity_ and _Max Buy/Sell Tax._ If any of these limits is not met, the bot won't auto-buy when the copytrade wallet buys. Initially, _Auto Buy Checks_ will inherit the same values that you've set in your [_Global Buy Settings_](/docs/sniper/global-settings/buy-settings#or-allow-auto-buy), but you can further customize and/or disable these checks directly from your copytrade wallet settings. **In such cases, the values specified in the copytrade wallet settings will take priority over the ones specified in your** [_**Global Buy Settings**_](/docs/sniper/global-settings/buy-settings#or-allow-auto-buy)_**.**_
### Max Buy Amount and Buy %
_Max Buy_ serves as the **maximum allowed auto-buy amount**, and is provided in native amount. _Buy %_ specifies the percentage of the copytrade wallet's buy amount that you wish to buy, and can go up to 1000% in case you'd like to buy more than what the copytrade wallet is buying. _Buy %_ will always be upper limited by the value in _Max Buy_. This is done to shield you from the fluctuations in transaction sizes coming from tracked wallets, especially if you’re tracking “whale” wallets that are prone to large buys that most people can’t afford.
Some examples are provided below to help you understand how _Max Buy_ and _Buy %_ function:
| Max Buy (BNB) | Buy % | CT Wallet Buy Amount (BNB) | Bot Auto Buy Amount (BNB) |
| --- | --- | --- | --- |
| 0.5 BNB | 100% | 0.2 BNB | 0.2 BNB |
| 0.5 BNB | 100% | 0.7 BNB | 0.5 BNB |
| 0.7 BNB | 200% | 0.3 BNB | 0.6 BNB |
| 0.7 BNB | 200% | 0.5 BNB | 0.7 BNB |
### 🟢 | 🔴 Blind Follow
The bot excludes transactions that don't originate from the copytraded address (fake/real airdrops, contract traders, multi-wallet transactions, etc.). _Blind Follow_ bypasses this protection, **which can expose you to fake/spoofed transactions. Only enable this if you're following a wallet that trades through transactions that do not originate from the copytraded address.**
### 🟢 | 🔴 Frontrun
_Exclusive to Ethereum and BSC_
This controls whether you would like to frontrun the copytrade wallet’s buys and sells. Enabling _Frontrun_ means that the bot will use higher gwei than the copytrade wallet to get ahead of it (when this is applicable, as explained [earlier](/docs/sniper/copytrade)). There are three possible cases here:
* _**Frontrun**_** is enabled and the copytrade wallet's transaction is detected in mempool:** In this case, for buys, the bot will compare your own _Gas Price/Delta_ (which is set in your Copytrade Wallet Settings) against the `copytrade wallet’s gas price/delta + 5`, and then pick whichever value is higher. For sells, the same logic applies but using the _Gas Price/Delta_ set in your [_Global Sell Settings_](/docs/sniper/global-settings/sell-settings) as the _Gas Price/Delta_ values you set in your _Copytrade Wallet Settings_ only concern auto-buys triggered by this copytrade wallet. This comparison allows you to ramp up the speed of your own transactions, which is especially useful if you’re pairing it with a tight slippage.
* _**Frontrun**_** is disabled and the bot detects the copytrade wallet's transaction in mempool:** In this case, the bot will use the same gwei as the tracked wallet to ensure that you don’t frontrun it. This applies for both buys and sells.
* _**Frontrun**_** is enabled or disabled and the copytrade wallet's transaction is detected after it's mined:** In this case, frontrunning is no longer an option. The bot will use the _Gas Price/Delta_ values set in your _Copytrade Wallet Settings_ for buys and the ones set in your [_Global Sell Settings_](/docs/sniper/global-settings/sell-settings) for sells.
### 🟢 | 🔴 Slippage
Choose the slippage tolerance for auto-buys triggered by this copytrade wallet. Initially, _Slippage_ will mirror the _Slippage_ value specified in your [_Global Buy Settings_](/docs/sniper/global-settings/buy-settings), but you have the option to further customize it directly in your _Copytrade Wallet Settings_.
### 🟢 | 🔴 Smart Slippage
_Available on ETH, BSC, Base, Avalanche and Arbitrum_
This allows slippage to automatically adjust based on the token’s taxes and the price impact of your trade. This is not suitable for volatile situations like launches and snipes. As a reminder, _Smart Slippage_ overrides any custom slippage values you might have selected earlier. In other terms, when _Smart Slippage_ is enabled 🟢, _Slippage_ is disabled 🔴 and vice versa.
### 💳 Multi Buy | 1
_Multi Buy_ can be used to select the wallets that will participate in any auto-buy triggered by this copytrade wallet. Initially, _Multi Buy_ is defaulted to your "[Default](/docs/sniper/wallet-setup#manual-and-default-wallet)" wallet, but you can further customize this to set any selection of wallet.
### _Gas Price / Delta_
_**Not available on Arbitrum and TON**_
Choose the gas price (BSC) or gas delta (Ethereum, Base, Avalanche, Sonic, TRX and Solana) to be used on auto-buys from this copytrade wallet. Initially, _Gas Price_ and _Gas Delta_ will mirror the values specified in your [_Global Buy Settings_](/docs/sniper/global-settings/buy-settings), but you have the option to further customize it directly in your _Copytrade Wallet Settings_. In such cases, the values specified in the _Copytrade Wallet Settings_ will take priority over the ones specified in your [_Global Buy Settings_](/docs/sniper/global-settings/buy-settings)_._
### 🟢 | 🔴 **Auto Sell**
If enabled 🟢, the bot will automatically create the sell limit orders defined in "**⚙️ Sell Limit**" following every automated buy triggered by this copytrade wallet. If _Auto Sell_ is disabled 🔴, no sell limit orders will be automatically added following an automated buy triggered by this copytrade wallet, even if you have them defined in "**⚙️ Sell Limit**".
_**NOTE: Auto Sell**_ **refers to the limit sell functionality that gets activated based on limits you specify. This is different from "**_**Copy Sell**_**" which is the copytrade functionality that allows you to sell when the copytrade wallet sells. This will be explored in the following sub-section.**
### **⚙️ Sell Limit (Presets)**
If you click on "**⚙️ Sell Limit**", you will be redirected to the following menu which allows you to preset and define sell limit orders to be automatically applied after an automated buy triggered by this signal:
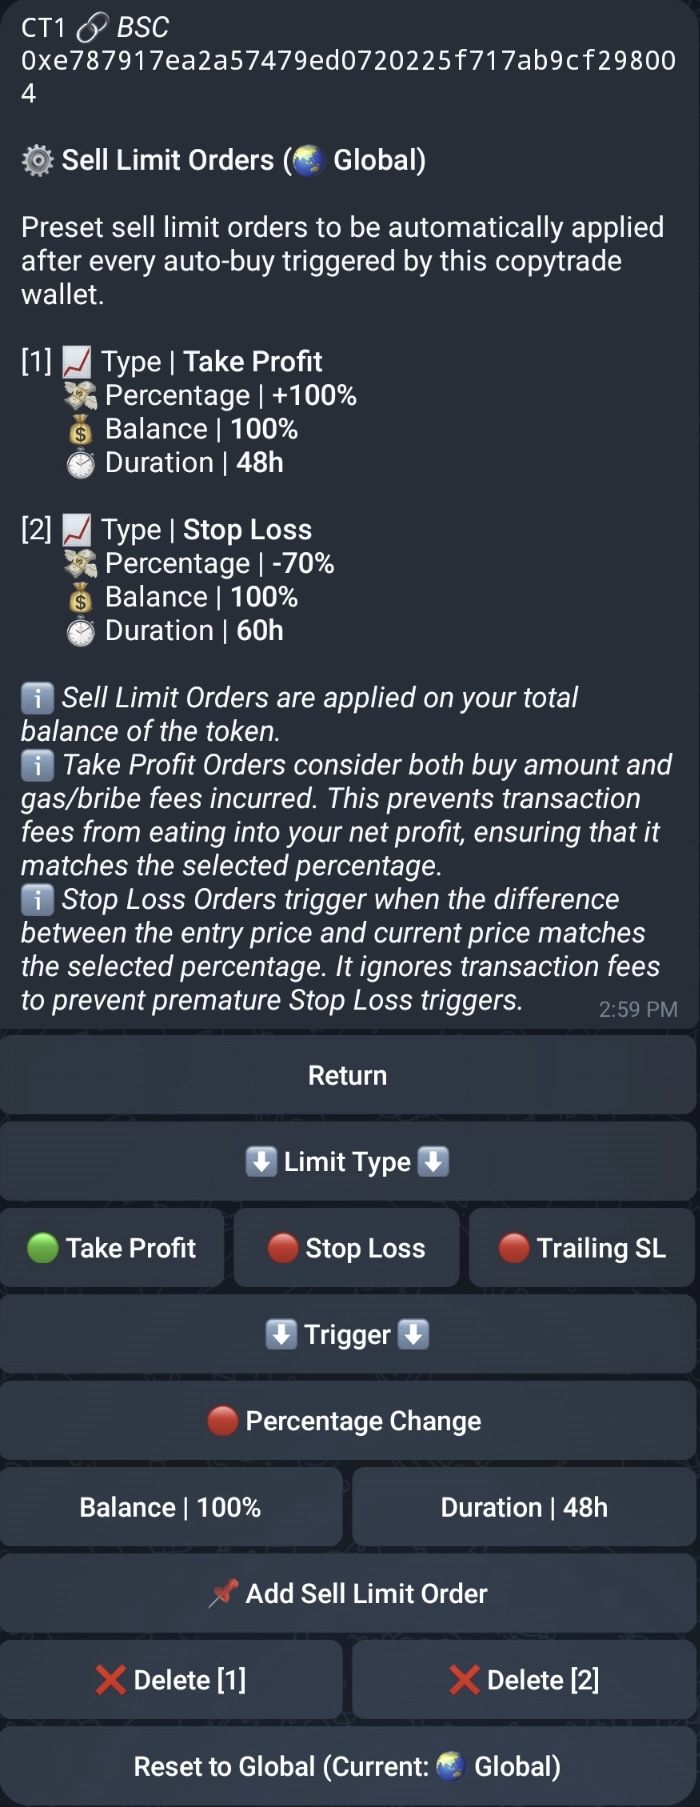
Initially, **⚙️ Sell Limit** is defaulted to the sell limit orders preset in your [_Global Sell Settings_](/docs/sniper/global-settings/sell-settings#sell-limits-presets), but you can further customize these limits directly from the signals sell limit settings to override the ones defined in your [_Global Sell Settings_](/docs/sniper/global-settings/sell-settings#sell-limits-presets). You will also have the option to reset these limits back to the ones defined in your [_Global Sell Settings_](/docs/sniper/global-settings/sell-settings#sell-limits-presets) by clicking on "**Reset to Global**" shown in the image above.
#### Limit Type
Select the type of the sell limit that you would like to add. There are three possible types: _Take Profit_, _Stop Loss_ and _Trailing Stop Loss_.
_Trailing Stop Loss_ is a powerful variation of Stop Loss that acts by adapting the price or market cap at which the sell limit order as the price of the concerned token increases. This will allow you to secure some profits as the market price of the token fluctuates. It should be noted that _Trailing Stop Loss_ will never decrease the price or market cap at which the sell limit order will trigger.
#### Percentage Change
For _Take Profit_, the _Percentage Change_ must be positive. For _Stop Loss_ and _Trailing Stop Loss_, it must be negative. The _Percentage Change_ is applied on the **entry price of your trade** to determine the price at which the sell limit order should trigger at. In other terms, the sell limit order will trigger when the difference between your trade entry price and the current token price matches _Percentage Change_. However, this entry price is computed slightly differently depending on the limit type:
* For _Take Profit_, the entry price is computed while considering your buy amount **and the gas/bribe fees incurred**. This prevents transaction fees from eating into your net profit, ensuring that it matches the selected percentage.
* For _Stop Loss_ and _Trailing Stop Loss_, the entry price used ignores transaction fees and only considers your buy amount. This is done to prevent premature triggers. For _Trailing Stop Loss_, the _Percentage Change_ will also serve as the “anchor” value.
#### **Balance**
Specify the percentage of your token balance that will be sold when the sell limit order is triggered. It is important to note that sell limit orders always act on your **total balance of the token**. For example, setting the _Balance_ to 50% will sell half of your token balance at the time of trigger.
#### **Duration**
Specify the duration in hours for which this sell limit order will remain active once it's automatically added or created for a specific token. The maximum duration is 96 hours.
---
# Copytrade Sells
Source: https://www.maestrobots.com/docs/sniper/copytrade/copytrade-sells.md
Section: Sniper
**In the last section, we skipped over one button in particular: the **_**Copy Sell**_ **button. Enabling this allows your bot to sell whenever the copytrade wallet sells.** This is one of the most unique functions in the bot, and it follows its own distinct set of rules and procedures, which we explain below:
* When the copytrade wallet sells, you will receive a notification informing you about the transaction. The bot will then check all your wallets to find whether you own the same token the copytrade wallet was selling. If you do own the token, **and **_**Copy Sell**_ **is enabled**, the bot will attempt to sell as well. If the bot recognizes that it can frontrun the copytrade wallet’s sell and _Frontrun_ is enabled, it will also attempt to do so.
* To determine the sell amount, the bot identifies the copytrade wallet’s current token balance, calculates the percentage of that balance that is being sold in the detected sell transaction, and then uses the same percentage on your wallet. For example, assume that the copytrade wallet has 100 tokens while your wallet has 80. If the copytrade wallet attempts to sell 50 tokens, which is 50% of its balance, the bot will try to sell 40 of your tokens, which is again 50% of your balance. This allows you to accurately follow the copytrade wallet without compromising your position.
With that explanation out of the way, it’s worth pointing out that:
* This feature can also activate for tokens that you have not bought through copytrade. This should already be evident from the explanation given above, since the bot simply evaluates whether you own the token being sold by the copytrade wallet or not, and then behaves accordingly.
* Copy Sell can be enabled in parallel to Auto Sell which triggers based on sell limits that you set.
#### Final remarks and tips:
* Base users can copytrade up to **5** wallets per chain, while ⭐️ Premium users can copytrade up to **12**.
* **You can override your global gas price/delta and slippage settings using the gas and slippage buttons found in every separate **_**Copytrade Wallet Setting**_**.**
* _Copy Sell_ allows the bot to automatically sell whenever the copytrade wallet is selling, but you can still use your own _Auto Sell_ settings in parallel.
* **We’ve implemented multiple screening methodologies to ensure that no malicious transactions can fool our copytrading mechanisms. The bot’s smart algorithms can detect transactions that aim to trap copytraders, like airdrops and swaps with obfuscated sources, and it will filter them out to ensure the safety and peace of mind of our users.**
* **The bot filters out transactions on stables (like purchasing USDC and USDT for example), so you won't get notified about these uninteresting transactions.**
---
# FAQ
Source: https://www.maestrobots.com/docs/sniper/faq.md
Section: Sniper
- [Security](/docs/sniper/faq/security)
- [Wallet Settings](/docs/sniper/faq/wallet-settings)
- [Manual Transactions](/docs/sniper/faq/manual-transactions)
- [Call Channels](/docs/sniper/faq/call-channels)
- [Auto-Buy Warnings](/docs/sniper/faq/auto-buy-warnings)
- [Transaction Error Messages](/docs/sniper/faq/transaction-error-messages)
- [Trade Monitor](/docs/sniper/faq/trade-monitor)
- [Multi-Wallet](/docs/sniper/faq/multi-wallet)
- [Copytrade](/docs/sniper/faq/copytrade)
---
# Auto-Buy Warnings
Source: https://www.maestrobots.com/docs/sniper/faq/auto-buy-warnings.md
Section: Sniper
## Wallet auto buy is disabled
_Auto Buy_ is disabled in your [Wallet Buy Settings](/docs/sniper/global-settings/buy-settings), which is accessible through `/start` ➡️ _Wallets_ ➡️ Select the chain ➡️ ⚙️ _Config_ ➡️ Buy. If you want any call channel or copytrade auto-buys to activate, this needs to be enabled (This has no effect on _Auto Snipe_).
## Channel auto buy is disabled
_Auto Buy_ is disabled in your [Call Channel Settings](/docs/sniper/signals/signals-settings) (or [`Me` Channel Settings](/docs/sniper/pasted-contracts/auto-buy-on-pasted-contract) in case of pasted contracts), which is accessible through `/start` ➡️ _Call Channels_ ➡️ Select the chain, then click on the relevant channel.
### Buy/Sell tax could not be estimated
This normally happens for tokens that don't have trade enabled yet, or have no liquidity. It will obviously prevent auto-buys from going through.
### Blacklist risk! Buying now could get you BLed
This happens when the bot detects that your buy will get you blacklisted on the contract. It will block the auto-buy in these cases.
### Token detected as honeypot!
This happens when the bot detects that the token is a honeypot, which means that the token is unsellable. It will block the auto-buy in these cases.
### Liquidity / Total Supply < 1%
This happens when the bot detects that the targeted liquidity pool holds less than 1% of the token's total supply. This indicates that the main pool of the token is currently not [supported by the bot](/docs/sniper/getting-started#supported-dexs), or that the token has a very unhealthy liquidity pool. The bot will block auto-buy in these cases.
### I get a warning that the token is a scam, but I still want to buy it.
The sniper normally blocks token auto-buys if it detects honeypots, blacklist risks, or unhealthy liquidity. However, some users have requested the removal of these “training wheels” to allow them to go _full degen_. This is what [_Degen Mode_](/docs/sniper/global-settings/general-settings#or-degen-mode) aims to accomplish. When enabled, the bot will still notify you if the aforementioned risks are detected, but it will **NO LONGER** block auto-buy in those events. **Only enable this if you absolutely know what you’re doing and are willing to handle the risks involved!**
---
# Call Channels
Source: https://www.maestrobots.com/docs/sniper/faq/call-channels.md
Section: Sniper
### My bot detects the call but doesn't auto-buy.
Please make sure _Auto Buy_ is enabled both in your [Wallet Buy Settings](/docs/sniper/global-settings/buy-settings) and in your [Channel Settings](/docs/sniper/signals/signals-settings) (With a [_Buy Amount_](/docs/sniper/signals/signals-settings#buy-amount) set). You can also consult the [Warning Section](/docs/sniper/pasted-contracts/warning-messages) for more information on why _Auto Buy_ failed to trigger.
### My bot auto-buys but _Auto Sell_ is always turned off.
You need to enable _Auto Sell_ both in your [Wallet Sell Settings](/docs/sniper/global-settings/sell-settings) and in your [Channel Settings](/docs/sniper/signals/signals-settings) . This enables _Auto Sell_ by default on the Trade Monitor which spawns after an auto-buy is triggered through this channel.
### My bot isn't detecting a channel's calls.
This can happen for one of three reasons:
1\. You didn't enable [_Track_](/docs/sniper/signals/signals-settings#track) in your [Call Channel Settings](/docs/sniper/signals/signals-settings). Even if you enable _Auto Buy_ for the channel, you still need to enable _Track_.
2\. The channel's call had no contract address in it. If the call has any form of contract (Be it raw, manipulated, or through a chart link), the bot will detect it. If the channel call only has a description of the token and/or its Telegram group, you will NOT be notified.
3\. The channel edited the contract address into the post more fairly late after the initial post. We don't report the contract in this case to protect you from late buys.
### Will the bot auto-buy the same token multiple times?
The bot will never report the same token twice from a single channel. This protects you from update posts. However, the bot can auto-buy the same token multiple times if multiple channels that you're following call the token. If you want to avoid that, make sure [_**Dupe Buy**_](/docs/sniper/global-settings/buy-settings#dupe-buy) is disabled.
### How can I find call channels easily in the bot?
Head to `/start` ➡️ _Signals_ ➡️ _Call Channels_ ➡️ Select the chain of interest. You will then be re-directed to a list of Call Channels that you can track and enable for auto-buys. These channels are ordered in descending order based on the number of Maestro users tracking them. Use the [_Search_](/docs/sniper/faq/call-channels) button to look for a specific channel either using the channel's username or ID.
### How can we add call channels?
Channel additions are now limited to top tier channels only. If you believe you have such a channel, please report it to our 24/7 support team. To track groups/channels not currently in the bot, you can use the [Maestro Telegram Scraper](/docs/scraper).
### How many channels can I follow?
As many as you wish, but note that receiving too many simultaneous calls could get you rate-limited on Telegram. This means that the bot won't be able to respond to you normally due to limitations imposed by Telegram, and some delays might be faced when interacting with the bot. Rate-limits are temporary and they normally get lifted in a few hours. If you believe that you're being rate-limited, please contact our 24/7 support for further assistance.
### Can I receive notifications without auto-buying?
Yes. Simply _Track_ the channel without enabling _Auto Buy_ your [Call Channel Settings](/docs/sniper/signals/signals-settings).
---
# Copytrade
Source: https://www.maestrobots.com/docs/sniper/faq/copytrade.md
Section: Sniper
### How does copytrade work?
Copytrade enables you to auto buy/sell a token whenever the wallet you're tracking buys/sells it.
### How many wallets can we track?
You can track up to **5** wallets per chain as a base user, and up to **12** as a [Premium](/docs/sniper/premium-subscription) user.
### How does _Auto Buy_ work in copytrade?
If you want the bot to auto-buy immediately when the tracked wallet performs a buy transaction, you NEED to enable [_Auto Buy_ ](/docs/sniper/copytrade/copytrade-buys#or-auto-buy)and choose a [_Buy Amount_](/docs/sniper/copytrade/copytrade-buys#buy-amount) in your [Copytrade Wallet Settings](/docs/sniper/copytrade/copytrade-buys). The bot will use this amount as the maximum allowed auto-buy. For example, if you set _Buy Amount_ to 0.5 BNB and the tracked wallet buys 0.1 BNB, then the bot will also buy 0.1 BNB, matching the tracked wallet. However, if the tracked wallet buys any amount LARGER than 0.5 BNB, the bot will still only buy 0.5 BNB. This is done to shield you from the fluctuations in transaction values coming from tracked wallets, especially if you're tracking "whale" wallets that are prone to large buys that most people can't afford.
### How does Copy Sell work in copytrade?
The bot will notify you whenever the tracked wallet sells tokens. It will then check whether you own the token or not. If you do own the token AND [_Copy Sell_](/docs/sniper/copytrade/copytrade-sells) is enabled in the Copytrade Wallet Settings, the bot will attempt to copy the sell. If the tracked wallet sells a certain percentage (50% for example) of their token holdings, then the bot will sell the same percentage from your wallet (50% as well). _Copy Sell_ doesn't need an active Trade Monitor to trigger as it is a separate functionality from _Auto Sell_.
### Can we frontrun the tracked wallet?
Yes, for chains where frontrunning is applicable. More details on frontrunning can be found [here](/docs/sniper/copytrade/copytrade-buys#or-frontrun).
### Does copytrade work with multi-wallets?
Yes. Please refer to the [Multi-Wallet](/docs/sniper/faq/multi-wallet) section for further information on how to enable this feature.
### Can I simply get notified without committing to an Auto Buy?
Yes. Add the tracked wallet, turn on Copytrade for the chain, and make sure [_Auto Buy_](/docs/sniper/copytrade/copytrade-buys#or-auto-buy) is disabled in the [Copytrade Wallet Settings](/docs/sniper/copytrade/copytrade-buys).
### Can I copytrade Pump.Fun transactions on Solana?
Yes.
### Can I copytrade a wallet that snipes a launch?
Yes. Please refer to the explanation provided [here ](/docs/sniper/copytrade)to know how Copytrade functions in this case.
---
# Fees
Source: https://www.maestrobots.com/docs/sniper/faq/fees.md
Section: Sniper
### Is the bot free?
Successful transactions through the Maestro Bot (manually or automatically) will be charged a 1% tax on every buy and sell. Simple transfers are NOT taxed.
### How are fees extracted?
_**Solana**_
Fees will be directly extracted in the same transaction.
_**Other Chains**_
The bot will NOT take the 1% directly from each transaction. It simply accumulates how much you owe us, and doesn't extract any fees until you accumulate more than 0.01 units of the chain's native coin (e.g. ETH on Ethereum, BNB on BSC, AVAX on Avalanche) or 0.5 TON in unpaid fees. The extracted fees will never be lower than that minimum, and never higher than 10% of your highest wallet balance.
The fees accumulate per telegram account, **NOT** per wallet, and the bot will always extract the fee from the wallet with the **highest balance** in the concerned chain. The sniper will deal with this silently, and you can always verify your trading volume by checking your block explorer.
All unpaid fees accumulated up to June 12th, 2023 were [completely forgiven](https://t.me/MaestroSniperUpdates/160), giving all users a chance to start fresh.
#### Fee Addresses
The following are the addresses to which the fees will be sent. Whenever you find a transfer made from your wallet to one of these addresses, this would be a fee payment to the bot.
| Chain | Fee Address |
| --- | --- |
| Solana | MaestroUL88UBnZr3wfoN7hqmNWFi3ZYCGqZoJJHE36 |
| Every EVM-compatible chain (BSC, Base, Ethereum, Monad, Sonic, Avalanche, Arbitrum, Hyper EVM) | 0xB0999731f7c2581844658A9d2ced1be0077b7397 |
| TON | UQBk4BgQvZ8zhlCPkdtfKC6bXTxJvwsguy-p-7Eh7K5vQ48E |
---
# Manual Transactions
Source: https://www.maestrobots.com/docs/sniper/faq/manual-transactions.md
Section: Sniper
### How can I buy a token manually?
Paste the token's contract address into the bot, then use the [buy menu](/docs/sniper/pasted-contracts/token-report-menu) to manually buy. You can also adjust the _Slippage_ and _Gas Price/Delta_ of your manual buys and switch between your connected wallets directly in the same panel.
### How can I sell a token manually?
Paste the token's contract address into the bot, then use the [Buy ↔️ Sell](/docs/sniper/pasted-contracts/token-report-menu#buy-sell) button to open the [sell menu](/docs/sniper/pasted-contracts/token-report-menu) to manually sell. You can sell your holdings of the token in the bot even if you acquired them externally. You can also adjust the _Slippage_ and _Gas Price/Delta_ of your manual sells and switch between your connected wallets directly in the same panel.
### Can I automate buying pasted contracts?
Yes. You can configure the `Me` channel to initiate auto-buys on pasted contracts. This is detailed [here](/docs/sniper/pasted-contracts/auto-buy-on-pasted-contract).
### If I bought a token inside the bot, can I sell it outside?
Yes.
### If I bought a token outside the bot, can I sell it inside?
Yes. Paste the token's contract address into the bot, then use the [Buy ↔️ Sell](/docs/sniper/pasted-contracts/token-report-menu#buy-sell) button to open the [sell menu](/docs/sniper/pasted-contracts/token-report-menu) to manually sell.
### What gas settings do manual buys/sells use?
Manual buys and sells use your [wallet's gas settings](/docs/sniper/global-settings). This can be overridden for specific transactions by manually changing the slippage and/or the gas price/delta in the [token's buy menu](/docs/sniper/pasted-contracts/token-report-menu) or [trade monitor menu](/docs/sniper/trade-monitor/trade-monitor-menu).
### How can I make my buys/sells go faster?
Your gas price/delta determines your transaction's priority on the blockchain. If you want more speed, please increase your gas price/delta.
### What if I try to buy an amount bigger than max buy?
The bot automatically adjusts your buy amount to match the max buy of the contract. The only case where we don't do that is 0-block-delay [Liquidity ](/docs/sniper/auto-snipe#liquidity-sniping)and [Method ](/docs/sniper/auto-snipe#method-sniping)sniping through _Auto Snipe_ on Arbitrum.
### Can I buy a specific amount of tokens?
Yes. Paste the token's contract address then use the [_Buy X Tokens_](/docs/sniper/pasted-contracts/token-report-menu#buy-x-tokens) button.
### Why can't I buy or sell a token?
Please refer to the [Transaction Error Messages](/docs/sniper/faq/transaction-error-messages) section for further explanation on the received error when attempting to buy or sell.
---
# Multi-Wallet
Source: https://www.maestrobots.com/docs/sniper/faq/multi-wallet.md
Section: Sniper
### How many wallets can I use?
You can connect or generate up to **4** wallets per chain as a base user (1 "Main" wallet + 3 additional wallets), and up to **6** wallets per chain as a [Premium](/docs/sniper/premium-subscription) user.
### Does multi-wallet work for Auto Snipe?
Yes. Please refer to the Multi-Wallet section for further information on how to enable this feature.
### Can I sell a token from all wallets at the same time?
Yes. The [☢️ _Sell_](/docs/sniper/trade-monitor/trade-monitor-menu#nuke-sell) button allows you to do so.
### Gas and slippage settings for multi-wallets
Your multi-wallets will follow the settings of your "Main" wallet. This is done to ensure uniformity between all your wallets.
---
# Security
Source: https://www.maestrobots.com/docs/sniper/faq/security.md
Section: Sniper
### Do I need to connect my wallet to the bot?
No. You can generate wallets directly in the bot.
### What security measures has the team taken?
All private keys are AES encrypted, and our servers' security is airtight.
### Are there any security concerns?
The only security concerns revolve around your actions. Make sure your Telegram is secure by enabling two-factor authentication. If you generate a wallet through the bot, do NOT share the private key or mnemonic phrase with anyone else, and only record it using **pen and paper**. **Never copy your wallet's private key or mnemonic phrase to your device's clipboard as this could compromise your wallet.** Your wallet's safety is completely in your hands.
### Where can I find my wallet's private key or mnemonic phrase?
Once you create a wallet through the bot, you will be provided with the wallet's private key and mnemonic phrase. We usually recommend that you write them down using **pen and paper**, and then delete the message from your DMs with the bot. If you lost the private keys and the mnemonic phrase to your wallet, and you've deleted them from your DMs with the bot, **there's unfortunately no other way to retrieve them**. **However, as long as your wallet is connected to the bot, you can still transfer all your assets out of it even if you don't have access to your private keys or mnemonic phrase. In this case, don't disconnect your wallet until you've transferred everything out of it.**
### I see transfers in my wallet that I haven't authorized.
If you're seeing small transfers of your chain's native coin (0.01 units for EVM chains, or 0.5 TON) to any of the Fee Addresses listed [here](/docs/sniper/faq/fees), then those are the 1% bot usage fees being extracted.
---
# Supported Chains and DEXs
Source: https://www.maestrobots.com/docs/sniper/faq/supported-chains-and-dexs.md
Section: Sniper
### Supported Chains
The bot currently supports eleven chains: Solana, BNB Smart Chain (BSC), Base, Ethereum, Monad, Sonic, Avalanche, Arbitrum, Hyper EVM, Tron (TRX) and TON.
### Supported DEXs and Launchpads
For each chain, the bot currently supports the following DEXs and launchpads:
| Chain | Supported DEXs and Launchpads |
| --- | --- |
| Solana | Raydium (V4, CP, CLMM) \| Raydium LaunchLab \| Jupiter \| Meteora (DLMM, DAMM v2) \| Pump.Fun \| Moonshot \| BoopFun \| Heaven \| Whirlpool \| FluxBeam \| Virtuals \| Dynamic Bonding Curve |
| BSC | Pancakeswap V2 \| Pancakeswap V3 \| Uniswap V2 \| Uniswap V3 \| Uniswap V4 \| SushiSwap \| FourMeme / SpringBoard |
| Base | Uniswap V2 \| Uniswap V3 \| Uniswap V4 \| SushiSwap V2 \| Aerodrome V2 \| Aerodrome Slipstream V3 \| Virtuals |
| Ethereum | Uniswap V2 \| Uniswap V3 \| Uniswap V4 \| SushiSwap V2 \| SushiSwap V3 \| Printr \| Virtuals |
| Monad | Uniswap V3 |
| Sonic | Uniswap V2 \| Uniswap V3 |
| Avalanche | Uniswap V2 \| Uniswap V3 \| Trader Joe V1 \| Trader Joe V2.1 |
| Arbitrum | Uniswap V3 \| SushiSwap V2 \| Camelot |
| Hyper EVM | Uniswap V2 \| Uniswap V3 |
| Tron | SunSwap V2 \| SunSwap V3 \| PancakeSwap V3 \| SunPump |
| TON | DeDust V2 \| STON.fi |
On Solana, the bot can also route trades through AMMs that aren't listed above — so in practice most SPL token pools remain tradable even if the underlying protocol doesn't appear explicitly in the list.
---
# Trade Monitor
Source: https://www.maestrobots.com/docs/sniper/faq/trade-monitor.md
Section: Sniper
### What's the difference between active and disabled trades?
Active trades benefit form access to live profit/loss tracking, _Auto Sell_ and _Buy Dip_ functionalities. However, disabled trades do not receive such benefits.
### Why was my trade disabled? How can I recover my trade?
Trades become "disabled" after 36 hours (96 hours for ⭐️Premium members). To get them back, try the following:
* Option #1 - Go back to the successful buy message and find the button that says Add to Monitor. Press it and the bot will add this trade back to the monitor. This will preserve the initials of your trade.
* Option #2 - Copy paste the CA and hit the [_Track_ ](/docs/sniper/pasted-contracts/token-report-menu#track)button. This will send the trade back to the trade monitor and the trade _Initial_ and _Worth_ will both be reset to the current worth of the token.
Remember to always press on the [_Refresh_ ](/docs/sniper/trade-monitor/trade-monitor-menu#refresh)button on your Trade Monitors before the time on the trade expires.
### If I disable/delete a trade, will the bot sell?
No. Disabling or deleting a trade means that _Auto Sell_ and _Buy Dip_ functionalities cannot activate anymore for the trade.
### What does the _Reset_ button do?
When you click on [_Reset_](/docs/sniper/trade-monitor/trade-monitor-menu#reset)_,_ the Trade Monitor will start showing the same information that you would see if you just clicked on the [_Track_](/docs/sniper/pasted-contracts/token-report-menu#track) button in the [token contract menu](/docs/sniper/pasted-contracts/token-report-menu). In other terms, whatever your tokens are _Worth_ at the time will become your _Initial_. This option can also combine your buys if you bought the same token multiple times. In addition, the _Reset_ button also resets the timer on your Trade Monitor and extends it for another 36 hours (96 hours for ⭐️Premium users).
### How can I check my trade monitors?
Send `/monitor` in your DM with the bot. If your trades expired or have been removed, you can get them back by trying the following:
* Option #1 - Go back to the successful buy message and find the button that says Add to Monitor. Press it and the bot will add this trade back to the monitor. This will preserve the initials of your trade.
* Option #2 - Copy paste the CA and hit the [_Track_ ](/docs/sniper/pasted-contracts/token-report-menu#track)button. This will send the trade back to the trade monitor and the trade _Initial_ and _Worth_ will both be reset to the current worth of the token.
Remember to always press on the [_Refresh_ ](/docs/sniper/trade-monitor/trade-monitor-menu#refresh)button on your Trade Monitors before the time on the trade expires.
### Can I create a Trade Monitor for a token I bought outside the bot?
Yes. Paste the token's contract address and press the [_Track_ ](/docs/sniper/pasted-contracts/token-report-menu#track)button.
### How can I activate a disabled trade?
Use [_Refresh_ ](/docs/sniper/trade-monitor/trade-monitor-menu#refresh)the button.
### How many trades can the monitor hold?
You are currently limited to **10** active trades (**30** active trades for ⭐️ Premium users). To clear space for new trades, make sure to delete active trades using the [_Delete_ ](/docs/sniper/trade-monitor/trade-monitor-menu#delete)button. The bot will also automatically replace disabled trades if you attempt to start another Trade Monitor while you're already at the limit.
### I made two buys of the same token. Can I combine them?
You can combine multiple buys of the same token on the trade monitor ONLY IF the buys came from the same wallet. For example, if you bought a token twice from the same wallet and are currently looking at two separate trade monitor panels for the same token, press [_Delete_ ](/docs/sniper/trade-monitor/trade-monitor-menu#delete)to remove one of the trades, then scroll over to the other trade and press [_Reset_](/docs/sniper/trade-monitor/trade-monitor-menu#reset). This will change the initial of that trade to match your current total worth of the token.
### My monitor always starts with Auto Sell turned off.
Trade Monitors are always linked to a channel. For example, if the buy was triggered by a call channel, then _Auto Sell_ and _Trailing Sell_ will follow the settings specified in that call channel's settings. Similarly, if the buy or tracking was triggered through the token contract menu, then _Auto Sell_ and _Trailing Sell_ will follow the settings specified in the `Me` channel settings. The same will also apply when the buy is triggered through a copytrade wallet or through a snipe. _Auto Sell_ and _Trailing Sell_ need to be enabled both in your [Wallet Sell Settings](/docs/sniper/global-settings/sell-settings) AND in your channel settings for the Trade Monitor to spawn with _Auto Sell_ and _Trailing Sell_ automatically enabled. If this is not the case, you can always manually enable, disable and setup the limits of _Auto Sell_ and _Trailing Selll_ directly through each Trade Monitor. **Always make sure that **_**Auto-Sell**_** and/or **_**Trailing Sell**_** has a green checkmark next to it on the Trade Monitor if you want the bot to auto-sell for you.**
---
# Transaction Error Messages
Source: https://www.maestrobots.com/docs/sniper/faq/transaction-error-messages.md
Section: Sniper
### Insufficient Output Amount
This can only occur on EVM-compatible chains. Your slippage tolerance is too low for this transaction. Either increase your slippage tolerance or increase your gas price/delta to gain more priority on the blockchain. If you're using _**Smart Slippage**_, remember that it requires high gas price/delta to work optimally.
### Excessive/Insufficient Input Amount
This can only occur on EVM-compatible chains. This happens when the bot attempts to buy an exact number of number of tokens, but the token's volatility turns out to be too extreme, even with your slippage taken into consideration. For example, assume that you want to buy exactly 1 token, and the current price for that 1 token is 1 BNB. With 100% slippage, the bot will allow you to pay up to 2 BNB to get that token. If the token's volatility is too extreme that even 2 BNB isn't enough to purchase 1 token, the transaction will fail. You can set slippage to higher than 100% as described [here](/docs/sniper/faq/wallet-settings#can-i-set-slippage-to-more-than-100).\
\
This error can also show up in certain copytrade scenarios. If the tracked wallet is sniping Block-0 of a launch with an exact token buy (demands a specific amount of tokens and over-sends native amount to the router), the bot will attempt a similar transaction and try to buy the exact same amount of tokens specified by the tracked wallet, but it will send the minimum between your copytrade _Buy Amount_ and the native amount sent by the tracked wallet. **If you set your copytrade **_**Buy Amount**_** too low, it won't be enough to secure the tokens you've requested, and you'll receive this error.**
For sells, it can happen when the contract forces your wallet to sell 0 tokens. This often implies that you've been scammed.
### Insufficient funds for gas \* price + value
This can only occur on EVM-compatible chains. Your wallet doesn't have enough funds to cover the transaction value and its gas fees. If you think you have enough, double check your gas settings and compare the potential gas fees to your wallet's native balance.
### Transfer Failed / Transfer From Failed
This can only occur on EVM-compatible chains. This error can happen for a multitude of reasons. We mention a few here:
* Trade hasn't been enabled yet.
* The transaction would've caused your wallet to exceed the contract's max wallet.
* There's a maximum allowed gas price on the contract.
* There's a transaction cooldown on the contract.
* For sells, the maximum allowed sell might be smaller than your attempted transaction.
* For sells, you may have already sold (press Reset on the Trade Monitor to ensure that you're looking at current values).
* You got blacklisted, or the token became a honeypot.
### Underpriced Transaction
This can only occur on EVM-compatible chains. This error happens when you attempt a transaction while another transaction from the same wallet is already pending. The bot supports only one transaction per wallet at any given time for EVM-compatible chains. The latter doesn't apply for Solana and TON.
### Transaction requires more gas than the max
This can only occur on EVM-compatible chains. If the bot detects that a transaction would require more gas than your chosen [_Max Gas Limit_](/docs/sniper/global-settings/general-settings#max-gas-limit), it will block the transaction immediately and display this error.
### Too\_Little\_Received
This can only occur on EVM-compatible chains. This error will be returned when the bot detects that a buy or sell will yield in 0 tokens or native amount in return.
### Insufficient lamports
This can only occur on Solana. Your wallet doesn't have enough funds to cover the transaction value, fees/tip and bot taxes which are extracted per transaction for Solana.
### Too Little (Much) SOL received (required) to sell (buy) the given amount of tokens
This can only occur on Solana. Your slippage tolerance is too low for this transaction. Either increase your slippage tolerance or increase your gas delta to gain more priority on the blockchain.
### HIGH PRICE IMPACT ALERT
As an additional layer of protection, the bot will automatically display an alert for **manual and automated buys** when the estimated price impact of the trade is beyond the value of [_**Price Impact Alert**_](/docs/sniper/global-settings/buy-settings#price-impact-alert). This alert can be bypassed by manually forcing the trade through. By default, _**Price Impact Alert**_ is set to 25% for buys but you can tune the value to effectively control the threshold at which the alert will be displayed. The exact thing applies for **manual and automated sells** where the default value of [_**Price Impact Alert**_](/docs/sniper/global-settings/sell-settings#price-impact-alert) is set to 50%.
---
# Wallet Settings
Source: https://www.maestrobots.com/docs/sniper/faq/wallet-settings.md
Section: Sniper
### Can I use the same wallet on multiple chains?
Yes, you can use the same wallet for all the EVM-compatible chains supported in the bot. These would be BSC, Base, Ethereum, Monad, Sonic, Avalanche, Arbitrum and Hyper EVM. You can use the private key or mnemonic phrase to connect the same wallet on these chains, or simply use the "[Import Cross-Chain](/docs/sniper/wallet-setup#import-cross-chain)" feature which allows you to easily import wallets from one compatible chain to another. A third way is to use the `/import` command. This command allows you to import an already connected wallet on one EVM-compatible chain to another one. It requires 4 arguments: Origin chain, Origin wallet name, Destination chain and Destination wallet name.
For example, if you want to import your "Main" wallet from BSC to ETH and name it "Wallet1" you would send `/import BSC main ETH Wallet1` in your DMs with the bot.
This is also useful in case you've transferred your funds by mistake to the wrong EVM-compatible chain and you'd like to recover them.
### What's _Gas Price_?
_Gas price_ determines your transactions' priority on BSC. The higher the price, the quicker the transactions will go through, but you’ll have to pay higher gas fees.
On every other EVM-compatible chain and on Solana, you'll encounter _**Gas Delta**_ instead of _**Gas Price.**_
### What's _Gas Delta_?
For EIP-1559 EVM chains (Base, Ethereum, Monad, Sonic, Avalanche, Hyper EVM), _Gas Delta_ will act as the max priority gwei on a Type-2 transaction. Essentially, the bot will automatically adjust to the current gas average, and then add the chosen _Gas Delta_ on top of it. Example:
* Gas average is 10 gwei
* Set _Gas Delta_ to 3 gwei for example
* Your transaction’s gas price will now be 10 (base) + 3 (priority) gwei
Higher deltas will yield higher transaction speeds at the cost of higher gas fees.
On Arbitrum, _Gas Price/Delta_ is completely irrelevant since the chain operates on a First-Come-First-Serve basis. More details on the subject can be found [here](https://research.arbitrum.io/t/transaction-ordering-policy/127).
On **Solana**, there is a minimum fixed transaction fee of 0.000005 SOL, but you have the ability to pay an additional fee through _Gas Delta_ to boost your transaction and achieve quicker execution times. For example, if you set your _Gas Delta_ to 0.01 SOL, you will end up paying 0.010005 SOL as transaction fees.
On **TON**, the bot will always send 0.2 TON as a reserve for transaction fees, and the remaining amount will be credited back to your wallet. Similarly, the transaction fee for TRON cannot be preset.
### What's _Max Gas Limit_?
This is available on every EVM-compatible chain, and it is the maximum amount of gas units you're willing to consume for the transaction. Since the bot can optimally determine this value, you don't need to bother with it, unless you want to block contracts that require a lot of gas.
### What's _Smart Slippage_?
This feature is available on _ETH, BSC, Base, Avalanche_ and _Arbitrum_. It overrides your custom slippage and automatically adjusts it based on the token's taxes and your price impact. It is very convenient for quick swaps and casual call channel sniping, as it can protect you from frontrunning bots. However, it is not suitable for highly volatile situations like stealth launches and auto-snipes. For these cases, please disable _Smart Slippage_ and specify a suitable slippage tolerance. **If you want to use **_**Smart Slippage**_**, we suggest you pair it with a high **_**Gas Price/Delta**_**.**
### Can I set slippage to more than 100%?
Yes, but this will only have an impact in situations where you're trying to buy an exact amount of tokens, which happens with auto-snipes that use specific token amounts instead of exact native amounts, as well as using the [_Ape Max_](/docs/sniper/pasted-contracts/token-report-menu#ape-max) and [_Buy X Token_](/docs/sniper/pasted-contracts/token-report-menu#buy-x-tokens) buttons. When slippage is set to `X00`% and you set a specific token amount, the bot will detect the native amount needed to buy that specific token amount, and then send `(X+1) * the detected native amount` to secure your buy. For example, you wish to buy exactly 100 tokens, and the bot detects that 100 tokens cost 0.1 ETH. If your slippage is set to 200%, the bot will send 0.3 ETH (3\*0.1) to secure your buy. The router will then use whatever ETH amount it needs to get 100 tokens, and the remaining ETH will be sent back to your wallet.
If you're buying with exact native amounts instead, then setting slippage to more than 100% is simply equivalent to 100% (which implies that you're willing to accept 0 tokens for whatever exact native amount you're paying).
### Do I need to adjust all the settings?
No. You can leave them on default/disabled. However, tailoring the bot using these settings makes for a more focused and profitable experience.
### How can I withdraw funds from my wallet?
Head to the `/start` menu, click on _Wallets_, and select your chain of interest. Then, click on "⚙️ Wallet Name" button for the wallet that you want to transfer funds from and you will be re-directed to a menu which allows you to transfer native and token amounts out of your wallet to any other wallet address. You can specify the amount to be transferred either in raw values or as a percentage of your holdings in that wallet.
### How to transfer native or tokens to another wallet?
Simply paste the **receiving wallet address** in your DM with the bot and you will be provided with a Wallet Summary panel which allows you to transfer native and token amounts **from any of your connected wallets** to the receiving wallet.
### How can I disconnect my wallet?
To disconnect any of your wallets: `/start` ➡️ _Wallets_ ➡️ Select chain ➡️ _Delete_ ❌.
If you need to connect the wallet elsewhere, make sure you have access to your private keys and mnemonic phrase BEFORE disconnecting the wallets. Otherwise, transfer all your funds out of the wallet and then proceed with disconnecting it from the bot.
### How can I check my currently active limit orders?
Send `/orders` in your DM with the bot to receive a summary on your currently active sell and limit buy orders.
### How can I check my currently active trade monitors?
Send `/summary` in your DM with the bot to receive a summary on your currently active Trade Monitors.
### How can I check my currently active auto-snipes?
Send `/autosnipe` in your DM with the bot to receive a summary on your currently active auto-snipes.
---
# 🔀 Funds Management
Source: https://www.maestrobots.com/docs/sniper/funds-management.md
Section: Sniper
> Move funds between your connected wallets in bulk — either fanning out from one wallet or sweeping in to one.
**Funds Management** is a pair of commands for moving native coin or tokens between your connected wallets in bulk. Instead of opening each wallet panel one by one, you point the bot at a source (or a destination) and a list, and it builds the transfers for you.
## Disperse: One Wallet to Many
Send **`/disperse`** in your DM with the bot to send funds from one of your connected wallets to many other wallets in a single flow. The bot will ask you to pick the source wallet, the target wallets, and the amount — either as a fixed native amount per recipient, or as a percentage of the source balance to split.
This is the quickest way to **fund a set of multi-wallets** before a launch, or to distribute gas to fresh wallets.
## Collect: Many Wallets to One
Send **`/collect`** in your DM with the bot to sweep funds **from many of your connected wallets into one**. Pick the destination wallet and the source wallets, and the bot will drain each source by the amount or percentage you specify.
This is the quickest way to **consolidate scattered balances** back into a main wallet after a multi-wallet campaign.
> **WARNING: Leave gas behind**
>
> When collecting native coin, always leave a small buffer in each source wallet for future transactions. Sweeping 100% of a wallet's native balance in one go will leave it unable to pay gas for its own sweep transaction, and the collect will fail for that wallet.
## Supported Assets
Both **`/disperse`** and **`/collect`** work on native coin and on the tokens the bot currently tracks for you. If a token isn't visible in the selection list, paste its contract into the bot first to register it, then re-run the command.
---
# 🚀 Getting Started
Source: https://www.maestrobots.com/docs/sniper/getting-started.md
Section: Sniper
> How to launch Maestro, enable the chains you want to trade on, and find the DEXs and launchpads supported on each.
## Starting the Bot
To begin, head to [Maestro Bot](https://t.me/maestro) and click on "**Start**". The bot will reply to you with a Captcha that you need to solve for verification as shown in the example below:
Next, reply to the welcome message with the Captcha solution to complete the verification process. If the verification fails, the bot will give you three more attempts. After that, the bot will go idle for a minute and you can only re-trigger the verification process after that minute passes by sending `/start` in your DMs with the bot. Once verification is successful, the bot will reply to you with the following message:
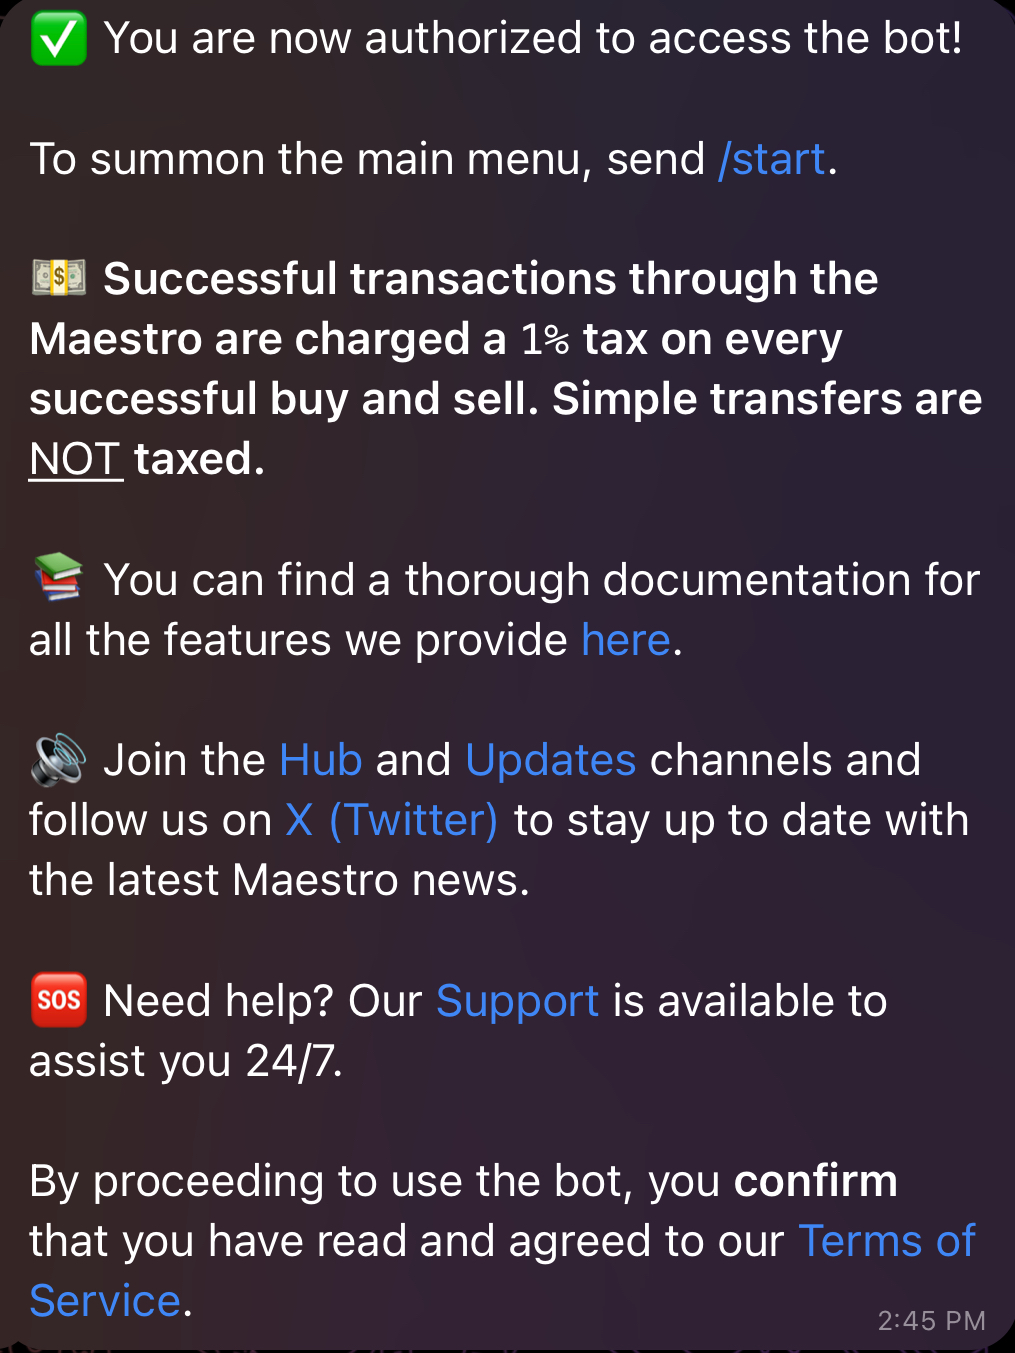
As the message states, you can now proceed to send `/start` in your DMs with the bot to spawn the main menu displayed below:
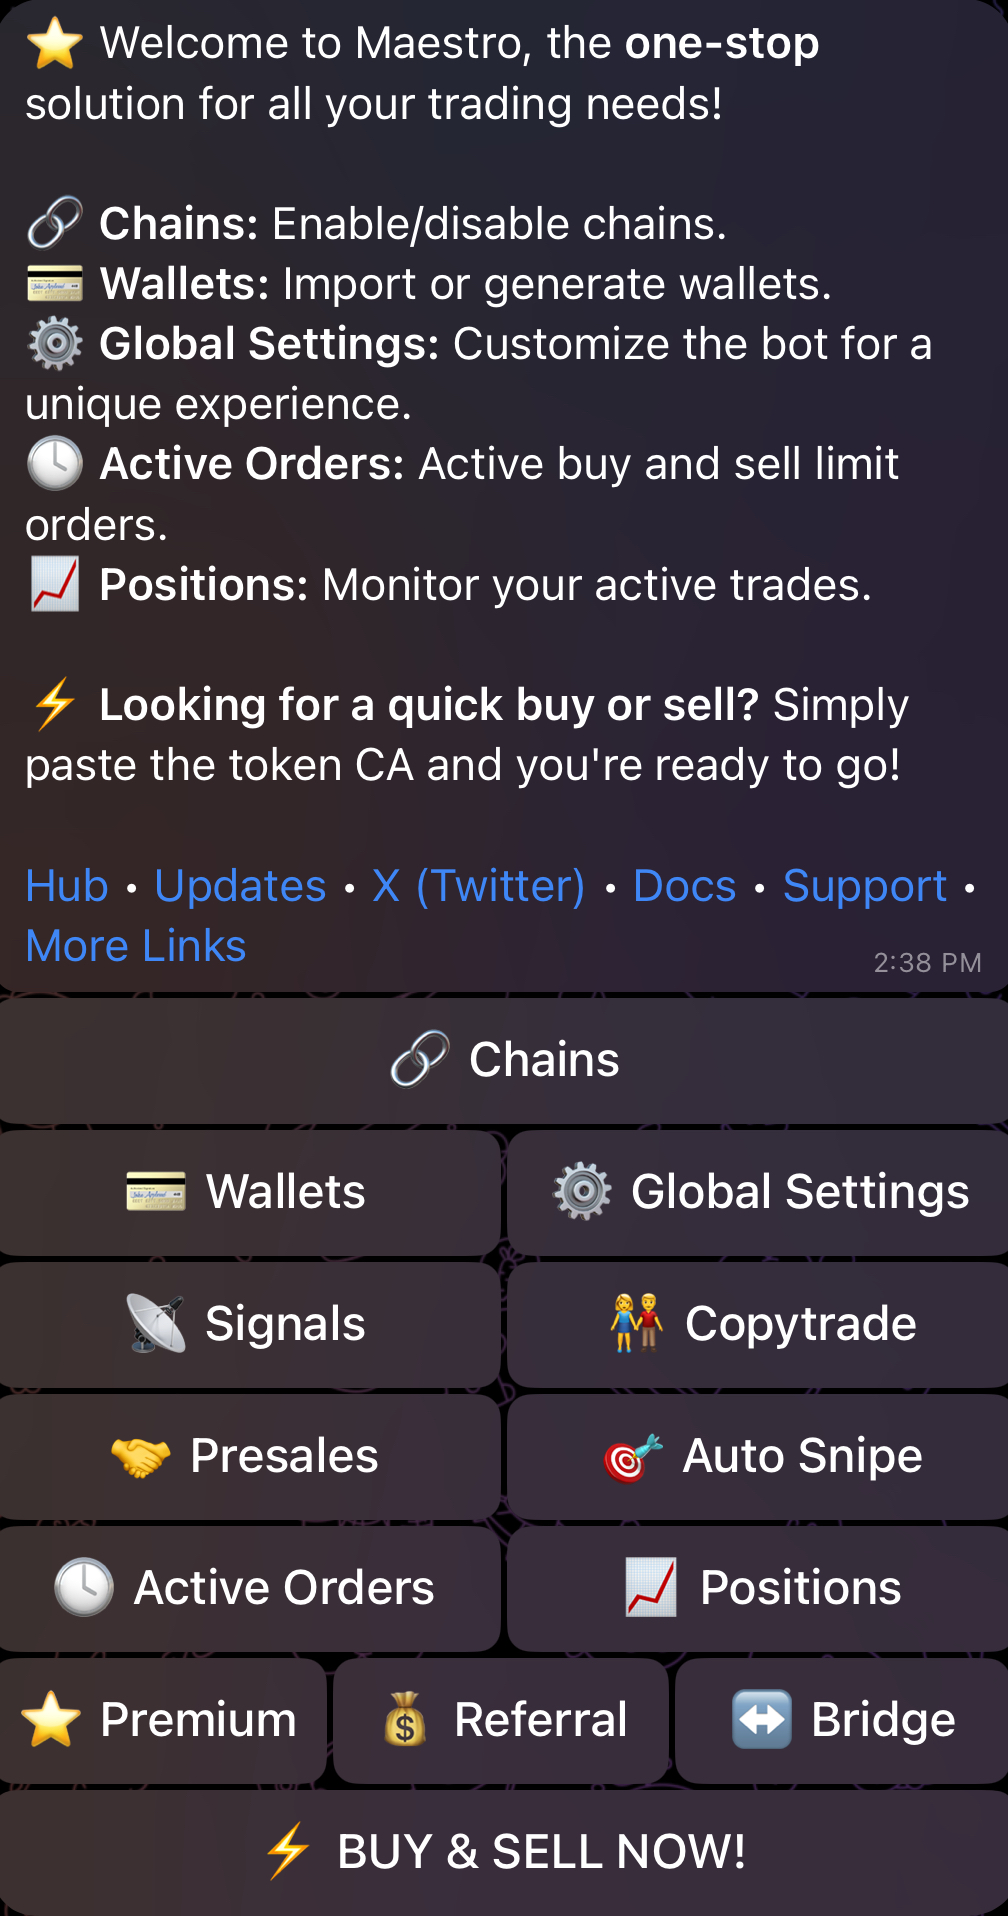
From here, the main buttons are:
* **🔗 Chains** — enable or disable chains and set up their wallets.
* **💳 Wallets** — import or generate wallets for each enabled chain.
* **⚙️ Global Settings** — configure gas, slippage and trade defaults that apply across your wallets.
* **📡 Signals**, **👫 Copytrade**, **🎯 Auto Snipe** — the bot's automated trading modes.
* **🕓 Active Orders** and **📈 Positions** — check your active limit orders and monitored trades.
* **↔️ Bridge** — cross-chain swaps powered by deBridge.
* **⭐️ Premium** — upgrade to Premium for higher limits and exclusive features.
* **💰 Referral** (and **💸 Cashback**, when active) — earn from referrals and claim rebates on your trading fees.
* **⚡ BUY & SELL NOW!** — paste a contract address to open the token's trade panel.
## Enabling/Disabling Chains
By selecting **🔗 Chains** from the Main Menu, you can enable or disable chains based on your preference as shown in the figure below. Alternatively, you can reach this menu by sending the command `/chains` in your DMs with the bot. The bot currently supports eleven chains: _Solana_, _BNB Smart Chain (BSC)_, _Base_, _Ethereum_, _Monad_, _Sonic_, _Avalanche_, _Arbitrum_, _Hyper EVM_, _Tron (TRX)_ and _TON_. By default, these chains are displayed as options for each of the bot's functionalities, but you can limit this to your chains of interest by disabling chains that you don't currently trade on. In addition, you have the option to import an existing wallet or generate a new one by clicking on the "**💳 Wallets**" button which appears next to each chain, as shown below. We go over the process of setting up a wallet in detail in Section [2](/docs/sniper/wallet-setup).
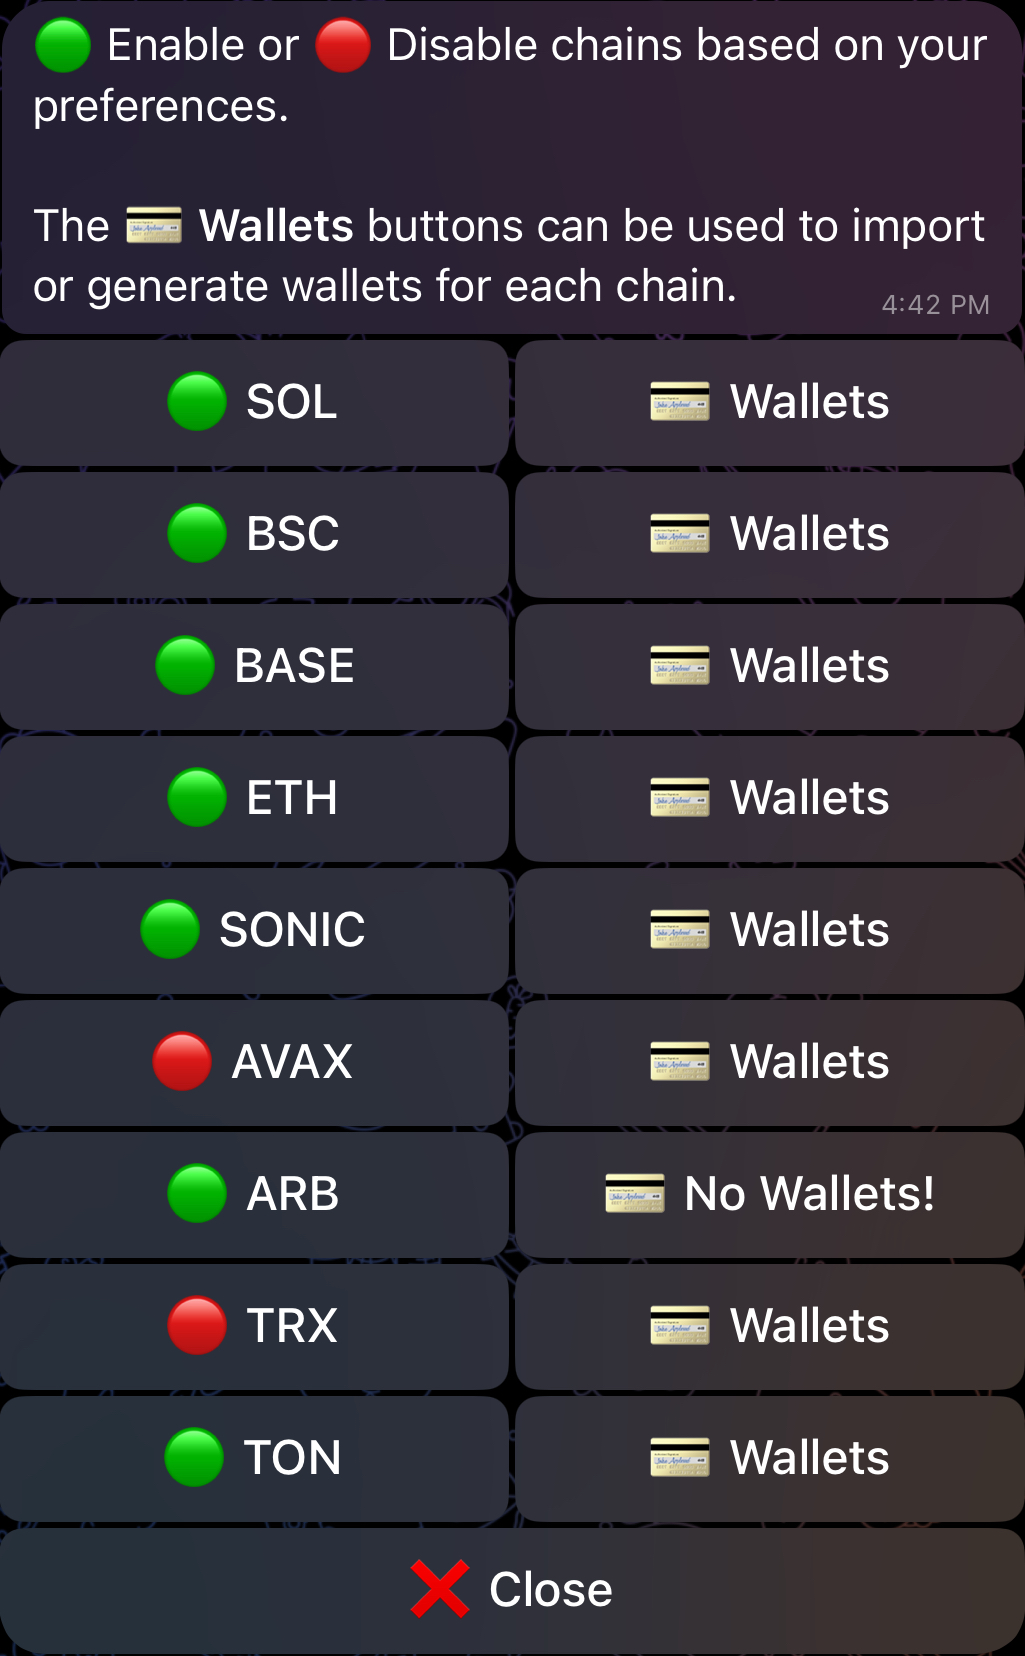
**With the exception of **_**TON**_**, **_**Solana**_ **and **_**Tron**_**, all the remaining supported chains will be referred to as "EVM-compatible chains" throughout this documentation.**
## Supported DEXs and Launchpads
For each chain, the bot currently supports the following DEXs and launchpads:
| Chain | Supported DEXs and Launchpads |
| --- | --- |
| Solana | Raydium (V4, CP, CLMM) \| Raydium LaunchLab \| Jupiter \| Meteora (DLMM, DAMM v2) \| Pump.Fun \| Moonshot \| BoopFun \| Heaven \| Whirlpool \| FluxBeam \| Virtuals \| Dynamic Bonding Curve |
| BSC | Pancakeswap V2 \| Pancakeswap V3 \| Uniswap V2 \| Uniswap V3 \| Uniswap V4 \| SushiSwap \| FourMeme / SpringBoard |
| Base | Uniswap V2 \| Uniswap V3 \| Uniswap V4 \| SushiSwap V2 \| Aerodrome V2 \| Aerodrome Slipstream V3 \| Virtuals |
| Ethereum | Uniswap V2 \| Uniswap V3 \| Uniswap V4 \| SushiSwap V2 \| SushiSwap V3 \| Printr \| Virtuals |
| Monad | Uniswap V3 |
| Sonic | Uniswap V2 \| Uniswap V3 |
| Avalanche | Uniswap V2 \| Uniswap V3 \| Trader Joe V1 \| Trader Joe V2.1 |
| Arbitrum | Uniswap V3 \| SushiSwap V2 \| Camelot |
| Hyper EVM | Uniswap V2 \| Uniswap V3 |
| Tron | SunSwap V2 \| SunSwap V3 \| PancakeSwap V3 \| SunPump |
| TON | DeDust V2 \| STON.fi |
> **INFO**
>
> On Solana specifically, the bot can also route trades through AMMs that aren't listed above — so in practice most SPL token pools remain tradable even if the underlying protocol doesn't appear in the list.
---
# ⚙️ Global Settings
Source: https://www.maestrobots.com/docs/sniper/global-settings.md
Section: Sniper
> Configure the general settings of the bot as well as the settings of your buys, sells and approves.
Global Settings are common to all of your connected wallets, and they are categorised into _**General**_, _**Buy**_ _**Sell**_, and _**Approve**_ (Only for EVM-compatible chains) groups as shown below.
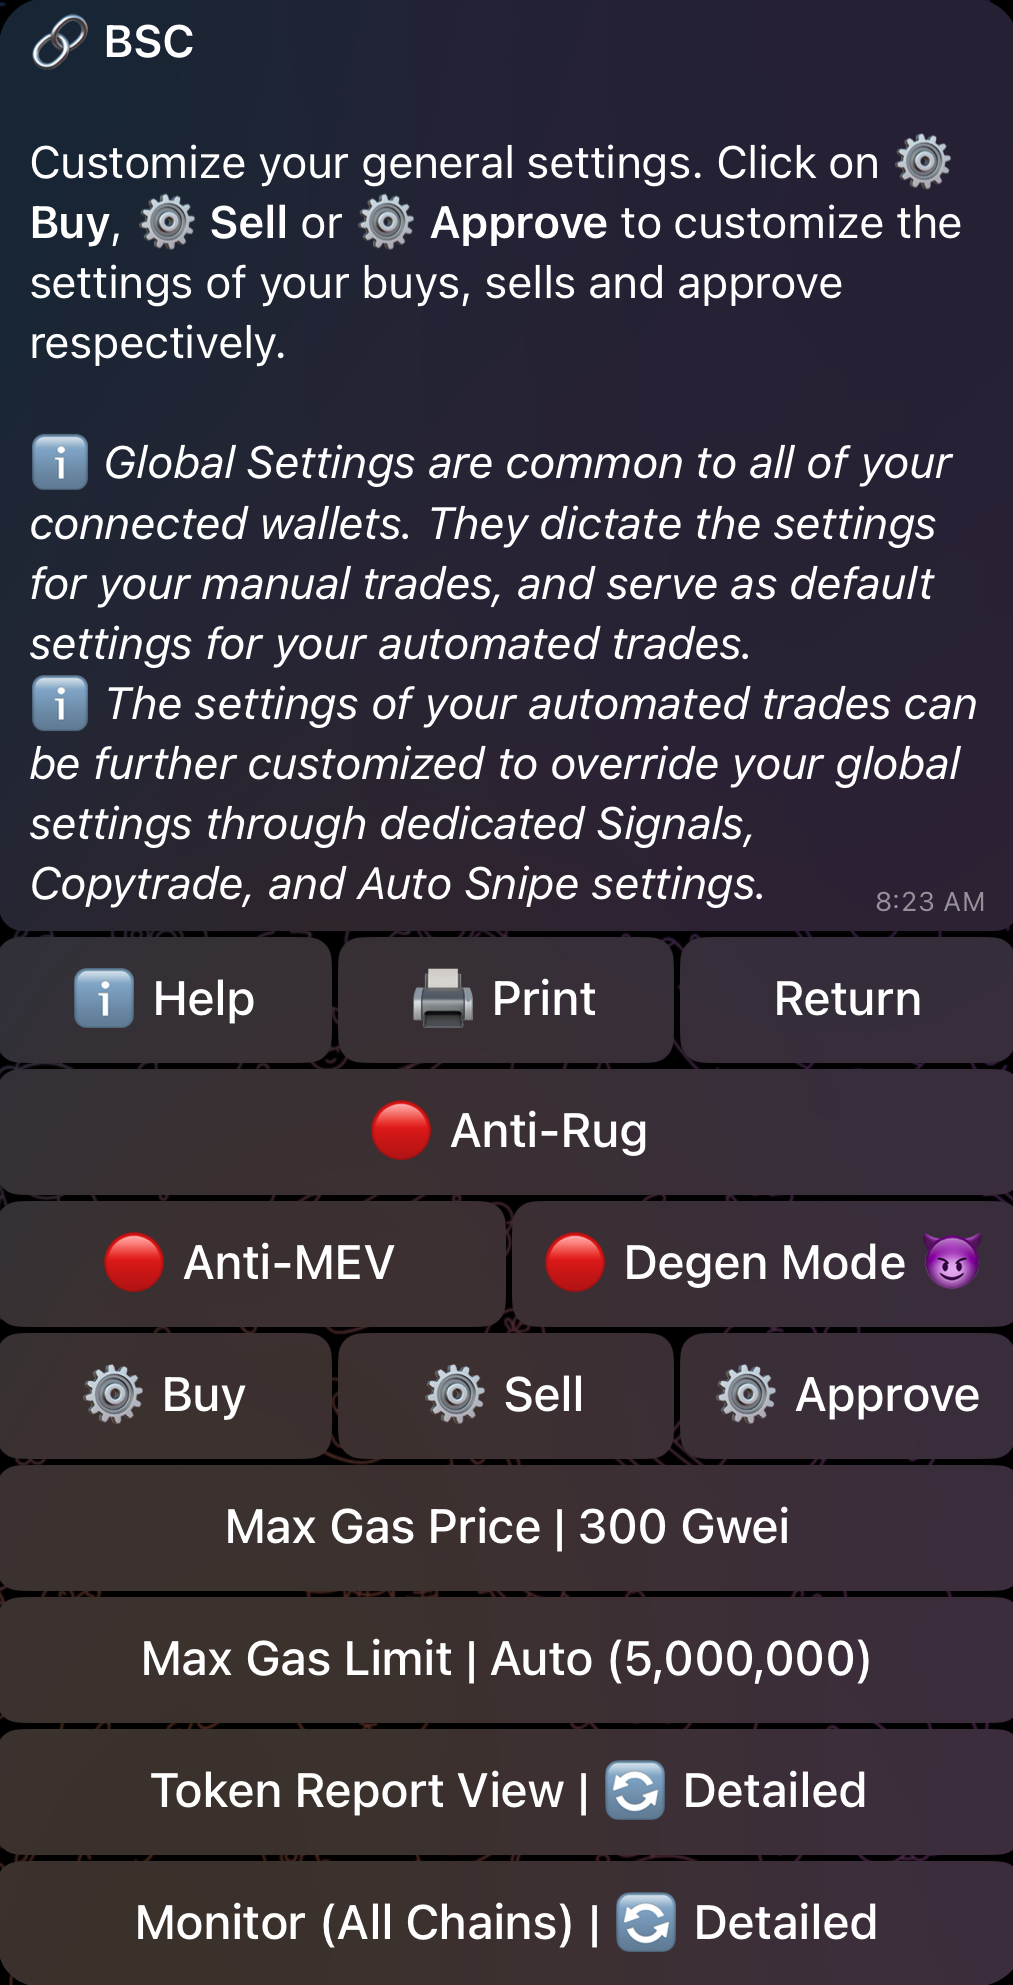
- [General Settings](/docs/sniper/global-settings/general-settings)
- [⚙️ Buy Settings](/docs/sniper/global-settings/buy-settings)
- [⚙️ Sell Settings](/docs/sniper/global-settings/sell-settings)
- [⚙️ Approve Settings](/docs/sniper/global-settings/approve-settings)
After you adjust these global settings to your liking, you can then proceed to trade with the bot.
---
# Approve Settings
Source: https://www.maestrobots.com/docs/sniper/global-settings/approve-settings.md
Section: Sniper
> Exclusive to EVM-Compatible Chains
Pressing the ⚙️ _Approve_ button reveals the menu shown below:
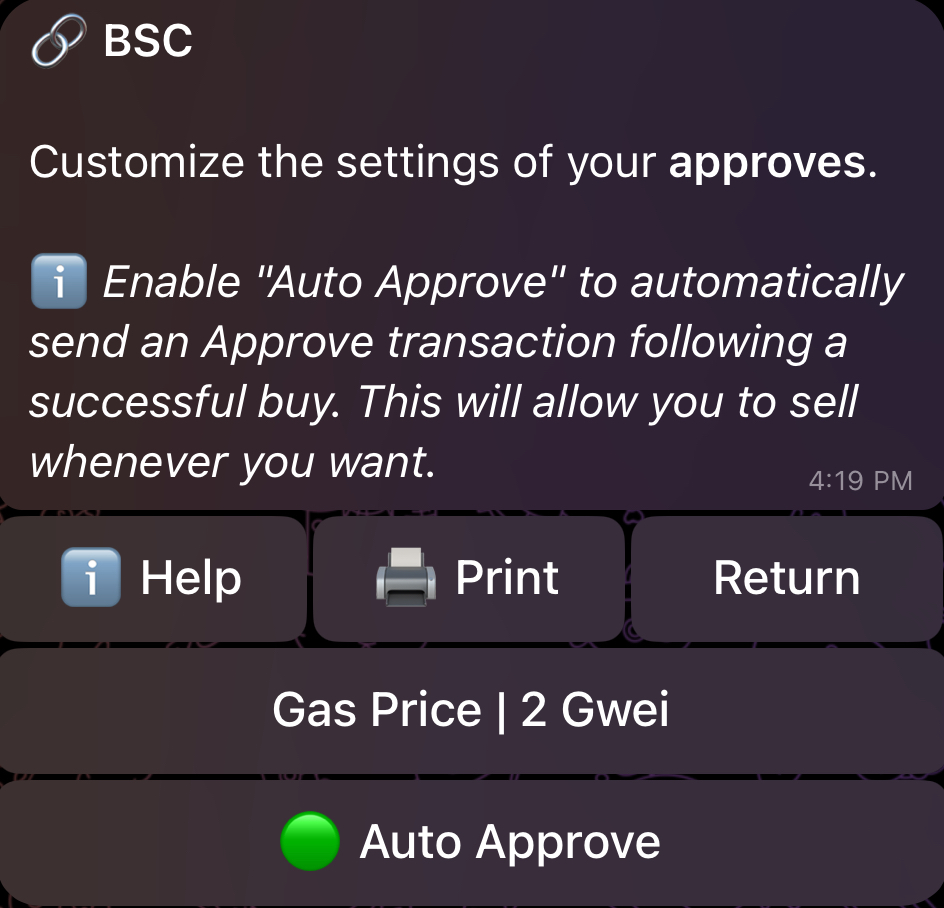
We explain the available options below:
### 🟢 | 🔴 **Auto Approve**
In order to sell tokens, you NEED to send a suitable approval transaction beforehand. When _Auto Approve_ is enabled 🟢, the bot will immediately and automatically send an _Approve_ transaction after a successful buy, which allows you to sell whenever you want to from that point onwards. If disabled 🔴, you’ll have to _Approve_ manually after you buy. Enabling _Auto Approve_ makes the bot easier to use overall, and is basically required for people who wish to benefit from _Auto Sell_.
### **Gas Price/Delta**
This allows you to control the transaction priority of your _Approve_ on **BSC** with _Gas Price_, and on every other EVM-compatible chain with _Gas Delta_. You don’t need to use high values for this, especially if you have _Auto Approve_ enabled.
Some final words on _Global Settings_:
* **You can configure the **_**Gas Price**_** (BSC) and **_**Gas Delta**_** (every other EVM-compatible chain) for **_**Buys**, **Sells**, and **Approves**_ separately.
* **It is important to note that if there are taxes on the token you auto-buy, then you will start with a loss. For example, if the buy tax is 15%, then you will start with a loss of -15% immediately when the buy happens. If your stop loss order is very strict, you might trigger an immediate auto-sell, so be careful.**
* **When using custom slippage on EVM-compatible chains, ensure that your slippage is at least equal to the token's buy tax, otherwise, your transaction will fail. This applies to both manual and automated buys, but does not hold for auto-snipes where your slippage can be lower than that of the token's buy tax.**
* **These settings are global and affect the behavior of Signals and Copytrade, but you can override them by adjusting the settings in dedicated Signals and Copytrade settings. This is described later in Sections** [**5**](/docs/sniper/signals) **and** [**8**](/docs/sniper/copytrade)**.**
---
# Buy Settings
Source: https://www.maestrobots.com/docs/sniper/global-settings/buy-settings.md
Section: Sniper
Selecting the ⚙️ _Buy_ button reveals the following menu:
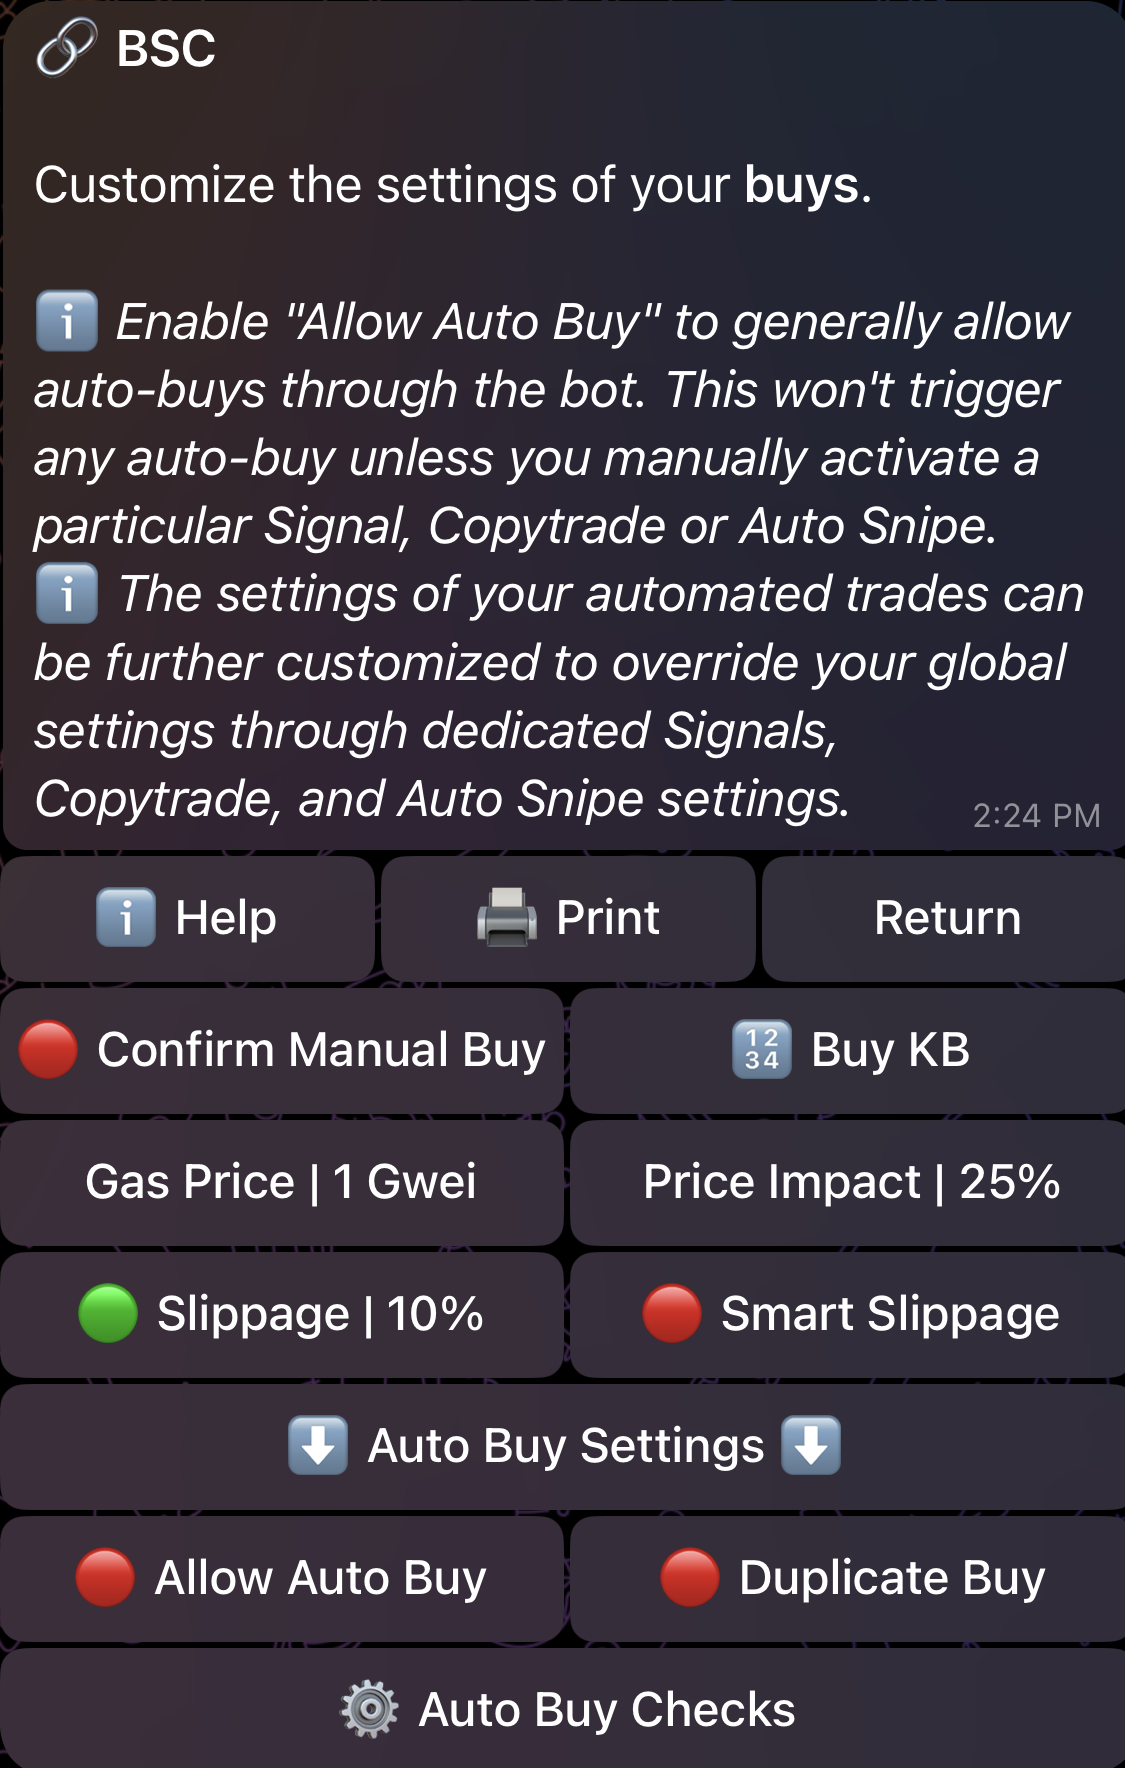
The _Buy_ menu offers a multitude of different configuration options that give you complete control over your purchase preferences. We explain these options below:
### 🟢 | 🔴 Confirm Manual Buy
If enabled 🟢, any buy buttons you press will require an additional confirmation. This can protect you from accidentally clicking buy buttons. **This only impacts manual buys and does NOT interfere with **_**Auto Buy**_**.**
### 🔢 Buy KB
Assign customized values to the buy keyboard as shown below. You also have the option to reset the values to the default ones.
### **Gas Price**
_Exclusive to BSC_
Choose the preferred gas price you would like to use. Your gas price determines your transactions’ priority on the blockchain. The higher the price, the quicker the transactions will go through, but you’ll have to pay higher gas fees.
On all other EVM-compatible chains, you'll encounter _**Gas Delta**_ instead of _**Gas Price**_:
### **Gas Delta**
_Available on Base, Ethereum, Monad, Sonic, Avalanche, Hyper EVM and Solana_
For **EIP-1559 EVM chains** (Base, Ethereum, Monad, Sonic, Avalanche, Hyper EVM), _Gas Delta_ will act as the max priority gwei on a Type-2 transaction. Essentially, the bot will automatically adjust to the current gas average, and then add the chosen _Gas Delta_ on top of it. Example:
* Gas average is 10 gwei
* Set _Gas Delta_ to 3 gwei for example
* Your transaction’s gas price will now be 10 (base) + 3 (priority) gwei
Higher deltas will yield higher transaction speeds at the cost of higher gas fees.
On Arbitrum, _Gas Price/Delta_ is completely irrelevant since the chain operates on a First-Come-First-Serve basis. More details on the subject can be found [here](https://research.arbitrum.io/t/transaction-ordering-policy/127).
On **Solana**, there is a minimum fixed transaction fee of 0.000005 SOL, but you have the ability to pay an additional fee through _Gas Delta_ to boost your transaction and achieve quicker execution times. For example, if you set your _Gas Delta_ to 0.01 SOL, you will end up paying 0.010005 SOL as transaction fees.
On **TON**, the bot will always send 0.2 TON as a reserve for transaction fees, and the remaining amount will be credited back to your wallet. Similarly, the transaction fee for TRON cannot be preset.
### Price Impact Alert
As an additional layer of protection, the bot will automatically display an alert for **manual and automated buys** when the estimated price impact of the trade is beyond the value of _**Price Impact Alert**_. This alert can be bypassed by manually forcing the trade through, as shown in the figure below. By default, _**Price Impact Alert**_ is set to 25% for buys but you can tune the value to effectively control the threshold at which the alert will be displayed.
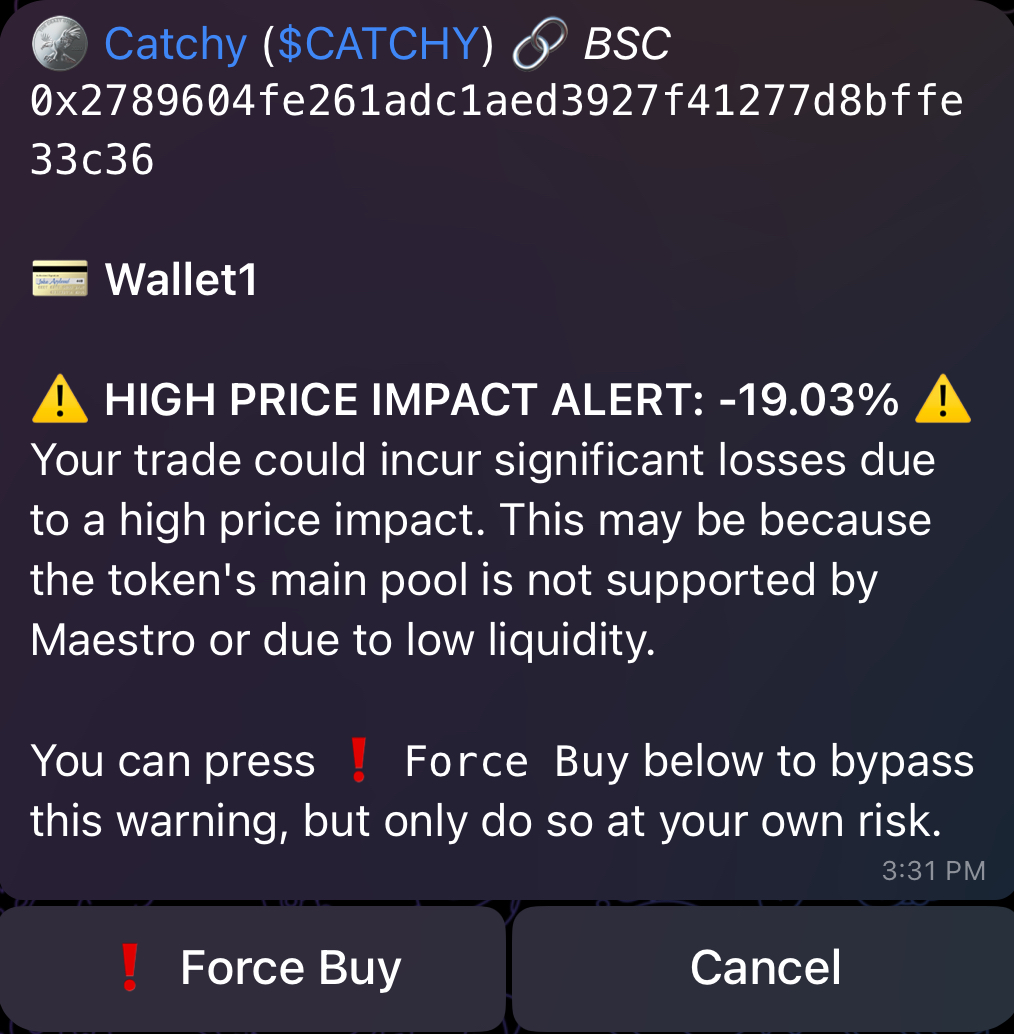
### 🟢 | 🔴 Slippage
Choose the slippage tolerance for your buys. In some chains, using extremely high slippage values is dangerous since you can get frontrun by MEV bots, so please use a suitable value, or utilize _Smart Slippage_.
### 🟢 | 🔴 Smart Slippage
_Available on ETH, BSC, Base, Avalanche and Arbitrum_
This allows slippage to automatically adjust based on the token’s taxes and the price impact of your trade. This is not suitable for volatile situations like launches and snipes. We recommend you pair it with high _Gas Price/Delta_. **Keep in mind that **_**Smart Slippage**_** overrides any custom slippage values you might have selected earlier.** In other terms, when _Smart Slippage_ is enabled 🟢, _Slippage_ is disabled 🔴 and vice versa.
**In most cases, manual buys will rely on the **_**Gas Price/Delta**_** and **_**Slippage**_** settings specified in your **_**Global Buy Settings**_**, so make sure you configure them properly.**
### 🟢 | 🔴 Allow Auto Buy
If enabled 🟢, auto-buys will now be allowed to trigger for pasted contracts, signals, and/or copytrade wallets that you have set up. However, enabling this does **NOT** force you to auto-buy UNLESS you have also enabled _Auto Buy_ for pasted contracts, signals and/or copytrade wallet (more on this in Sections [5](/docs/sniper/signals) and [8](/docs/sniper/copytrade)). If you want to allow auto-buys in general, make sure that _Allow_ _Auto Buy_ is enabled 🟢 here as a first step.
### ⚙️ Auto Buy Checks
Includes optional checks and limits that you can set up for _Auto Buy_, as shown in the figure below. If any of the enabled limits is not met, _Auto Buy_ won't trigger.
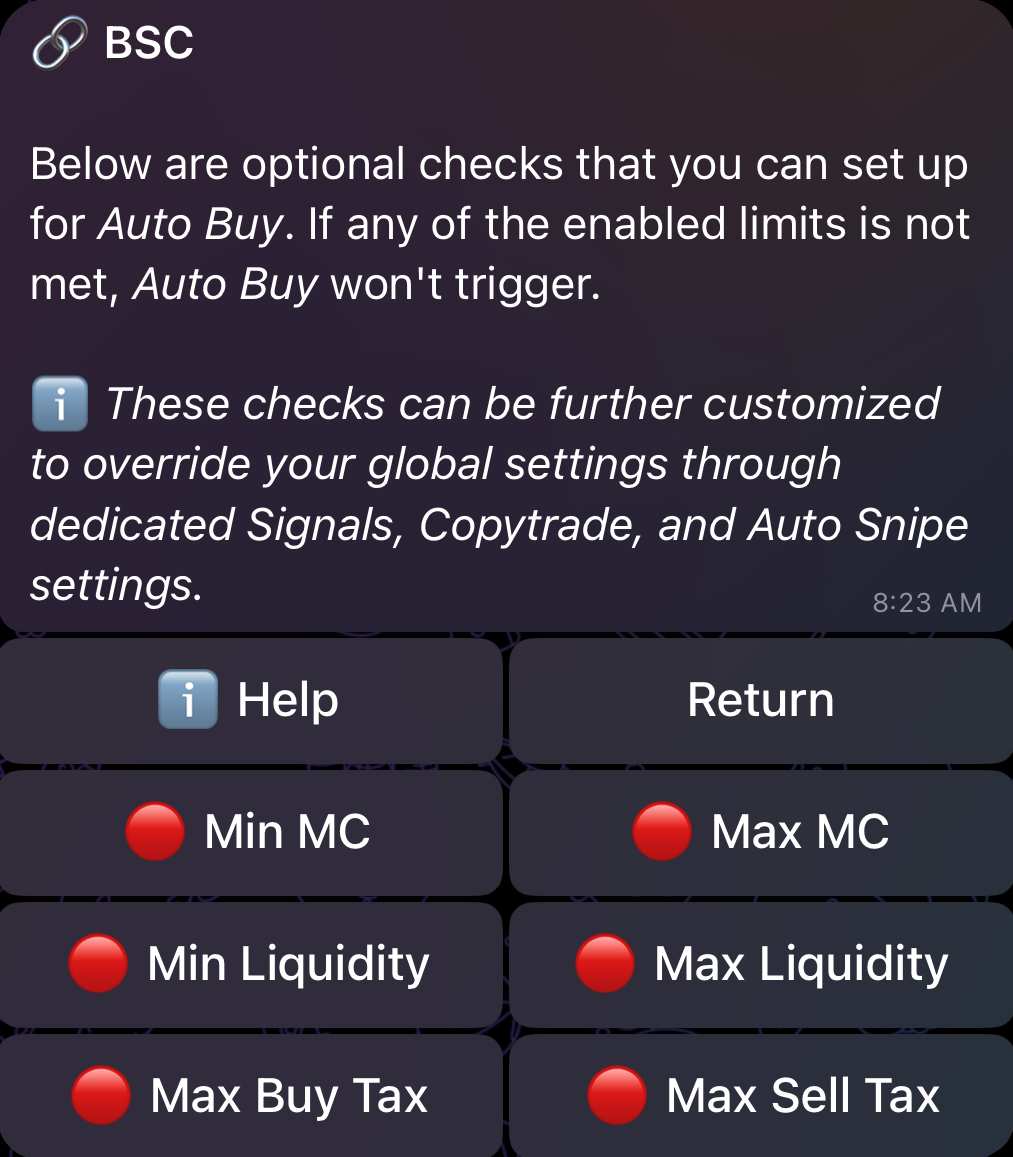
#### Min and Max MC
Choose the minimum and maximum marketcap the bot can auto-buy. **This will not impact manual buys.**
#### Min and Max Liquidity
Choose the minimum and maximum liquidity the bot can auto-buy. **This will not impact manual buys.**
#### Max Buy/Sell Tax
_Available on every EVM-compatible chain_
Choose the maximum buy/sell tax the bot can auto-buy. This is a very important feature, as it can block contracts with high buy/sell tax. **This will not impact manual buys.**
### 🟢 | 🔴 Duplicate Buy
If disabled 🔴, the bot will block auto-buys for any token that you have a positive balance of. This protects you from situations where multiple call channels post the same token, or a copytrade wallet makes multiple purchases of the same project. To turn this protection off, enable ✅ _Dupe Buy_.
This wraps up the _Global Buy Settings._ We can now move on to the _Global Sell Settings_.
---
# General Settings
Source: https://www.maestrobots.com/docs/sniper/global-settings/general-settings.md
Section: Sniper

### 🟢 | 🔴 **Anti-MEV**
_**Exclusive to Ethereum and Solana**_
* **Ethereum**: For **Ethereum**, Anti-MEV is force-enabled and **cannot be disabled**. In this case, the bot will route your transactions through a private relay, and your transactions will not be broadcast on mempool. This technique will guard against MEV/sandwich bots and avoid pesky copytraders.
* **Solana**: If enabled, the bot will route your transaction through private relays (Jito, Temporal or NextBlock). This technique will guard against MEV/sandwich bots.
### 🟢 | 🔴 Degen Mode 😈
The bot normally blocks automated buys (auto-buys) of a token if it detects honeypots, blacklist risks, or unhealthy liquidity. However, some users have requested the removal of these “training wheels” to allow them to go _full degen_. This is what _Degen Mode_ aims to accomplish. When enabled 🟢, the bot will still notify you if the aforementioned risks are detected, but it will **NO LONGER** block auto-buy in those events. Only enable this if you absolutely know what you’re doing and are willing to handle the risks involved.
### **Max Gas Price**
_Available on every EVM-compatible chain_
Choose the maximum gas price you’re willing to pay for a copytrade transaction. It compares against the gas price needed to frontrun/match copytrades. If this requires a higher gas price than the _Max Gas Price_ you set, the bot will block the transaction.\
\
Please note that the _Max Gas Price_ will not interfere with manual transactions, Signals auto-buys, or snipes.
### Max Gas Limit
_Available on every EVM-compatible chain_
Choose the max gas limit you allow the bot to use. You can leave it on _Auto_ as the bot already selects an optimal gas limit for the contracts you’re interacting with, or you can set a specific amount to block tokens with high gas usage. If a transaction requires more gas than the set max gas limit, the transaction will be immediately rejected. **This setting impacts both manual and automated transactions.**
Similarly, for **TRON**, there's _Max Energy Limit_ which sets the maximum Energy a manual or automated transaction can use.
### Token Report View
This setting is customizable per chain and it sets the default view for the [Token Report](/docs/sniper/pasted-contracts). A Token Report is a summary of the most important token info and metrics, and you can get it by simply pasting the token contract address in your DMs with the bot. There are two possible views for the Token Report: 🔄 **Brief** and 🔄 **Detailed**. As the name suggests, the 🔄 **Detailed** view provides more metrics and details compared to the 🔄 **Brief** view.
### Monitor (All Chains)
This setting is **common across all chains**, and it sets the default view for the [Trade Monitor](/docs/sniper/trade-monitor). A Trade Monitor is a tool that can be used to monitor your positions in real time. There are three possible views for the Trade Monitor: 🔄 **Brief**, 🔄 **Detailed** and 🔄 **Extended**. As the name suggests, the 🔄 **Detailed** view provides additional details on your position compared to the 🔄 **Brief** view. The 🔄 **Extended** view is similar to 🔄 **Detailed** view with the only exception that the summary of positions in the Trade Monitor is displayed in a **non-collapsible quote**. For the 🔄 **Brief** and 🔄 **Detailed** views, this summary is normally displayed in a collapsible-quote that can be extended and minimized at will.
---
# Sell Settings
Source: https://www.maestrobots.com/docs/sniper/global-settings/sell-settings.md
Section: Sniper
Selecting the ⚙️ _Sell_ button reveals the following menu:
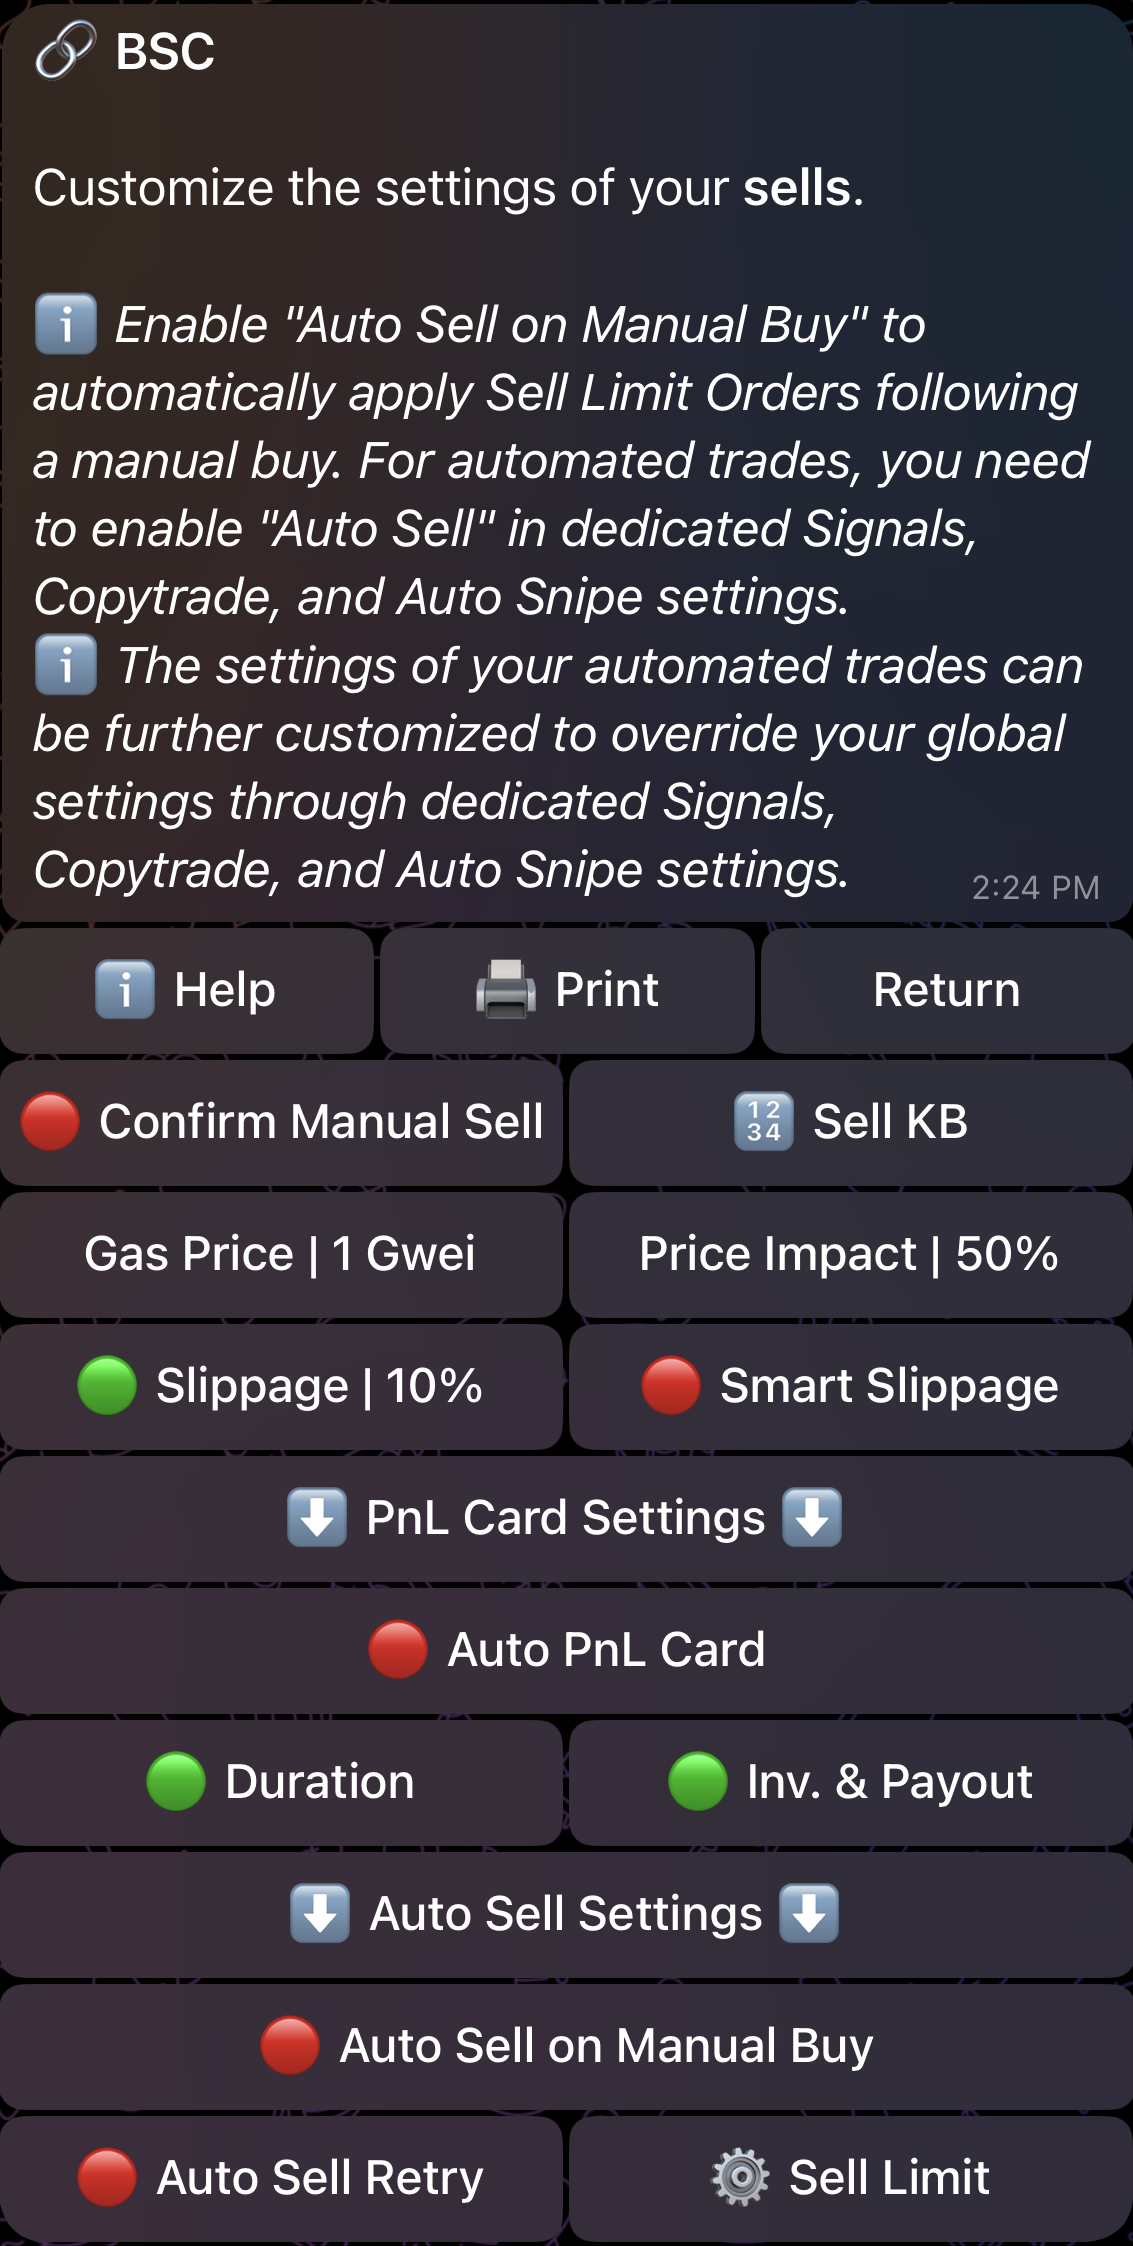
We explain the available options below:
### 🟢 | 🔴 Confirm Manual Sell
When enabled 🟢, any sell buttons you press will require an additional confirmation. This can protect you from accidentally clicking sell buttons. **This does NOT interfere with **_**Auto Sell**_**.**
### 🔢 Sell KB
Assign customized values to the sell keyboard as shown below. You also have the option to reset the values to the default ones.

### **Gas Price/Delta**
Refer to the [_Gas Price_](/docs/sniper/global-settings/buy-settings#gas-price) and [_Gas Delta_](/docs/sniper/global-settings/buy-settings#gas-delta) explanations detailed in the [Buy Settings](/docs/sniper/global-settings/buy-settings) page.
### Price Impact Alert
As an additional layer of protection, the bot will automatically display an alert for **manual and automated sells** when the estimated price impact of the trade is beyond the value of _**Price Impact Alert**_. This alert can be bypassed by manually forcing the trade through, as shown in the figure below. By default, _**Price Impact Alert**_ is set to 50% for sells but you can tune the value to effectively control the threshold at which the alert will be displayed.
.jpg)
### 🟢 | 🔴 Slippage
Choose the slippage tolerance for your sells. In some chains, using extremely high slippage values is dangerous since you can get frontrun by MEV bots, so please use a suitable value, or utilize _Smart Slippage_.
### 🟢 | 🔴 Smart Slippage
_Available on ETH, BSC, Base, Avalanche and Arbitrum_
This allows slippage to automatically adjust based on the token’s taxes and the price impact of your trade. This is not suitable for volatile situations like launches and snipes. We recommend you pair it with high _Gas Price/Delta_. **Keep in mind that **_**Smart Slippage**_** overrides any custom slippage values you might have selected earlier.** In other terms, when _Smart Slippage_ is enabled 🟢, _Slippage_ is disabled 🔴 and vice versa.
**In most cases, manual sells and auto-sells (Limit Sell Orders) will rely on the **_**Gas Price/Delta**_** and **_**Slippage**_** settings specified in your **_**Global Sell Settings**_**, so make sure you configure them properly.**
### 🟢 | 🔴 Auto PnL Card
If enabled 🟢, the bot will automatically generate a PnL Card following every sell. The generated card is customizable through two options: "Duration" and "Inv. & Payout".
#### 🟢 | 🔴 Duration
If enabled 🟢, the PnL Card will display the trade duration.
#### 🟢 | 🔴 Inv. & Payout
If enabled 🟢, the PnL Card will display the invested amount and the payout received after selling, both in native currency.
### 🟢 | 🔴 **Auto Sell** on Manual Buy
If enabled 🟢, the bot will automatically create the sell limit orders defined in "**⚙️ Sell Limits**" following every **manual buy**. If _Auto Sell on Manual Buy_ is disabled 🔴, no sell limit orders will be automatically added following a manual buy, even if you have them defined in "**⚙️ Sell Limits**".
For **automated buys**, you can enable _Auto Sell_ and further customize sell limit orders through dedicated Signals, Copytrade and Auto Snipe settings.
### **⚙️ Sell Limits (Presets)**
If you click on "**⚙️ Sell Limits**", you will be redirected to the following menu which allows you to preset and define sell limit orders to be automatically applied after a manual buy:
.jpg)
#### Limit Type
Select the type of the sell limit that you would like to add. There are three possible types: _Take Profit_, _Stop Loss_ and _Trailing Stop Loss_.
_Trailing Stop Loss_ is a powerful variation of Stop Loss that acts by adapting the price or market cap at which the sell limit order as the price of the concerned token increases. This will allow you to secure some profits as the market price of the token fluctuates. It should be noted that _Trailing Stop Loss_ will never decrease the price or market cap at which the sell limit order will trigger.
#### Percentage Change
For _Take Profit_, the _Percentage Change_ must be positive. For _Stop Loss_ and _Trailing Stop Loss_, it must be negative. The _Percentage Change_ is applied on the **entry price of your trade** to determine the price at which the sell limit order should trigger at. In other terms, the sell limit order will trigger when the difference between your trade entry price and the current token price matches _Percentage Change_. However, this entry price is computed slightly differently depending on the limit type:
* For _Take Profit_, the entry price is computed while considering your buy amount **and the gas/bribe fees incurred**. This prevents transaction fees from eating into your net profit, ensuring that it matches the selected percentage.
* For _Stop Loss_ and _Trailing Stop Loss_, the entry price used ignores transaction fees and only considers your buy amount. This is done to prevent premature triggers. For _Trailing Stop Loss_, the _Percentage Change_ will also serve as the “anchor” value.
#### **Balance**
Specify the percentage of your token balance that will be sold when the sell limit order is triggered. It is important to note that sell limit orders always act on your **total balance of the token**. For example, setting the _Balance_ to 50% will sell half of your token balance at the time of trigger.
#### **Duration**
Specify the duration in hours for which this sell limit order will remain active once it's automatically added or created for a specific token. The maximum duration is 96 hours.
This wraps up the _Global Sell Settings._ We can now move on to the _Global Approve Settings_.
---
# 🕓 Limit Orders
Source: https://www.maestrobots.com/docs/sniper/limit-orders.md
Section: Sniper
Previously, we detailed the process of presetting sell limit orders to be automatically applied following every manual and/or automated buy. In this section, we will explain how you can manually add sell and buy limit orders for a particular token.
- [Sell Limits](/docs/sniper/limit-orders/sell-limits)
- [Buy Limits](/docs/sniper/limit-orders/buy-limits)
- [Active Orders](/docs/sniper/limit-orders/active-orders)
---
# Active Orders
Source: https://www.maestrobots.com/docs/sniper/limit-orders/active-orders.md
Section: Sniper
You can check the active buy and sell limit orders across all tokens for a given chain as follows:
1. From the `/start` menu, click on "🕔 Active Orders". Alternatively, you can send the command `/orders` in your DMs with the bot.
2. The next panel will display the list of chains with at least one active buy or sell limit order. Select the chain of interest and you will then be redirected to a panel similar to the one displayed in the image below:
.jpg)
The panel displayed above is showing a summary of active sell limit orders for the selected chain. In this case, we only have sell limit orders on wallets **TEST** and **TEST2** for token $Catchy. More specifically, we have 2 _Stop Loss_ orders on wallet **TEST2** and 1 _Stop Loss_ order on wallet **TEST** for this token.
To check a summary of active buy limit orders for the selected chain, you can select "**Buy Limits**" from the menu, and you will be re-directed to a panel similar to the one displayed in the image below:
.jpg)
If you click on the token name "🪙 $Catchy", you will then be redirected to the **Buy Limit** or **Sell Limit** panel of that token which we've covered in the previous sections. These can be used to check, edit, add and delete buy and sell limit orders on the token.
---
# Buy Limits
Source: https://www.maestrobots.com/docs/sniper/limit-orders/buy-limits.md
Section: Sniper
To check and edit the existing buy limit orders for a token, or to add a new one, follow these steps:
1. Paste the token CA in the bot to access the Token Report.
2. From the Token Report, click on "⚙️ **Buy Limit**". You will then be redirected to a panel similar to the one displayed in the image below:
.jpg)
It should be noted that the ⚙️ _Buy Limit_ menu of a token can also be accessed from the Trade Monitor of the token.
Let's start by looking at the buttons and options available for creating and editing buy limit orders for a token:
### **💳 Multi Buy | 2**
This button is a dropdown and clicking on it will reveal all of your connected wallets for this chain. This can be used to add the same buy limit order simultaneously on multiple wallets.
### ⬇️ Trigger ⬇️
There are two types of triggers that you can select for each limit type:
* Price: Insert the price at which this buy limit order will trigger at. You can provide an exact price value in USD or a percentage change that will be applied **on the current token price**.
* Market Cap (MC): Insert the market cap at which this buy limit order will trigger at. You can provide an exact market cap value in USD or a percentage change that will be applied **on the current token market cap**.
It should be important to note that you can set upper and lower buy limits. In other terms, you can set the trigger value for either price or market cap to be higher or lower than the current value.
### **Amount**
Specify the buy amount that will be used when the buy limit order triggers. This should be provided in the chain's native coin.
### **Duration**
Specify the duration in hours for which this buy limit order will remain active once it's automatically added or created for a specific token. The maximum duration is 96 hours.
Once you configure all these fields, click on "📌 Add Buy Limit Order" to add the buy limit order(s) on the selected wallet(s). Once the limits are added, they are displayed in the message area of the panel, as displayed in the image above. In this example, an upper buy limit order based on _Price_ is defined for both wallets _TEST_ and _TEST2_. A lower buy limit order based on _MC_ is also defined for wallet TEST2.
### ⚙️ Config \[X]
For every added buy limit order, you will see a "**⚙️ Config \[X]**" button towards the end of the panel where X represents the numbering of this buy limit. For example, if we click on "**⚙️ Config \[X]**", we will be redirected to the configuration menu displayed below:
![Configure Buy Limit [1]](/images/docs/sniper/Edit%20MC%20Buy%20Limit%20(Catchy).jpg)
As displayed above, the configuration menu will list the buy limit impacted, the associated wallet, and will provide you with the ability to edit the _Trigger_, _Amount_ and _Duration_ of the limit. If you want to delete this buy limit order, simply click on "❌ **Delete**".
---
# Sell Limits
Source: https://www.maestrobots.com/docs/sniper/limit-orders/sell-limits.md
Section: Sniper
To check and edit the existing sell limit orders for a token, or to add a new one, follow these steps:
1. Paste the token CA in the bot to access the Token Report.
2. From the Token Report, click on "↔️ **Go to Sell**" to access the Sell Menu.
3. In the Sell Menu, click on "⚙️ **Sell Limit**". You will then be redirected to a panel similar to the one displayed in the image below:
.jpg)
It should be noted that the ⚙️ _Sell Limit_ menu of a token can also be accessed from the Trade Monitor of the token.
Let's start by looking at the buttons and options available for creating and editing sell limit orders for a token:
### **💳 Multi Sell | 2**
The "**Multi Sell**" button is a dropdown and clicking on it will reveal all of your connected wallets **with a positive balance of the token**. Initially, all wallets will be enabled by default in "**Multi Sell**", but you can further customize this to select the wallets that you want to add a particular sell limit order on. This can be used to add the same sell limit order simultaneously on multiple wallets.
### ⬇️ Limit Type ⬇️
Select the type of the sell limit that you would like to add. There are three possible types: _Take Profit_, _Stop Loss_ and _Trailing Stop Loss_.
_Trailing Stop Loss_ is a powerful variation of Stop Loss that acts by adapting the price or market cap at which the sell limit order as the price of the concerned token increases. This will allow you to secure some profits as the market price of the token fluctuates. It should be noted that _Trailing Stop Loss_ will never decrease the price or market cap at which the sell limit order will trigger.
### ⬇️ Trigger ⬇️
There are three types of triggers that you can select for each limit type:
* Price: Insert the price at which this sell limit order will trigger at. You can provide an exact price value in USD or a percentage change that will be applied **on the current token price**. For _Take Profit_, the provided percentage must be positive. For _Stop Loss_ and _Trailing Stop Loss_, it must be negative.
* Market Cap (MC): Insert the market cap at which this sell limit order will trigger at. You can provide an exact market cap value in USD or a percentage change that will be applied **on the current token market cap**. For _Take Profit_, the provided percentage must be positive. For _Stop Loss_ and _Trailing Stop Loss_, it must be negative.
* Entry Price: This option only takes a percentage change that will be applied against **your average entry price for this token**. Since the entry price for a token varies as you trade the token, any sell limit based on _Entry Price_ will be dynamically updated following every buy of the token. In other terms, when you buy again, the new average entry price is re-computed and the impacted sell limit order that's based on this entry price will be updated. As usual, for _Take Profit_, the provided percentage must be positive. For _Stop Loss_ and _Trailing Stop Loss_, it must be negative.
### **Balance**
Specify the percentage of your token balance that will be sold when the sell limit order is triggered. It is important to note that sell limit orders always act on your **total balance of the token**. For example, setting the _Balance_ to 50% will sell half of your token balance at the time of trigger.
### **Duration**
Specify the duration in hours for which this sell limit order will remain active once it's automatically added or created for a specific token. The maximum duration is 96 hours.
Once you configure all these fields, click on "📌 Add Sell Limit Order" to add the sell limit order(s) on the selected wallet(s). Once the limits are added, they are displayed in the message area of the panel, as displayed in the image above. In this example, a Stop Loss based on _Entry Price_ is defined for both wallets _TEST_ and _TEST2_. A Trailing Stop Loss based on MC is also defined for wallet SL2.
### ⚙️ Config \[X]
For every added sell limit order, you will see a "**⚙️ Config \[X]**" button towards the end of the panel where X represents the numbering of this sell limit. For example, if we click on "**⚙️ Config \[X]**", we will be redirected to the configuration menu displayed below:
![Configure Sell Limit [1]](/images/docs/sniper/Edit%20Entry%20SL%20(Catchy).jpg)
Similarly, clicking on "**⚙️ Config \[3]**" will redirect us to the configuration menu displayed below:
![Configure Sell Limit [3]](/images/docs/sniper/Edit%20MC%20TSL%20(Catchy).jpg)
As displayed above, the configuration menu will list the sell limit impacted, the associated wallet, and will provide you with the ability to edit the _Trigger_, _Balance_ and _Duration_ of the limit. If you want to delete this sell limit order, simply click on "❌ **Delete**".
---
# 💵 Monetization
Source: https://www.maestrobots.com/docs/sniper/monetization.md
Section: Sniper
Successful transactions through the Maestro Sniper Bot (manually or automatically) will be charged a 1% tax on every buy and sell. Simple transfers are NOT taxed.
### Fee Extraction Mechanism
#### _**Solana**_
Fees will be directly extracted in the same transaction.
#### _**Other Chains**_
The bot will NOT take the 1% directly from each transaction. It simply accumulates how much you owe us, and doesn't extract any fees until you accumulate more than 0.01 units of the chain's native coin (e.g. ETH on Ethereum, BNB on BSC, AVAX on Avalanche) or 0.5 TON. The extracted fees will never be lower than that minimum, and never higher than 10% of your highest wallet balance.
The fees accumulate per telegram account, **NOT** per wallet, and the bot will always extract the fee from the wallet with the **highest balance** in the concerned chain. The sniper will deal with this silently, and you can always verify your trading volume by checking your block explorer.
All unpaid fees accumulated up to June 12th, 2023 were [completely forgiven](https://t.me/MaestroSniperUpdates/160), giving all users a chance to start fresh.
### Fee Addresses
The following are the addresses to which the fees will be sent. Whenever you find a transfer made from your wallet to one of these addresses, this would be a fee payment to the bot.
| Chain | Fee Address |
| --- | --- |
| Solana | MaestroUL88UBnZr3wfoN7hqmNWFi3ZYCGqZoJJHE36 |
| Every EVM-compatible chain (BSC, Base, Ethereum, Monad, Sonic, Avalanche, Arbitrum, Hyper EVM) | 0xB0999731f7c2581844658A9d2ced1be0077b7397 |
| TON | UQBk4BgQvZ8zhlCPkdtfKC6bXTxJvwsguy-p-7Eh7K5vQ48E |
---
# 🏆 MVP
Source: https://www.maestrobots.com/docs/sniper/mvp.md
Section: Sniper
> Track your MVP holdings and the perks they unlock from a single menu.
**MVP** is a loyalty tier tied to your holdings of the MVP token. Tap **⭐️ MVP** or send **`/mvp`** to open the MVP menu, which shows how much MVP you hold across your connected wallets and which benefits your current tier unlocks.
## Opening the MVP Menu
Send **`/mvp`** in your DM with the bot. The menu aggregates MVP balances across every connected wallet on the chains where the token is live, so you don't need to switch chains manually.
## What You'll See
- _Total MVP Holdings_ — the sum of MVP held across all of your connected wallets.
- _Current Tier_ — the tier your holdings qualify you for.
- _Perks_ — the benefits attached to that tier (fee discounts, priority access, or campaign eligibility, depending on what is currently active).
> **INFO**
>
> MVP holdings are read directly from your connected wallets. If you transfer MVP in or out, the bot will reflect the change on the next refresh.
---
# ✏️ Pasted Contracts
Source: https://www.maestrobots.com/docs/sniper/pasted-contracts.md
Section: Sniper
> Execute manual buys and sells, and auto-buy on pasted contracts.
Through the bot, you can execute “manual” buying and selling transactions, similar to how Pancakeswap and Uniswap work. You can also setup the bot to auto-buy pasted contracts through the `Maestro DMs` signal.
- [Token Report Menu](/docs/sniper/pasted-contracts/token-report-menu)
- [Token Report Details](/docs/sniper/pasted-contracts/token-report-details)
- [Auto Buying](/docs/sniper/pasted-contracts/auto-buy-on-pasted-contract)
- [Warning Messages](/docs/sniper/pasted-contracts/warning-messages)
---
# Auto Buy on Pasted Contract
Source: https://www.maestrobots.com/docs/sniper/pasted-contracts/auto-buy-on-pasted-contract.md
Section: Sniper
Suppose that you want to snipe a stealth launch of a hyped token. In such situations, speed is key, especially when hundreds of buyers are racing to copy-paste the new contract address into Pancakeswap/Uniswap, or in our case, the bot trading terminal. To give you an edge over your competition, we introduced the `Maestro DMs` signal, which allows you to setup auto-buys for pasted contract addresses. Follow these steps to set it up:
* From the `/start` menu, go to _Signals._ This will open the following menu:
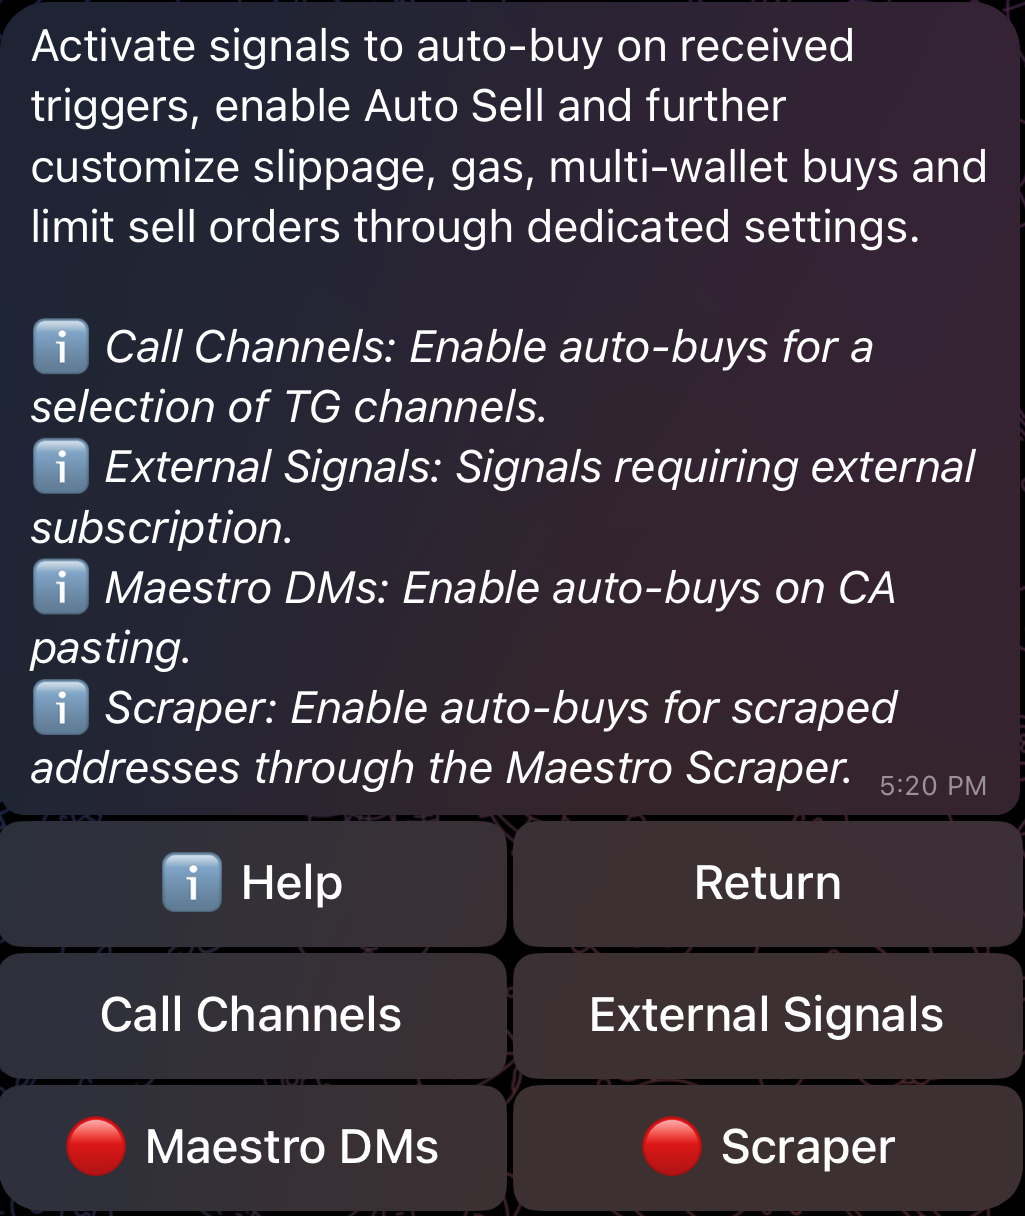
* Select the `Maestro DMs` signal. This will open the settings menu shown below. This menu behaves exactly like other Signals settings (Call Channels, External Signals and Scraper). We delve deeper into these settings in Section [5](/docs/sniper/signals).
.jpg)
* Select a suitable _Buy Amount_ and click on "**Inactive**" to activate the channel as shown in the image above. As discussed earlier, automated buys will not trigger unless "**Allow Auto Buy**" is enabled in your [_Global Buy Settings_](/docs/sniper/global-settings/buy-settings#or-allow-auto-buy). The bot will warn you if this is not the case once you activate a signal.
* _Auto Buy Checks_ can be used to set optional checks and limits such as Min/_Max MC_, _Min/Max Liquidity_ and _Max Buy/Sell Tax._ If any of these limits is not met, _Auto Buy_ won't trigger for the pasted contract. Initially, _Auto Buy Checks_ will inherit the same values that you've set in your [_Global Buy Settings_](/docs/sniper/global-settings/buy-settings#or-allow-auto-buy), but you can further customize and/or disable these checks directly from your `Maestro DMs` settings. **In such cases, the values specified in the `Maestro DMs` settings will take priority over the ones specified in your** [_**Global Buy Settings**_](/docs/sniper/global-settings/buy-settings#or-allow-auto-buy)_**.**_
* _Slippage_, _Smart Slippage_, _Gas Delta/Price_ and _Degen Mode_ will initially mirror what you have in your [_Global Buy Settings_](/docs/sniper/global-settings/buy-settings) and your [_Global General Settings_](/docs/sniper/global-settings/general-settings), and **they only impact auto-buys on pasted contracts**. You can also customize them directly in the `Maestro DMs` signal.
* _Multi Buy_ can be used to select the wallets that will participate in any auto-buy triggered by the `Maestro DMs` signal (pasted contracts) as shown in the image below. Initially, _Multi Buy_ is defaulted to your "[Default](/docs/sniper/wallet-setup#manual-and-default-wallet)" wallet, but you can further customize this to set any selection of wallet.
.jpg)
* If _Auto Sell_ is enabled 🟢, the bot will automatically create the sell limit orders defined in "**⚙️ Sell Limit**" following every **automated buy triggered by the** `Maestro DMs` **signal.** If _Auto Sell_ is disabled 🔴, no sell limit orders will be automatically added following an automated buy triggered by this signal, even if you have them defined in "**⚙️ Sell Limits**". Initially, "**⚙️ Sell Limits**" will inherit the same limits defined in your [_Global Sell Settings_](/docs/sniper/global-settings/sell-settings#sell-limits-presets), but you can further customize these limits directly from your `Maestro DMs` settings. **In such cases, the sell limits specified in the `Maestro DMs` settings will take priority over the ones specified in your** [_**Global Sell Settings**_](/docs/sniper/global-settings/sell-settings#sell-limits-presets)_**.**_
Now, when you paste a contract address into the bot, it will check whether the token satisfies the marketcap, liquidity, and tax conditions specified for the `Maestro DMs` signal, and then attempt to auto-buy the token with the amount specified in _Buy Amount,_ and using the slippage and gas settings specified in the signal.
**You DO NOT need to worry about your auto-buy amounts exceeding the max transaction limit. If your **_**Buy Amount is higher than the limit and the bot manages to estimate that limit, then the bot will automatically adjust the Buy Amount**_** to make sure the transaction goes through.**
If you don’t want the bot to auto-buy pasted contract addresses, make sure that _the_ `Maestro DMs` signal is inactive 🔴. You can also control this using the shortcut `/quick` , which gives you an easily accessible menu of useful settings for all [enabled](/docs/sniper/getting-started#enabling-disabling-chains) chains. Alternatively, you can append a particular chain to the command to access the quick settings for a particular chain. For example, `/quick_eth` and `/quick_sol` can be used to access the quick settings of Ethereum and Solana, respectively.
---
# Token Report Details
Source: https://www.maestrobots.com/docs/sniper/pasted-contracts/token-report-details.md
Section: Sniper
Anyone with a keen eye would’ve noticed that the bot gives extensive information about any contract you paste in the bot. This can be seen in the message of the Token Report displayed below:
.jpg)
We go over a few of the important pieces of information below:
### 🌟 Referral
Includes your quick-buy referral link for the token. Referrals are detailed in the [Referral Program](/docs/sniper/referral-program) section.
### Liquidity Pool (Pool)
For TON and EVM-compatible chains, the bot will select from the list of [supported pools](/docs/sniper/getting-started#supported-dexs) the one with the highest USD value for the backing reserves. However, when buying or selling on EVM-compatible chains, the sniper will select the pool which yields the **highest output for the trade**.
For Solana, the bot will select from the list of supported pools the one which yields the highest output for the trade. That also goes for buying and selling on the chain.
### 👀 hits - Premium Only
This shows the number of Maestro users who have pasted the same contract into the bot, and allows you to gauge how “alpha” a contract truly is.
### ⛽ BSC | X GWEI
_Available on every EVM-compatible chain_
For BSC, this shows the current minimum chain gas price.
For every other EVM-compatible chain, this shows the current chain gas price average. This is especially relevant on Ethereum where gas is highly volatile.
### 💵 TX Fees
_Available on every EVM-compatible chain_
This shows the gas fees you’ll be paying to buy (next to **B**) and sell (next to **S**) when interacting with this contract. These values will use the buy and sell G_as Price/Delta_ specified in the Token Report.
### 🔥 Burnt
_Not available on Solana and TRX_
The percentage of the token’s max supply that was burned.
### 🪠 Clog
_Available on every EVM-compatible chain_
This value shows the percentage of the token's maximum supply that is currently in the balance of the token CA.
### 🎯 Max TX (Max Buy, Max Sell and Max Wallet)
_Available on every EVM-compatible chain_
This shows the maximum amount of tokens you’re allowed to buy and sell in one transaction, as well as the maximum amount of tokens you’re allowed to hold in one wallet. These values are controlled by the contract’s developer. If you try to buy an amount that is bigger than the contract’s max buy, the bot will automatically adjust your buy amount to ensure the success of your transaction. If you wish to make use of this functionality, make sure that the bot can estimate a concrete value for the contract’s max buy when you paste the contract.
### 🧢 Market Cap
This shows the Market Capital of the token.
### ⚖️ Taxes | 🅑 X % 🅢 Y % 🅣 Z %
Exclusive to EVM-compatible chains
This shows the contract’s buy, sell and transfer taxes at the time of pasting the contract. If you wish to use _Smart Slippage_, make sure that the bot can estimate concrete values for the buy and sell tax.
### 💧 Liquidity
This displays the USD value of the total liquidity (token and backing reserves) in the selected token's liquidity pool. Low percentages (less than 0.1% for example) are highly suspect.
### 🕓 Refresh
This displays the timestamp at which this Token Report was last refreshed.
### 📌 Limit Orders
This displays a summary of the total number of sell and buy limit orders currently active on this token, and for all of your connected wallets for this chain. For example, having 2 Take Profit, 4 Stop Loss/Trailing Stop Loss and 1 Buy limit order for $CATCHY across all the connected wallets would show the following summary in the Token Report:
.jpg)
You can check, edit and add buy and sell limit orders for any token from the Token Report, Trade Monitor or the Active Orders tab — see the [Limit Orders](/docs/sniper/limit-orders) section for details.
### 💰 _Balance_
An expandable quote which includes your token balance and the equivalent percentage of token supply for all of your connected wallets, as well as the native balance for each wallet. The wallets with positive token balance are listed first followed by the ones with no token balance as shown in the image below:
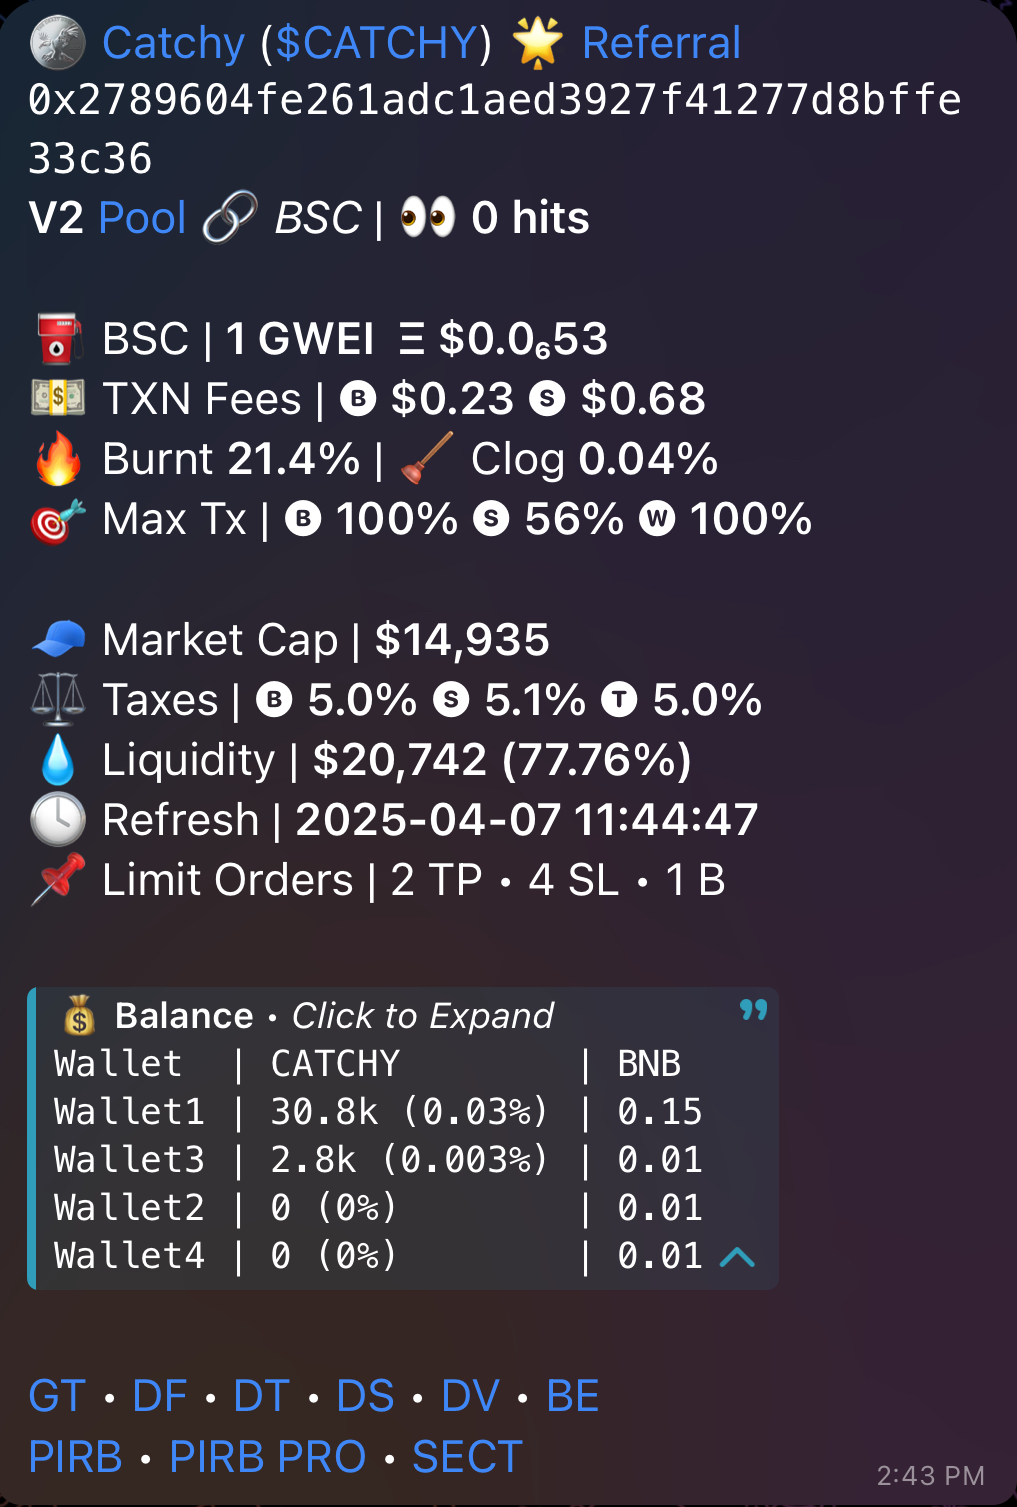
---
# Token Report Menu
Source: https://www.maestrobots.com/docs/sniper/pasted-contracts/token-report-menu.md
Section: Sniper
To get the Token Report, you simply need to paste the token contract address in your DMs with the bot. The Token Report provides extensive information about the token contract and allows you to multi-buy, multi-sell, and set up buy and sell limit orders for the token.
In the following figure, we display the Token Report of $CATCHY’s contract address to demonstrate the bot’s capabilities.
%20(1).jpg)
We will now go through all the relevant buttons:
### 📍 Track
Opens a Trade Monitor for the token without buying it. This allows you to monitor your token's positions in real time for all wallets with a positive token balance. _Track_ will not work if you don't own the token in any of your connected wallets. The Trade Monitor also allows you to multi-buy, multi-sell and set up buy and sell limit orders for the token. We discuss the Trade Monitor in much more detail in Section [6](/docs/sniper/trade-monitor).
### 🔄 BSC
If an address has tokens on multiple chains, you can use this button to cycle between the chains.
### Approve
_Exclusive to EVM-compatible chains_
Sends an _Approve_ transaction for this token using the selected wallets in "**💳 Multi Buy**". If _Auto-Approve_ is enabled in your [_Global Approve Settings_](/docs/sniper/global-settings/approve-settings), the bot automatically sends an _Approve_ transaction after a successful buy. However, you can approve a token even before you buy it. This is especially useful for pre-launch tokens where one intends to sell quickly after sniping.
### _⇔_ Go to Sell
This button switches the menu from buying to selling as displayed in the figure below.
.jpg)
### Revoke
_Exclusive to EVM-compatible chains_
Sends a _Revoke_ transaction for a previously approved token for all of your connected wallets.
### **💳 Multi Buy | 2**
This button is a dropdown and clicking on it will reveal all of your connected wallets for this chain as shown in the figure below. Initially, only the wallets enabled for ["**Manual**" ](/docs/sniper/wallet-setup#manual-and-default-wallet)in your _Wallet Settings_ are enabled by default, but you can further customize this to select the wallets that you want to participate in any **manual buys initiated by this Token Report**.
.jpg)
### Default Wallet Only
Clicking on this button will automatically select the "**Default"** wallet in "**Multi Buy**" and all other wallets will be disabled. This is useful for instances where you'd like to immediately switch to manually buying with a single wallet without having to do multiple steps in "**Multi Buy**". As a reminder, the ["Default"](/docs/sniper/wallet-setup#manual-and-default-wallet) wallet can be set in your [_Wallet Settings_](/docs/sniper/wallet-setup).
### **💳 Multi Sell | 2**
Similarly to "**Multi Buy**", the "**Multi Sell**" button is a dropdown and clicking on it will reveal all of your connected wallets **with a positive balance of the token**, as shown in the figure below. Initially, all wallets will be enabled by default in "**Multi Sell**", but you can further customize this to select the wallets that you want to participate in any **manual sells initiated by this Token Report**.
.png)
### Buy X BNB, ETH, AVAX, S, TON, TRX or SOL
Buy the amount of tokens equivalent to _X_ amount of BNB, ETH, AVAX, S, TON, TRX or SOL using the selected wallets in "**Multi Buy**".
### Ape Max
_Available on ETH, BSC, Base, Avalanche and Arbitrum_
Buy max TX of the token using the selected wallets in "**Multi Buy**".
### Buy X Tokens
#### _Not available on TON_
Buy _X_ amount of tokens using the selected wallets in "**Multi Buy**".
### ☢️ Sell All
Sell your **entire holdings of this token across all the wallets** that you've generated or imported for this chain.
### Sell X%
Sell X% of your token balance for the selected wallets in "**Multi Sell**".
### Sell X BNB, ETH, AVAX, S, TON, TRX or SOL
Sell the amount of tokens equivalent to _X_ amount of BNB, ETH, AVAX, S, TON, TRX or SOL using the selected wallets in "**Multi Sell**".
### Sell Max TX
_Available on ETH, BSC, Base, Avalanche and Arbitrum_
Sell max TX of the token using the selected wallets in "**Multi Sell**".
### Sell X Tokens
Sell _X_ amount of tokens using the selected wallets in "**Multi Sell**".
### Slippage
By default, _Slippage_ will have the same value of _Slippage_ set in your _Global_ [_Buy_](/docs/sniper/global-settings/buy-settings) and [_Sell_](/docs/sniper/global-settings/sell-settings) _Settings_, for the _Buy Menu_ and the _Sell Menu_ respectively. You can set a new slippage value though this menu for your buys and sells separately. This change will only impact **manual** buys and sells **initiated through this panel**. In other terms, setting a slippage value here will not impact the slippage set in your _Global_ [_Buy_](/docs/sniper/global-settings/buy-settings) and [_Sell_](/docs/sniper/global-settings/sell-settings) _Settings_, and pasting the same contract again will show the same value of _Slippage_ set in your _Global_ [_Buy_](/docs/sniper/global-settings/buy-settings) and [_Sell_](/docs/sniper/global-settings/sell-settings) _Settings._
### Gas Price/Delta
_Not available on Arbitrum, TRX and TON_
By default, _Gas Price/Delta_ will have the same values of _Gas Price/Delta_ set in your _Global_ [_Buy_](/docs/sniper/global-settings/buy-settings) and [_Sell_](/docs/sniper/global-settings/sell-settings) _Settings_, for the _Buy Menu_ and the _Sell Menu_ respectively. You can set a new gas price/delta value though this menu for your buys and sells separately. This change will only impact **manual** buys and sells **initiated through this panel**. In other terms, setting a gas price/delta value here will not impact the gas price/delta set in your _Global_ [_Buy_](/docs/sniper/global-settings/buy-settings) and [_Sell_](/docs/sniper/global-settings/sell-settings) _Settings_, and pasting the same contract again will show the same value of _Gas Price/Delta_ set in your _Global_ [_Buy_](/docs/sniper/global-settings/buy-settings) and [_Sell_](/docs/sniper/global-settings/sell-settings) _Settings._
### ⚙️ Snipe
_Exclusive to Ethereum, BSC, Base, Arbitrum and Solana_
Unlocks automated sniping capabilities. This will be discussed in Section [10](/docs/sniper/auto-snipe).
### ⚙️ Buy Limit
Check, edit and add buy limit orders for this token. See the [Buy Limits](/docs/sniper/limit-orders/buy-limits) section for details.
### ⚙️ Sell Limit
Check, edit and add sell limit orders for this token. See the [Sell Limits](/docs/sniper/limit-orders/sell-limits) section for details.
**After you buy through the Token Report (or use the **_**Track**_** function), the Trade Monitor will automatically open. This will be explored in Section** [**6**](/docs/sniper/trade-monitor)**.**
---
# Warning Messages
Source: https://www.maestrobots.com/docs/sniper/pasted-contracts/warning-messages.md
Section: Sniper
When the bot detects anomalies or risks in a contract, it will display a warning message at the end of a Token Report. These warnings are blockers for automated buys unless _Degen Mode_ is enabled in your signals settings. Some examples of these warnings are listed below:
* _Buy-Sell tax could not be estimated!_ - When the bot cannot estimate the buy or sell tax of a contract, **then trading hasn’t been enabled yet**, or the contract might be problematic.
* **🚨 Honeypot** - The bot can detect honeypot contracts through its own internal simulations, and will not auto-buy contracts where such risks are observed.
* **🚨 Blacklist risk** - The bot can detect blacklisting outcomes through its own internal simulations, and will not auto-buy contracts where such risks are observed.
* **🚨 Liquidity / Total Supply < 1 %** - The bot checks how healthy the liquidity pool is by comparing its balance against the token’s total supply. If the pool has less than 1% of the supply, then the pool is deemed to be too unhealthy.
In conclusion, the bot will not only abide by your selected automated buys checks and limits, but it will also attempt to protect you from extremely risky contracts and save your investments from potential scams. You should still exercise caution as these protection measures are not fool-proof, but they help quite a bit in ensuring a safe and smooth trading experience. Keep in mind that even though the bot will refrain from auto-buying in these scenarios, you can still manually buy the tokens normally.
---
# 📈 Positions
Source: https://www.maestrobots.com/docs/sniper/positions.md
Section: Sniper
Whenever you buy a token through Maestro, the bot will create a position for this token for the buying wallet. After that, this position gets updated every time you buy or sell this token using this wallet.
To access your positions in the bot, go to the `/start` menu and click on "**Positions**", or simply send `/positions` in your DMs with the bot. To quickly access the positions menu for chain BSC, you can use the command `/pos_bsc`. The same applies for all the remaining chains. The image below shows an example of the Positions Menu on BSC:
.jpg)
At the top of the message, you'll notice from the image above that these are the positions linked to _Wallet1_. You can check the positions linked to any of your connected wallets on the chain by switching the selected wallet under the "**⬇️ Select the wallet ⬇️**" row.
Every position will display the following information which is also displayed in the Trade Monitor of the token:
* 🪙 _Token Name_ - Name of the token that the wallet has a positive balance of.
* _Initial:_ This value will reflect how much you've spent to buy the token for this wallet.
* _Payout_ - How much BNB/ETH/AVAX/S/TRX/TON/SOL you will receive when you sell the tokens in this wallet. This factors in both taxes and price impact, and can be written as: `Payout = Initial × (1 + P/L w/tax) × (1 + Price Impact)`.
* _Tokens_ - This reflects the wallet’s token holdings as a percentage of the token's total
supply.
* _Worth_ - This reflects the current value of your wallet's total holdings of the token in the chain's native coin. It does not account for sell taxes nor price impact.
* 🚀 _Profit/Loss_ - Profit or Loss percentage of the trade after sell tax and while considering the price impact of your sell. In other terms, this is computing the percentage of change between the _Initial_ and _Payout_. Clicking on the P/L value will generate the PnL Card for this wallet's current position. You will also have the ability to further customize the generated PnL Card by excluding or adding the trade duration and/or the invested amount.
* 💸 _PI_: The effect of your sell on the chart for this wallet.
* 💵 _Price | MC_ - Current price and market cap of the token.
It is important to note that _Initial_ is only updated for buys made through Maestro. In other terms, if you buy or sell the token outside of Maestro, your _Initial_ won't be updated accordingly. However, as mentioned above, _Tokens, Payout_ and _Worth_ will always be computed based on your wallet's balance of this token. This implies that trading the token outside of Maestro will cause your _Initial_ to be mismatched with _Tokens, Payout_ and _Worth_, and that essentially means that the P/L displayed for that wallet is inconsistent. In these cases, the corresponding position for this token and wallet will display the alert "⚠️ Initial Outdated ⚠️" as shown for token $Catchy in the image above. That's the same alert that would appear for this wallet on the Trade Monitor of token $Catchy as we've explained [earlier](/docs/sniper/trade-monitor/trade-monitor-menu).
To fix this mismatch, you will need to reset your position for this token and for that particular wallet. To do so, click on the alert and the bot will ask you to confirm whether you want to reset the token's position for this wallet or not, as shown in the image below:
.jpg)
If you select "Yes", the bot will then proceed to reset your position by setting your _Initial_ and _Worth_ to the same value, and that's the current worth of your tokens in the chain's native coin. In other terms, the bot will assume that you just bought the tokens in that wallet's balance, and the alert will no longer appear on the Trade Monitor for that token and wallet.
For each position, you also have the ability to _Reset_ and _Track_:
* _Reset_ - If you click on _Reset_, the bot will ask you to confirm whether you want to reset the token's position for this wallet or not, as shown in the image below:
.jpg)
If you click on "Yes", the bot will then proceed to reset your position by setting your _Initial_ and _Worth_ to the same value, and that's the current worth of your tokens in the chain's native coin. In other terms, the bot will assume that you just bought the tokens in that wallet's balance
* _Track_ - Opens a Trade Monitor for the token without buying it. This allows
you to monitor your token's positions in real time for all wallets with a
positive balance of this token. _Track_ will not work if you don't own the token in any
of your connected wallets. The Trade Monitor also allows you to multi-buy,
multi-sell and set up buy and sell limit orders for the token. We discuss the
Trade Monitor in much more detail in Section 6.
We now turn our attention to the button overlay in the Positions Menu.
* 📍 _Track All_ - This button will attempt to add all of the tokens in the positions list above for the selected wallet, starting with the most recent positions first. The number of tokens that will eventually be added to the Trade Monitor will depend on the Trade Monitor's capacity (**10** Trade Monitors for base users and **30** for ⭐️ Premium users).
* 📈 _Add Position_ - This button allows you to create a new position for the selected wallet, and using your current balance of the token in this wallet. **The position will only be created for the selected wallet**. If you own the same token in multiple wallets and you want to create a new position for each wallet, an easier approach would be to click on "📍 **Track**" in the Token Report of the token. Naturally, adding a new position is useful in instances where you've bought this token from outside of Maestro, or you've received it through a transfer from any other wallet.
* 🔃 _Refresh_ - This button refreshes the information and values displayed in
the Positions Menu. Make sure to refresh your positions after adding a new one
or after resetting an existing position.
---
# ⭐ Premium Subscription
Source: https://www.maestrobots.com/docs/sniper/premium-subscription.md
Section: Sniper
> For hardcore users and day-traders that require a bit more out of their sniper experience, Maestro offers a Premium subscription that bolsters the bot’s extensive features.
Premium users will benefit from:
* Access to the [Maestro Pro Bot](https://t.me/MaestroProBot), an exclusive version of the bot that delivers even faster speeds than the base version.
* Access to the Maestro Launch Simulator, which finds a contract's launch taxes, deadblocks, and max wallet before the contract launches.
* Access to the trending list which showcases Maestro trending pre-launch and launched tokens in the past 6 hours. This list can be accessed by typing "`/trending`" in the [Maestro Pro Bot](https://t.me/MaestroProBot).
* **30** concurrent trades in the Trade Monitor (vs. **10** for base users).
* **96**-hour Trade Monitors (vs. **36** hours for base users).
* **6** total wallets per chain (vs. **4** for base users).
* **12** copytrade wallets per chain (vs. **5** for base users).
* **10** concurrent auto-snipes per chain (vs. **5** for base users).
* Up to **60** chains enabled simultaneously (vs. **20** for base users).
* Access to the _Hits_ indicator, which shows you the number of users who have pasted the same contract in the bot.
* First-class Support.
* Access to the _Maestro Yacht Club_, a private group with experienced Maestro users and crypto influencers.
These offerings can be accessed for $200 a month. All payments can be done directly through the bot by consulting the "`/premium`" menu.
---
# 👬 Referral Program
Source: https://www.maestrobots.com/docs/sniper/referral-program.md
Section: Sniper
> **INFO**
>
> If you're bringing many users with good volume through your referrals, please contact our marketer [@MaestroMarketer](https://t.me/MaestroMarketer) for a custom deal on your referral percentage.
[https://www.youtube.com/embed/d1IqA85H3_E?si=ecC4fKMptgCbeLVu](https://www.youtube.com/embed/d1IqA85H3_E?si=ecC4fKMptgCbeLVu)
Maestro offers a showstopping Referral Program through which you can earn up to 25% commission for any user that trades on the bot using your referral link.
## Types of Referral Links
There are two types of referrals offered by our Referral Program:
### Sticky Referrals
With this referral, you will receive a 25% lifetime commission on the fees of every user that starts trading on Maestro using your referral link. This referral type is only applicable for first-time users who are starting the bot for the very first time using your referral link.
### Quick-Buy Referral
These are token-specific referral links. When a user clicks on this link, they are redirected to Maestro and the corresponding token report will be immediately displayed for the user to start trading. In this case, you will earn a portion of the fees for all the token trades initiated through your link, as follows:
* If the referred user is a first-time user of the bot, the Quick-Buy Referral will double as a Sticky Referral and you will be earning a 25% lifetime commission for ALL the trades that this user performs through the bot.
* If the user was an existing **referred** Maestro user, then the 25% commission will be split in half with the original referrer of the user.
## Accessing Referral Links and Stats
To access your Sticky Referral link, start by sending `/referral` in your DM with the bot to expose the Referral Menu shown below in Figure 52.
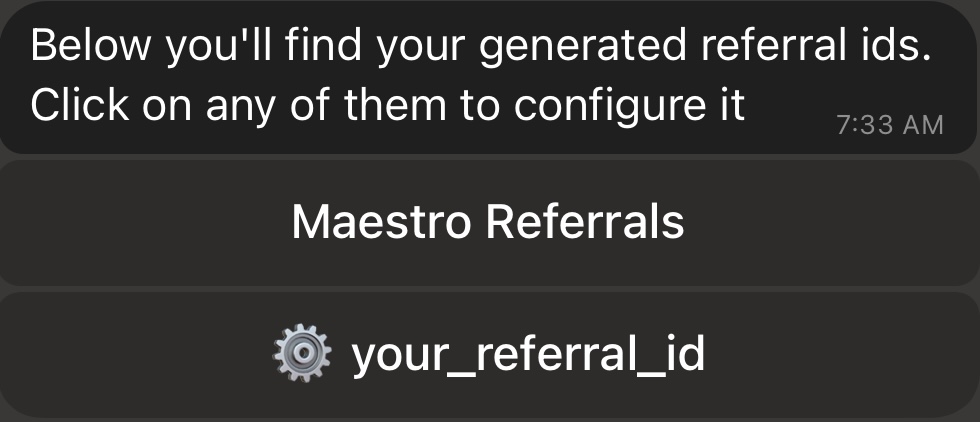
Next, click on the icon with your username to summon the Referral Configuration Menu displayed in Figure 53. Your personal Sticky Referral link will be displayed in the message area under "Referral Link".
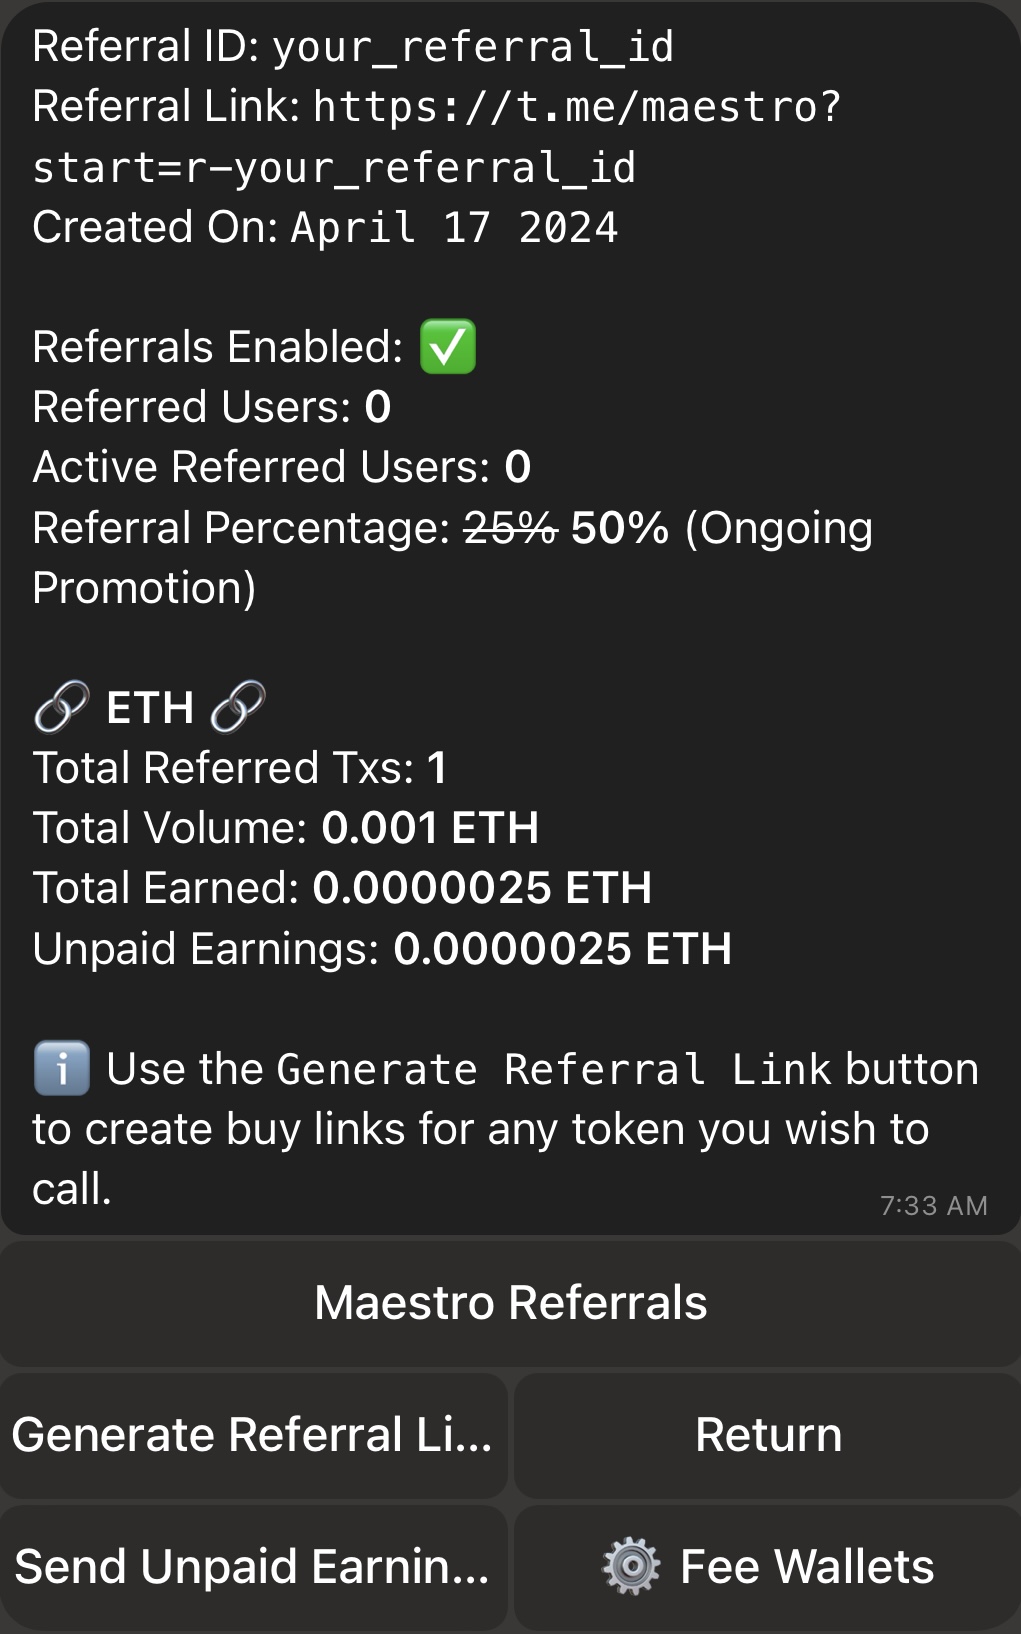
There are two ways you can access your Quick-Buy Referral link for a token, and both will yield the same link:
1. Click on "Generate Referral Link" in Figure 53, and the bot will prompt you to insert the token CA. Once this is done, you will be provided with your Quick-Buy Referral link for this particular token.
2. Paste the token CA in your DM with the bot, and your Quick-Buy Referral link will be displayed towards the end of the token report message. An example would be the Quick-Buy Referral link displayed for $CATCHY in [Figure 11](/docs/sniper/pasted-contracts/token-report-menu).
Now that you have access to your referral links, we will now go over the Referral Configuration Menu displayed in Figure 53.
* _Referred Users:_ This displays the total number of users **that started the bot for the very first time using either your Sticky or Quick-Buy Referral link. In other terms, this won't include existing Maestro users that traded using your Quick-Buy Referral Link.**
* _Active Referred Users:_ Number of _Referred Users_ who were "active" on the bot in the past two weeks. **Please note that "active" does not necessarily mean that the users traded on the bot.**
* _Referral Percentage_: By default, this value is 25%. Our team sometimes runs a promotion and increases the _Referral Percentage_ over a period of time. Stay tuned to our update channels to know more!
* 🔗 ETH 🔗: This section show your referral statistics for each chain. Figure 53 only displays an example for ETH, but the same would be replicated on other chains if you've referred users who traded there. For each chain, we show the following information:
* _Total Referred Txs:_ This is the total number of transactions that count towards your referral links (Sticky and Quick-Buy Referral links).
* _Total Volume:_ This is the total volume traded through transactions that count towards your referral links (Sticky and Quick-Buy Referral links).
* _Total Earned:_ The total cumulative earnings from your referrals. This includes both paid and unpaid earnings.
* _Unpaid Earnings:_ The earnings from your referrals that are not yet paid or collected. Further details on how to withdraw these earnings are provided below.
## Withdrawing Referral Earnings
To collect your earnings from your referrals, you first need to connect a Fee Wallet for every chain where you have earnings. A Fee Wallet is simply the wallet to which these earnings will be sent. To connect your Fee Wallet, click on ⚙️ _Fee Wallets_ in Figure 53, and select the chain of interest. The bot will then prompt you to insert the address of the wallet.
With this settled, you can withdraw your referral earnings by clicking on _Send Unpaid Earnings_ in Figure 53, and selecting the chain of interest. You will then be redirected to the menu shown in Figure 54.
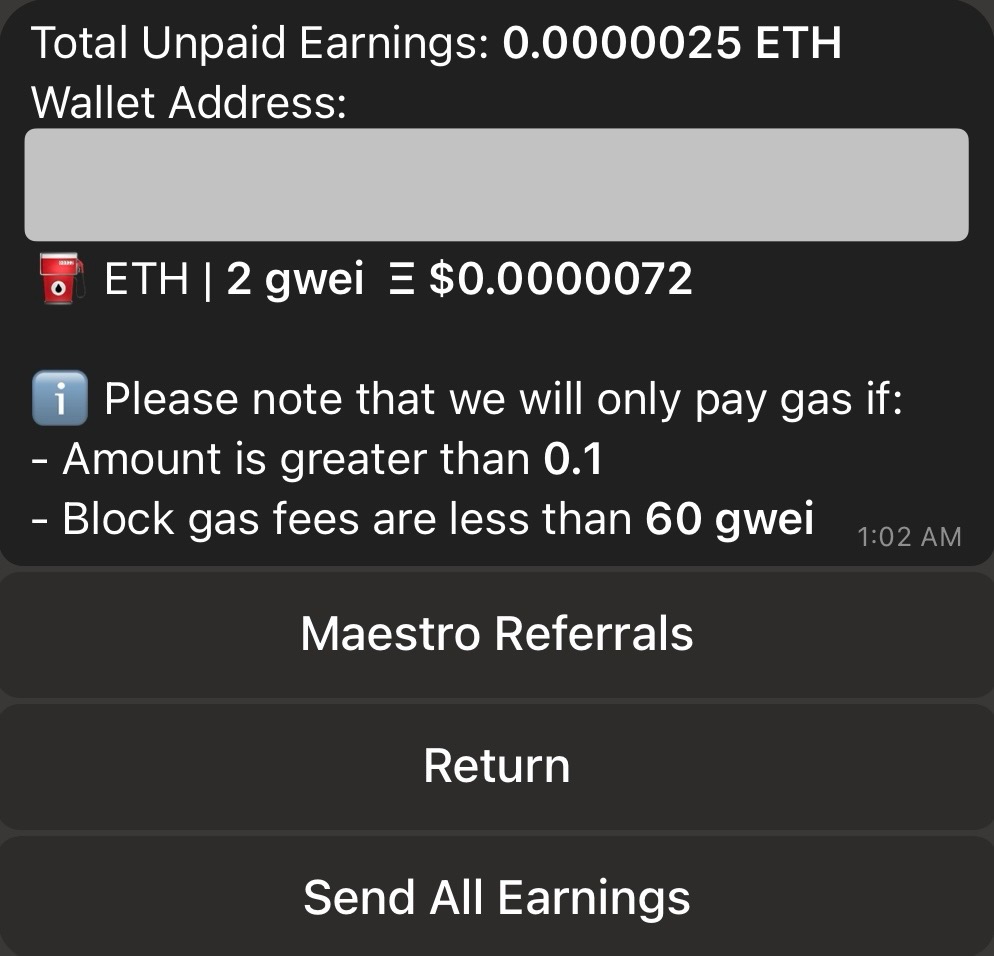
The menu will show your unpaid earnings as well as the set Fee Wallet for the selected chain. Please note that Maestro does not automatically send any referral earnings, so you need to send the earnings manually. However, Maestro covers the transaction fees when the amount and block gas fees are within certain limits which are mentioned in the message area in Figure 54. If these conditions are not satisfied, you can still withdraw your earnings, but you will also be paying for the transaction fees.
---
# 🎁 Rewards
Source: https://www.maestrobots.com/docs/sniper/rewards.md
Section: Sniper
> Claim rewards Maestro distributes to active users — fee rebates, airdrops, and other one-off pools.
**Rewards** is a menu that surfaces rewards Maestro has allocated to you outside of the normal [Cashback](/docs/sniper/cashback) flow — things like retroactive fee rebates, airdrops to active traders, or one-off pools tied to specific programs. Unlike Cashback, Rewards aren't always active: when a pool is running, the menu will show your eligible amount and a button to claim it.
## Opening the Rewards Menu
Send **`/rewards`** in your DM with the bot to open the menu.
If no program is currently active, the bot will reply with _"Rewards are not yet available. Please come back later!"_ — keep an eye on the Maestro updates channel for announcements.
## Checking Your Eligibility
When a rewards pool is open, the menu lists each supported chain and how much you're eligible to claim on that chain. The amount is computed from your trading activity in the relevant period and is already credited to you — there is nothing to apply for.
## Claiming Your Reward
Select the chain you want to claim on, confirm the receiving wallet, and tap the claim button. The bot will send your reward directly to the selected wallet and mark the claim as processed.
> **WARNING: Claim windows are time-limited**
>
> Most rewards pools stay open for a fixed window. If a program ends before you claim, your eligible amount expires and cannot be recovered — check the menu as soon as you see the announcement.
## Related Programs
- [Cashback](/docs/sniper/cashback) — continuous rebate on your trading fees.
- [Campaigns](/docs/sniper/campaigns) — promotional drops that temporarily boost your Cashback tier or grant other perks.
---
# 📡 Signals
Source: https://www.maestrobots.com/docs/sniper/signals.md
Section: Sniper
> Configuring auto-buy for received signals.
From the `/start` menu, go to _Signals._ This will open the following menu:

### Call Channels
In addition to the `Maestro DMs` signal which was covered [previously](/docs/sniper/pasted-contracts/auto-buy-on-pasted-contract), the bot includes an extensive list of TG call channels that you can activate to auto-buy on received signal. These are listed under _Call Channels_ in the Signals menu, and are displayed in the image below:
Call channels are ordered based on the number of Maestro users tracking them. You can use the _**Search**_ button to quickly find any channel you want. The command works with both the channel's link and numerical ID. Once you select a call channel, you will be redirected to a settings menu that you can use to activate auto-buys, setup slippage, gas price/delta, auto-buy checks, and preset sell limit orders to be applied following every auto-buy triggered by this channel. This is explored in detail in the [Signals Settings](/docs/sniper/signals/signals-settings) section.
### Scraper
If you need to scrape a specific TG channel that you cannot find in the bot, please refer to the [standalone Maestro Scraper](/docs/scraper). Similar to a call channel, The _Scraper_ signal can be used to to activate auto-buys, setup slippage, gas price/delta, auto-buy checks, and preset sell limit orders to be applied following every auto-buy triggered by the Scraper.
### External Signals
External Signals are signals that you can receive through the bot by having an external subscription with the signals provider. In this case, activating the signal in the bot is not enough as it also requires a valid subscription with the corresponding providers so that the bot can convey the received signal to you.
In the following section, we will detail the settings menu of a signal. For the most part, this menu acts the same way for _Call Channels_, _External Signals,_ and the _Scraper_ signal.
- [Signals Settings](/docs/sniper/signals/signals-settings)
- [Maestro Scraper](/docs/scraper)
---
# Signals Settings
Source: https://www.maestrobots.com/docs/sniper/signals/signals-settings.md
Section: Sniper
Call channels, external signals and the scraper signal will each have a settings menu that can be used to activate auto-buys, setup slippage, gas price/delta, auto-buy checks, and preset sell limit orders to be applied following every auto-buy triggered by this signal. This settings menu is displayed in the image below:
.jpg)
### 🟢 Active | Inactive 🔴
If you want to enable auto-buys for received signals, you need to select a suitable _Buy Amount_ and click on "**Inactive**" to activate the signal as shown in the image above. As discussed earlier, automated buys will not trigger unless "**Allow Auto Buy**" is enabled in your [_Global Buy Settings_](/docs/sniper/global-settings/buy-settings#or-allow-auto-buy). The bot will warn you if this is not the case once you activate a signal.
### 🟢 | 🔴 Track Only
When _Track Only_ is enabled 🟢, the bot will not auto-buy on a received signal. Instead, it will only notify you of the signal by printing the corresponding Token Report where you can manually buy. It is important to note that a signal cannot be active for auto-buys and enabled for tracking at the same time as only one option can be selected at a time.
### ⚙️ Auto Buy Checks
_Auto Buy Checks_ can be used to set optional checks and limits for _Auto Buy_, such as Min/_Max MC_, _Min/Max Liquidity_ and _Max Buy/Sell Tax._ If any of these limits is not met, _Auto Buy_ won't trigger when a signal is received. Initially, _Auto Buy Checks_ will inherit the same values that you've set in your [_Global Buy Settings_](/docs/sniper/global-settings/buy-settings#or-allow-auto-buy), but you can further customize and/or disable these checks directly from your signals settings. **In such cases, the values specified in the signals settings will take priority over the ones specified in your** [_**Global Buy Settings**_](/docs/sniper/global-settings/buy-settings#or-allow-auto-buy)_**.**_
### Buy Amount
Choose the amount of BNB/ETH/AVAX/S/TRX/TON/SOL for auto-buys triggered by this signal. As mentioned above, you need to fill this in if you want to activate the signal for auto-buys.
### 🟢 | 🔴 Slippage
Choose the slippage tolerance for auto-buys triggered by this signal. Initially, _Slippage_ will mirror the _Slippage_ value specified in your [_Global Buy Settings_](/docs/sniper/global-settings/buy-settings), but you have the option to further customize it directly in your signals settings.
### 🟢 | 🔴 Smart Slippage
_Available on ETH, BSC, Base, Avalanche and Arbitrum_
This allows slippage to automatically adjust based on the token’s taxes and the price impact of your trade. This is not suitable for volatile situations like launches and snipes. As a reminder, _Smart Slippage_ overrides any custom slippage values you might have selected earlier. In other terms, when _Smart Slippage_ is enabled 🟢, _Slippage_ is disabled 🔴 and vice versa.
### 💳 Multi Buy | 1
_Multi Buy_ can be used to select the wallets that will participate in any auto-buy triggered by this signal as shown in the image below. Initially, _Multi Buy_ is defaulted to your "[Default](/docs/sniper/wallet-setup#manual-and-default-wallet)" wallet, but you can further customize this to set any selection of wallet.
.png)
### _Gas Price / Delta_
_**Not available on Arbitrum and TON**_
Choose the gas price (BSC) or gas delta (Ethereum, Base, Avalanche, Sonic, TRX and Solana) to be used on auto-buys from this signals. Initially, _Gas Price_ and _Gas Delta_ will mirror the values specified in your [_Global Buy Settings_](/docs/sniper/global-settings/buy-settings), but you have the option to further customize it directly in your signals settings. In such cases, the values specified in the signal will take priority over the ones specified in your [_Global Buy Settings_](/docs/sniper/global-settings/buy-settings)_._
### 🟢 | 🔴 Degen Mode 😈
If _Degen Mode_ is enabled 🟢, the bot will block automated buys triggered by this signal when it detects honeypots, blacklist risks, or unhealthy liquidity associated with the token. Only enable this if you absolutely know what you’re doing and are willing to handle the risks involved. Initially, _Degen Mode_ will be defaulted to the state defined in your [_Global General Settings_](/docs/sniper/global-settings/general-settings)_,_ but you can change this in the signals settings directly to override what's in your [_Global General Settings_](/docs/sniper/global-settings/general-settings)_._
### 🟢 | 🔴 **Auto Sell**
If enabled 🟢, the bot will automatically create the sell limit orders defined in "**⚙️ Sell Limits**" following every automated buy triggered by this signal. If _Auto Sell_ is disabled 🔴, no sell limit orders will be automatically added following an automated buy triggered by this signal, even if you have them defined in "**⚙️ Sell Limits**".
### **⚙️ Sell Limit (Presets)**
If you click on "**⚙️ Sell Limit**", you will be redirected to the following menu which allows you to preset and define sell limit orders to be automatically applied after an automated buy triggered by this signal:
.jpg)
Initially, **⚙️ Sell Limit** is defaulted to the sell limit orders preset in your [_Global Sell Settings_](/docs/sniper/global-settings/sell-settings#sell-limits-presets), but you can further customize these limits directly from the signals sell limit settings to override the ones defined in your [_Global Sell Settings_](/docs/sniper/global-settings/sell-settings#sell-limits-presets). You will also have the option to reset these limits back to the ones defined in your [_Global Sell Settings_](/docs/sniper/global-settings/sell-settings#sell-limits-presets) by clicking on "**Reset to Global**" shown in the image above.
#### Limit Type
Select the type of the sell limit that you would like to add. There are three possible types: _Take Profit_, _Stop Loss_ and _Trailing Stop Loss_.
_Trailing Stop Loss_ is a powerful variation of Stop Loss that acts by adapting the price or market cap at which the sell limit order as the price of the concerned token increases. This will allow you to secure some profits as the market price of the token fluctuates. It should be noted that _Trailing Stop Loss_ will never decrease the price or market cap at which the sell limit order will trigger.
#### Percentage Change
For _Take Profit_, the _Percentage Change_ must be positive. For _Stop Loss_ and _Trailing Stop Loss_, it must be negative. The _Percentage Change_ is applied on the **entry price of your trade** to determine the price at which the sell limit order should trigger at. In other terms, the sell limit order will trigger when the difference between your trade entry price and the current token price matches _Percentage Change_. However, this entry price is computed slightly differently depending on the limit type:
* For _Take Profit_, the entry price is computed while considering your buy amount **and the gas/bribe fees incurred**. This prevents transaction fees from eating into your net profit, ensuring that it matches the selected percentage.
* For _Stop Loss_ and _Trailing Stop Loss_, the entry price used ignores transaction fees and only considers your buy amount. This is done to prevent premature triggers. For _Trailing Stop Loss_, the _Percentage Change_ will also serve as the “anchor” value.
#### **Balance**
Specify the percentage of your token balance that will be sold when the sell limit order is triggered. It is important to note that sell limit orders always act on your **total balance of the token**. For example, setting the _Balance_ to 50% will sell half of your token balance at the time of trigger.
#### **Duration**
Specify the duration in hours for which this sell limit order will remain active once it's automatically added or created for a specific token. The maximum duration is 96 hours.
#### Closing words:
* You DO NOT need to worry about your auto-buy amounts exceeding the max transaction limit. If your _Buy Amount_ is higher than the limit and the bot manages to estimate that limit, then the bot will automatically adjust the _Buy Amount_ to make sure the transaction goes through.
* Signals sniping benefits from the same protections showcased in Section [4.4](/docs/sniper/pasted-contracts/warning-messages), and will block auto-buys when a scam or a problematic token is detected.
---
# 📊 Trade Monitor
Source: https://www.maestrobots.com/docs/sniper/trade-monitor.md
Section: Sniper
> How the bot functions after a buy has been made.
## Trade Monitor Operations
Trade Monitor is a powerful tool which allows you to monitor the status of your portfolio in real time while capitalizing on market dips and fluctuations by setting automated sell and buy limit orders to manage your assets effortlessly. Furthermore, the Trade Monitor allows you to manually buy and sell from multiple wallets simultaneously while automatically updating your position for each wallet.
The following image shows the Trade Monitor in action. We’ll use $Catchy for demonstration purposes.
%20(3).jpg)
Trade Monitors are automatically spawned in the following cases:
1. You click on "[_Track_](/docs/sniper/pasted-contracts/token-report-menu#track)" in the Token Report. This will spawn a Trade Monitor that summarizes your position of the token for all your connected wallets with a positive balance of this token. This will be the case whether the tokens were acquired through the bot or externally. If the tokens were acquired externally and a position for this token doesn't exist in the bot for a given wallet, the bot will then automatically create a position for this wallet by assuming that you just bought the token. In other terms, for this specific wallet, your _Initial_ and _Worth_ would both have the same value, and that's the current worth of your tokens in the chain's native coin. The Trade Monitor will also provide some insights on the tracked token such as the price and market cap. In case none of your connected wallets has a positive balance of the token, "Track" won't spawn a Trade Monitor as only tokens with at least one wallet with a positive balance can be added to the Trade Monitor.
2. An automated or manual buy is triggered through the bot. In this case, the bot will automatically spawn a Trade Monitor that summarizes your position of the token for all your connected wallets with a positive balance of this token.
We’ll break the above image down in two parts. We will first explain the message above the buttons:
* _First Row_:
* 🪙 _Token Name_ - Name of the token being tracked in this Trade Monitor.
* ⏱ _Time Left_ - Trade Monitors will remain active for 36 hours (96 hours for ⭐️ Premium users). This is reflecting how much of the 96 hours is left. You can always refresh the counter to start over as we explain below. Once a monitor expires, the Trade Monitor for this token becomes "**disabled**" and will eventually be automatically removed from the Trade Monitor. However, this will have no impact on your positions for this token, or on any limit orders that you have set. You can bring the token back to the monitor by tracking the token again from the corresponding Token Report.
* 🌟 Referral - Includes your quick-buy referral link for the token. Referrals are detailed in the [Referral Program](/docs/sniper/referral-program) section.
Following the first row, the Trade Monitor will display a summary of the position for each wallet with a positive balance of the token:
* 💳 _Wallet Name_ - Name of the wallet with a positive balance of the token.
* 🚀 _Profit/Loss_ - Profit or Loss percentage of the trade after sell tax and while considering the price impact of your sell. In other terms, this is computing the percentage of change between the _Initial_ and _Payout_. Here, _Initial_ shows the total amount you spent to purchase the token using that wallet, while _Payout_ reflects how much BNB/ETH/AVAX/S/TRX/TON/SOL you will receive when you sell these tokens. Clicking on the P/L value will generate the PnL Card for this wallet's current position. You will also have the ability to further customize the generated PnL Card by excluding or adding the trade duration and/or the invested amount. The following image represents a PnL Card generated by a Maestro user:
.png)
* 💸 _PI_: The effect of your sell on the chart for this wallet.
* _Initial:_ This value will reflect how much you've spent to buy the token for this wallet.
* _Payout_ - How much BNB/ETH/AVAX/S/TRX/TON/SOL you will receive when you sell the tokens in this wallet. This factors in both taxes and price impact, and can be written as: `Payout = Initial × (1 + P/L w/tax) × (1 + Price Impact)`.
* _Tokens_ - This reflects the wallet’s token holdings as a percentage of the token's total supply.
* _Worth_ - This reflects the current value of your wallet's total holdings of the token in the chain's native coin. It does not account for sell taxes nor price impact.
* _Limit Orders_ - This displays a summary of the total number of sell and buy limit orders currently active on this wallet for this token. For example, in the Trade Monitor shown at the beginning of this page, _Wallet1_ has 3 sell limit orders (1 Take Profit and 2 Stop Losses) and 1 buy limit order for the token $Catchy. You can check, edit and add buy and sell limit orders for any token from the Token Report, Trade Monitor or the Active Orders tab — see the [Limit Orders](/docs/sniper/limit-orders) section for details.
* 💵 _Price | MC_ - Current price and market cap of the token.
* ⚖️ _Taxes_ - This shows the contract’s buy, sell and transfer taxes
Towards the end of every monitor, the _Other Trades_ section displays a summary of all the remaining active monitors that you currently have. For each monitor, this summary shows the token name, the first 3 characters of the token's contract address, the P/L of the wallet with the highest token balance in that monitor, and the amount of time remaining before the monitor expires.
It is important to note that _Initial_ is only updated for buys made through Maestro. In other terms, if you buy or sell this token outside of Maestro, your _Initial_ won't be updated accordingly. However, as mentioned above, _Tokens, Payout_ and _Worth_ will always be computed based on your wallet's balance of this token. This implies that trading the token outside of Maestro will cause your _Initial_ to be mismatched with _Tokens, Payout_ and _Worth_, and that essentially means that the P/L displayed for that wallet is inconsistent. In these cases, the monitor will display the alert "⚠️ Initial Outdated ⚠️" for that wallet as shown in the image below:
.jpg)
To fix this mismatch, you will need to reset your position for this token and for that particular wallet. To do so, click on the alert and the bot will ask you to confirm whether you want to reset the token's position for this wallet or not, as shown in the image below:
.jpg)
If you select "Yes", the bot will then proceed to reset your position by setting your _Initial_ and _Worth_ to the same value, and that's the current worth of your tokens in the chain's native coin. In other terms, the bot will assume that you just bought the tokens in that wallet's balance, and the alert will no longer appear on the Trade Monitor for that token and wallet.
The information displayed in a Trade Monitor will get updated (the message will edit itself) whenever you refresh the Trade Monitor. This can be done by clicking on the _Refresh_ button.
The Trade Monitor updates automatically when there's a considerable price change, but you can always manually force an update by clicking on the button "🔃". This will also reset the timer on your Trade Monitor back to 36 hours (96 hours for ⭐ Premium users).
Some closing words:
* Trade Monitors will remain active for 36 hours (96 hours for ⭐️Premium users). During this time, you could refresh the monitor by clicking on the button "🔃" to reset the timer back to 36 or 96 hours. Once the allocated time is over, the Trade Monitor becomes disabled. You do NOT need to clear disabled trades manually, as the bot will handle that automatically. Sell and buy limit orders are not impacted in this case as these don't require an active monitor to function.
* You can only have **10** active trades in your Trade Monitor (**30** concurrent trades for ⭐️ Premium users). After you reach the maximum number of active trades, any additional purchases will not be tracked in the Trade Monitor.
* You can control the default view of your Trade Monitors through the [Global General Settings](/docs/sniper/global-settings/general-settings#monitor-all-chains). There are three possible views for the Trade Monitor: 🔄 **Brief**, 🔄 **Detailed** and 🔄 **Extended**. As the name suggests, the 🔄 **Detailed** view provides additional details on your position compared to the 🔄 **Brief** view. The 🔄 **Extended** view is similar to 🔄 **Detailed** view with the only exception that the summary of positions in the Trade Monitor is displayed in a **non-collapsible quote**. For the 🔄 **Brief** and 🔄 **Detailed** views, this summary is normally displayed in a collapsible-quote that can be extended and minimized at will.
---
# Trade Monitor Menu
Source: https://www.maestrobots.com/docs/sniper/trade-monitor/trade-monitor-menu.md
Section: Sniper
%20(3).jpg)
We now turn our attention to the button overlay in the above image.
### ⬅️ 🔃 ➡️
The arrows (⬅️ - ➡️) allow you to cycle between your Trade Monitors. Pressing the button "🔃" will force refresh the information displayed in the Trade Monitor and will reset the timer back to 36 hours (96 hours for ⭐ Premium users).
### Copy CA
Clicking this button will copy the token CA to your clipboard.
### _⇔_ Go to Sell
This button switches the menu from buying to selling as displayed in the figure below:
.jpg)
### **💳 Multi Buy | 1**
This button is a dropdown and clicking on it will reveal all of your connected wallets for this chain. Initially, only the wallets enabled for ["**Manual**" ](/docs/sniper/wallet-setup#manual-and-default-wallet)in your _Wallet Settings_ are enabled by default, but you can further customize this to select the wallets that you want to participate in any **manual buys initiated by this Trade Monitor.**
### Default Wallet Only
Clicking on this button will automatically select the "**Default"** wallet in "**Multi Buy**" and all other wallets will be disabled. This is useful for instances where you'd like to immediately switch to manually buying with a single wallet without having to do multiple steps in "**Multi Buy**". As a reminder, the ["Default"](/docs/sniper/wallet-setup#manual-and-default-wallet) wallet can be set in your [_Wallet Settings_](/docs/sniper/wallet-setup).
### **💳 Multi Sell | 2**
Similarly to "**Multi Buy**", the "**Multi Sell**" button is a dropdown and clicking on it will reveal all of your connected wallets **with a positive balance of the token**. Initially, all wallets will be enabled by default in "**Multi Sell**", but you can further customize this to select the wallets that you want to participate in any **manual sells initiated by this Trade Monitor**.
### Buy X BNB, ETH, AVAX, S, TON, TRX or SOL
Buy the amount of tokens equivalent to _X_ amount of BNB, ETH, AVAX, S, TON, TRX or SOL using the selected wallets in "**Multi Buy**".
### Ape Max
_Available on ETH, BSC, Base, Avalanche and Arbitrum_
Buy max TX of the token using the selected wallets in "**Multi Buy**".
### Buy X Tokens
#### _Not available on TON_
Buy _X_ amount of tokens using the selected wallets in "**Multi Buy**".
### Sell Initials
Sell the amount of tokens equivalent to the amount of BNB, ETH, AVAX, S, TON, TRX or SOL currently in the _Initial_ of this Trade Monitor and for the selected wallets in "Multi Sell".
### ☢️ Sell All
Sell your **entire holdings of this token across all the wallets** that you've generated or imported for this chain.
### Sell X%
Sell X% of your token balance for the selected wallets in "**Multi Sell**".
### Sell X BNB, ETH, AVAX, S, TON, TRX or SOL
Sell the amount of tokens equivalent to _X_ amount of BNB, ETH, AVAX, S, TON, TRX or SOL using the selected wallets in "**Multi Sell**".
### Sell Max TX
_Available on ETH, BSC, Base, Avalanche and Arbitrum_
Sell max TX of the token using the selected wallets in "**Multi Sell**".
### Sell X Tokens
Sell _X_ amount of tokens using the selected wallets in "**Multi Sell**".
### Slippage
By default, _Slippage_ will have the same value of _Slippage_ set in your _Global_ [_Buy_](/docs/sniper/global-settings/buy-settings) and [_Sell_](/docs/sniper/global-settings/sell-settings) _Settings_, for the _Buy Menu_ and the _Sell Menu_ respectively. You can set a new slippage value though this menu for your buys and sells separately. This change will only impact **manual** buys and sells **initiated through this Trade Monitor**. In other terms, setting a slippage value here will not impact the slippage set in your _Global_ [_Buy_](/docs/sniper/global-settings/buy-settings) and [_Sell_](/docs/sniper/global-settings/sell-settings) _Settings_.
### Gas Price/Delta
_Not available on Arbitrum, TRX and TON_
By default, _Gas Price/Delta_ will have the same values of _Gas Price/Delta_ set in your _Global_ [_Buy_](/docs/sniper/global-settings/buy-settings) and [_Sell_](/docs/sniper/global-settings/sell-settings) _Settings_, for the _Buy Menu_ and the _Sell Menu_ respectively. You can set a new gas price/delta value though this menu for your buys and sells separately. This change will only impact **manual** buys and sells **initiated through this Trade Monitor**. In other terms, setting a gas price/delta value here will not impact the gas price/delta set in your _Global_ [_Buy_](/docs/sniper/global-settings/buy-settings) and [_Sell_](/docs/sniper/global-settings/sell-settings) _Settings_.
### ❌ Delete
Deletes the Trade Monitor. As mentioned previously, this will have no impact on your positions for this token, or on any limit orders that you have set. You can bring the token back to the monitor by tracking the token again from the corresponding Token Report.
### ⚙️ Buy Limit
Check, edit and add buy limit orders for this token. See the [Buy Limits](/docs/sniper/limit-orders/buy-limits) section for details.
### ⚙️ Sell Limit
Check, edit and add sell limit orders for this token. See the [Sell Limits](/docs/sniper/limit-orders/sell-limits) section for details.
---
# 💲 Wallet Setup
Source: https://www.maestrobots.com/docs/sniper/wallet-setup.md
Section: Sniper
> This section will help you set up your wallets in the bot. This is a necessary step for Signals, Copytrade and Auto Snipe, as well as for manual trading through the bot.
### Import or Generate Wallets
To generate a new wallet or to import an existing wallet, select _Wallets_ from the _`/start`_ menu. The next screen will display the list of chains that you have enabled through the _`/chains`_ settings as discussed in Section [1](/docs/sniper/getting-started). The same steps apply to all chains for the most part.
* After selecting the chain, the next screen will allow you to import your existing wallet or to generate a new wallet through the bot. This is the same screen that you would reach if you click on the setup "⚙️" button in the _`/chains`_ settings for any chain. **It is recommended to generate a new wallet instead of importing your existing main wallet.**
* Whether you choose to import or generate a wallet, the bot will first prompt you to provide a name for the wallet. If you generate a wallet through the bot, it is recommended to import the provided private key to TW, Metamask, or your preferred wallet so you can access your funds outside the bot. However, this step is not necessary since the bot allows you to send SOL/BNB/ETH/S/AVAX/TON and tokens out of your wallet. If you do intend to import your wallet somewhere else, **do NOT copy-paste the private key or seed phrase. Always use pen and paper if you want to save these credentials, and never place them into your device’s clipboard.**
* Make sure to send funds (SOL, BNB, ETH, S, AVAX, TRX or TON only) to the wallet so you can start using the bot.
* By repeating the same steps above, you can proceed to set up multiple wallets for every chain. You can connect up to **4** wallets per chain, or **6** if you're a ⭐️ Premium user.
Once the wallet is set up, you will end up at the panel displayed below:
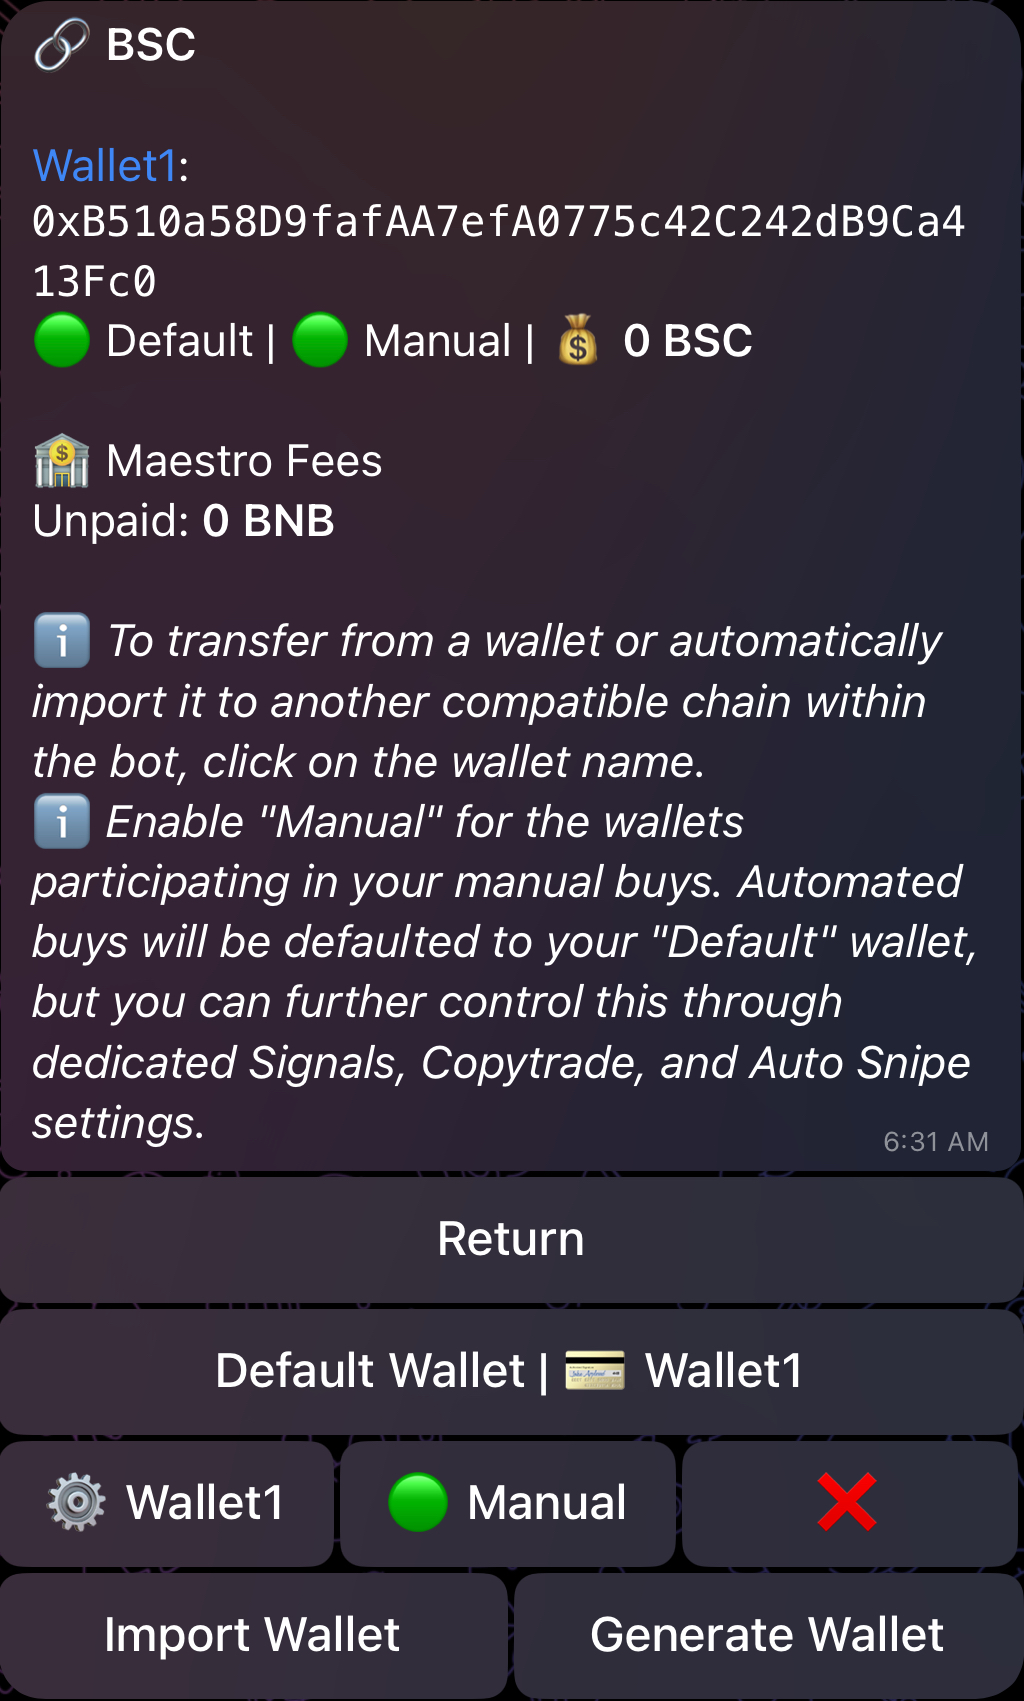
### 🟢 Manual and 💳 Default Wallet
As soon as you set up your first wallet, you will notice two options: **"Manual"** and **"Default Wallet"**.
* "Manual" is a wallet-specific setting which you can 🟢 enable or 🔴 disable for each added wallet. When you enable "Manual" for a wallet, you are specifying that this wallet should participate in your **manual buys**. In other terms, "Manual" will allow you to select the wallets that will participate in all your manual multi-buys. The first wallet you set up is automatically enabled for "Manual" since there always needs to be at least one "Manual" wallet.
* "Default Wallet" is a chain-specific setting. Only one wallet can be set as "Default Wallet" and this is required at all times. To change the default wallet, simply click on the "Default Wallet" button and you will be provided with the list of your connected wallets so you can select the wallet of preference. The wallet selected in "Default Wallet" will serve as the default wallet for all your automated buys generated through Signals, Copytrade and Auto Snipe. However, you will be able to further control which wallets will participate in every automated buy through dedicated settings.
### ⚙️ Wallet Config
If you click on the "⚙️ Wallet Name" button, you will be redirected to the following menu:
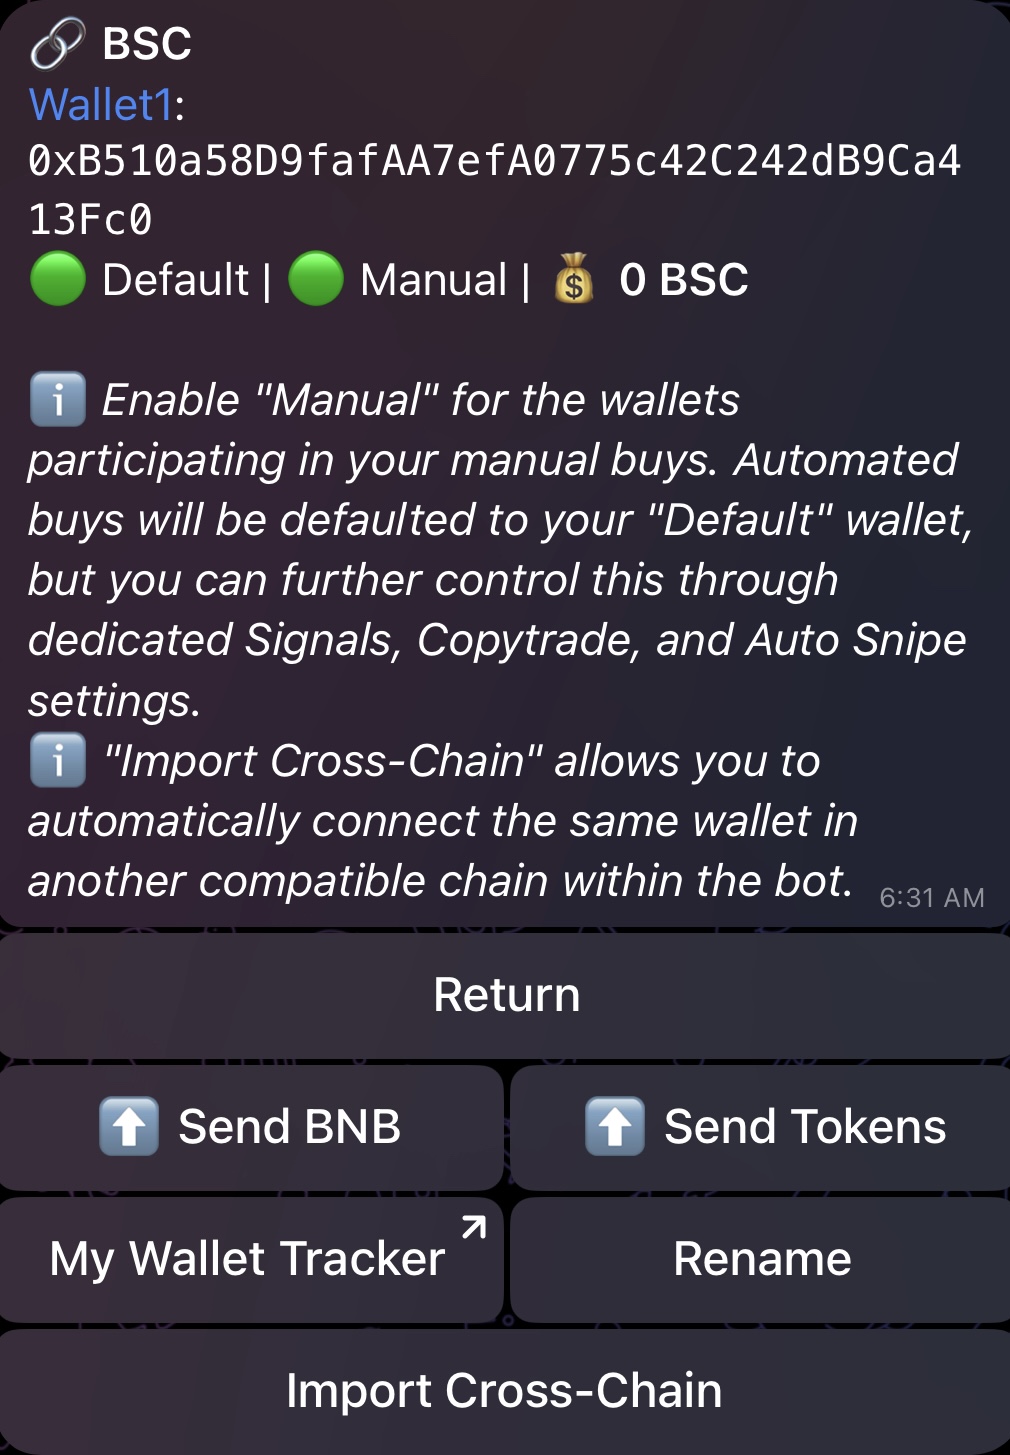
#### ⬆️ Send BNB
Send BNB from this wallet to another one of your connected wallets in the bot, or to an external wallet address. Once the destination wallet is selected, the bot will prompt you for the BNB amount that you would like to transfer. You can specify an amount in terms of BNB or a percentage by adding % to the number (Example: 50% would send half of your BNB but 50 would send 50 BNB). The same applies to SOL, ETH, S, AVAX and TON.
#### ⬆️ Send Tokens
Paste the contract address of the token you want to send out of your wallet. Then, choose whether you want to send the tokens to another one of your connected wallets in the bot, or to an external wallet address. Once the destination wallet is selected, the bot will prompt you for the token amount that you would like to transfer. You can specify an amount in terms of the token or a percentage by adding % to the number (example: 50% would send half of the tokens but 50 would send 50 tokens).
#### ↗️ My Wallet Tracker
Links to the free [Maestro Wallet Bot](https://t.me/MaestroWalletBot) which offers advanced wallet tracking functionalities.
#### Rename
Rename your wallet.
#### Import Cross-Chain
_Available on all EVM-compatible chains_
Allows you to import this wallet to another EVM-compatible chain in the bot (BSC, Base, Ethereum, Monad, Sonic, Avalanche, Arbitrum, Hyper EVM). Once you click on this button, the bot will provide you with the list of compatible chains that you can import this wallet to. After selecting the chain, you will be prompted to provide a name for the wallet on the destination chain.
---
# Wallet Bot
Source: https://www.maestrobots.com/docs/wallet.md
Section: Wallet Bot
> A Telegram bot that tracks DeFi portfolios across Ethereum, Base, BNB Chain, and Solana — balances, cost-basis PnL, and price alerts, all in one chat.
**Wallet Bot** is a Telegram companion that lets you watch any public wallet across multiple chains at amazing speeds. Add a wallet address and the bot keeps a live view of your balances, profit and loss, market caps, taxes, and price moves — all without ever touching a key or signing a transaction. Even if you only intend to use it to watch one address, we recommend you go through the entire document — otherwise you'd be missing out on features like *PnL anchors*, custom *price alerts*, and pinned tokens that keep the wallet screen exactly the way you like it.
## Sections
| Section | What it covers |
| ----------------------------------------------------------------------------- | ---------------------------------------------------------------------------------- |
| **[Getting Started](/docs/wallet/getting-started)** | Finding the bot on Telegram, verifying your language, and opening the main menu. |
| **[Adding a Wallet](/docs/wallet/adding-a-wallet)** | Picking a chain, pasting an address, and naming your first *portfolio*. |
| **[Viewing Balances](/docs/wallet/viewing-balances)** | The balance screen, its columns, pagination, and the refresh cool-down. |
| **[Token Details](/docs/wallet/token-details)** | The per-token panel — price, market cap, liquidity, taxes, and honeypot flags. |
| **[Price Alerts](/docs/wallet/price-alerts)** | Setting a threshold and getting a direct message when a token crosses it. |
| **[PnL Tracking](/docs/wallet/pnl-tracking)** | Wallet-level and per-token profit and loss, plus *anchors* for custom baselines. |
| **[Pinning and Hiding Tokens](/docs/wallet/pinning-and-hiding-tokens)** | Forcing a token into the list or keeping stray airdrops out of sight. |
| **[Display Settings](/docs/wallet/display-settings)** | Per-portfolio preferences — columns, order, *PnL mode*, page size, footer. |
| **[Privacy](/docs/wallet/privacy)** | What the bot stores, what it never asks for, and what a wallet address allows. |
| **[Troubleshooting](/docs/wallet/troubleshooting)** | The symptoms you might run into, and what to do about each of them. |
| **[FAQ](/docs/wallet/faq)** | Quick answers to the questions users ask most often. |
## Supported Networks
| Chain | Notes |
| -------------- | ------------------------------------------------------------------------ |
| *Ethereum* | EVM-compatible. Full balance, PnL, and market-cap coverage. |
| *Base* | EVM-compatible. Full balance, PnL, and market-cap coverage. |
| *BNB Chain* | EVM-compatible. Full balance, PnL, and market-cap coverage. |
| *Solana* | Non-EVM. Full balance and PnL coverage; some EVM-only metrics do not apply. |
> **INFO**
>
> With the exception of *Solana*, all remaining supported chains are referred to as *EVM-compatible chains*.
---
# Adding a Wallet
Source: https://www.maestrobots.com/docs/wallet/adding-a-wallet.md
Section: Wallet Bot
> Choose a chain, paste a wallet address, and pick a nickname — the bot starts tracking immediately.
**Adding a wallet** takes three small steps. Once it is in, the bot starts fetching balances and *cost-basis PnL* for that address right away, and the new *portfolio* appears in the main menu.
## The Flow
1. From the main menu, tap **➕ Add Portfolio**.
2. **Choose the chain.** Pick *Ethereum*, *Base*, *BNB Chain*, or *Solana*. If the same address holds tokens on more than one chain, add it once per chain — each becomes its own portfolio.
3. **Paste the wallet address.** The bot validates the format — `0x…` for *EVM-compatible chains*, base58 for *Solana*. If the address is malformed, the bot will ask you to try again.
4. **Pick a nickname.** 1–8 alphanumeric characters. This is what you will see in the portfolio list.
Once verification is successful, the bot replies with a confirmation and returns you to the main menu with the new portfolio in place.
## The Onboarding Wait
The first time a wallet is added, the bot fetches two things in the background:
- **Balances** — usually ready in a few seconds.
- **Cost-basis PnL** — can take up to about a minute the first time, because the full trade history for the wallet is being computed from scratch.
While the PnL calculation is still running, the bot shows an onboarding panel with three buttons:
- **🔄 Refresh** — check whether the PnL data is ready yet.
- **📊 View Portfolio** — open the portfolio once balances *and* PnL are in.
- **👁 View without PnL** — open the portfolio right away with balances only; the PnL columns fill in automatically on the next refresh.
> **INFO**
>
> Cold PnL computation only happens once per wallet, ever. Every future refresh is near-instant.
## Renaming and Removing
Tap a portfolio from the main menu to open its detail view. From here you can:
- **✏️ Rename** — change the nickname at any time.
- **🗑 Remove** — delete the portfolio, along with its price alerts, pinned tokens, hidden tokens, and display preferences. The on-chain wallet itself is untouched.
> **WARNING: Removal is permanent**
>
> Removing a portfolio clears every preference and anchor tied to it. The wallet can always be re-added, but your *PnL anchors* and *display settings* will start fresh.
---
# Display Settings
Source: https://www.maestrobots.com/docs/wallet/display-settings.md
Section: Wallet Bot
> Per-portfolio preferences that shape the balance screen — columns, order, PnL mode, page size, and footer toggles.
**Display Settings** are per-portfolio preferences that shape what you see on the balance screen, and they are categorised into ***Columns***, ***PnL Mode***, ***Page Size***, ***Header Hints***, ***Footer***, and ***Reset***. Each portfolio has its own settings, so a wallet you use for trading and one you use to track long-term holdings can look completely different.
To open the panel, tap **⚙️ View** from the balance screen.
## ***Columns***
Turn individual columns on or off:
- **Tokens** — unit count held.
- **Price** — current price per token.
- **Balance** — USD value of the position.
- **Market Cap** — token's total market cap.
- **PnL** — profit or loss for the position.
- **Status** — the ▲ / ▼ indicator shown in front of each row.
*Ticker* is always visible and always the first column. Every other column that is currently on can be **re-ordered** using the ◂ / ▸ buttons next to its label in the ***Columns*** section.
## ***PnL Mode***
A single button cycles through the four modes:
1. **Percentage** — `+12.3%`
2. **USD** — `+$1,234.56`
3. **Both** — `+12.3% [$1,234.56]`
4. **None** — hides the PnL column entirely.
See [PnL Tracking](/docs/wallet/pnl-tracking) for a full explanation of each.
## ***Page Size***
Cycles through **5**, **8**, **10**, **15**, and **20** tokens per page. Fewer tokens fit better on small phone screens; more give you a single-glance overview of the whole wallet.
## ***Header Hints***
The short `ticker / price / PnL` key that appears near the table can be placed at the **top**, at the **bottom**, or turned **off** entirely.
## ***Footer***
Two optional summary lines below the table:
- **Total** — portfolio total in USD.
- **Native** — the same total converted to the chain's native currency (*ETH*, *BNB*, or *SOL*).
- **Time** — the timestamp of the last refresh.
## ***Reset***
Tap **Reset** to restore every display setting for this portfolio to its default — all columns on, default order, **Percentage** PnL mode, **10** per page, top header hints, and total + native + time shown in the footer.
> **INFO**
>
> Display preferences take effect on the next render of the balance screen. If a change does not appear immediately, tap **Refresh** or close and re-open the screen.
---
# FAQ
Source: https://www.maestrobots.com/docs/wallet/faq.md
Section: Wallet Bot
> Quick answers to the questions users ask most often about Wallet Bot.
A short list of the questions that come up most often. If your question is not here, skim the [Troubleshooting](/docs/wallet/troubleshooting) page — most operational issues are covered there.
### Do I Need to Connect My Wallet?
No. The bot works entirely from a **public** wallet address — the same string you would paste into a block explorer. It never asks for keys, seed phrases, or signatures.
### Can the Bot Move My Funds?
No. It reads public on-chain data. It **cannot** sign transactions or take any action on your wallet.
### How Many Wallets Can I Add?
Several. The exact limit depends on the hosted instance — when you hit it, the **➕ Add Portfolio** button will tell you.
### Can I Track the Same Wallet on Multiple Chains?
Yes. Add it once per chain — each entry becomes its own portfolio, with its own *PnL*, *display settings*, and anchors.
### Why Does PnL Take So Long on the First Refresh?
*Cost-basis PnL* is computed from the full trade history of the wallet. For active wallets this can mean thousands of transactions on the first pass. Every subsequent refresh reuses the computed history and is near-instant.
### How Often Does the Bot Refresh Prices?
Whenever you open a portfolio, the bot serves a cached snapshot — at most a few minutes old. Tap **Refresh** to force a fresh fetch. The refresh cool-down is **60 seconds** per portfolio.
### What Is a *PnL Anchor*?
An *anchor* is a snapshot of your PnL values at a moment you choose. From that point on, displayed PnL is measured from the anchor instead of from the wallet's first move. Tap **⊘ Clear Anchor** to go back to total lifetime PnL. See [PnL Tracking](/docs/wallet/pnl-tracking).
### Why Don't I See Market Cap or Taxes for My Token?
Market-cap and tax enrichment uses third-party data that is not available for every token — very new tokens, illiquid tokens, or unsupported niches on some chains may come back blank. Balance and PnL figures still work regardless.
### Why Is There a 200-Token Cap?
The list is sorted by USD value and capped at the **top 200** to keep the balance screen responsive on mobile. Pin the tokens you care about to guarantee they appear regardless of their rank.
### What Is the Dust Threshold?
Positions worth less than **$0.10** are treated as dust and filtered out by default. Pin a token to keep it visible below that threshold.
### What Languages Does the Bot Support?
Eight: *English*, *Türkçe*, *中文* (Simplified Chinese), *العربية*, *Русский*, *Français*, *हिन्दी*, and *فارسی*. Your language is auto-detected from your Telegram profile and can be changed from **⚙️ Settings → 🌐 Language**.
### Where Is My Data Stored?
On the bot's server. It contains only what is described in [Privacy](/docs/wallet/privacy) — wallet addresses, nicknames, display preferences, alerts, and anchors. Nothing that could move your funds, and nothing that could authenticate you anywhere else.
---
# Getting Started
Source: https://www.maestrobots.com/docs/wallet/getting-started.md
Section: Wallet Bot
> Launch Wallet Bot on Telegram, set your language, and open the main menu.
This section walks you through opening **Wallet Bot** for the first time, so that you can add your first *portfolio* and start watching a wallet within a minute.
## Launching the Bot
To begin, find **Wallet Bot** on Telegram and tap **Start** (or send **`/start`**). The bot will reply with a welcome message and the main menu.
On first contact the bot picks up your language automatically from your Telegram profile. It supports *English*, *Türkçe*, *中文*, *العربية*, *Русский*, *Français*, *हिन्दी*, and *فارسی*. You can switch at any time from **⚙️ Settings → 🌐 Language**.
> **INFO**
>
> If the bot ever appears unresponsive after an update or outage, send **`/start`** again — your portfolios, alerts, pins, and display preferences are all persisted, and only the in-progress dialog is reset.
## The Main Menu
The main menu is where everything starts. From here you can tap:
- **➕ Add Portfolio** — start tracking a new wallet. See [Adding a Wallet](/docs/wallet/adding-a-wallet).
- **⚙️ Settings** — change your language or review your options.
Once you have added one or more portfolios, they appear above these buttons as a paginated list. Tap any entry to open its detail view, where you can view balances, rename the portfolio, or remove it.
## Supported Chains
| Chain | Address format | Notes |
| ------------- | --------------------------------------------- | ------------------------------------- |
| *Ethereum* | `0x…` (40 hex characters) | EVM-compatible. |
| *Base* | `0x…` (40 hex characters) | EVM-compatible. |
| *BNB Chain* | `0x…` (40 hex characters) | EVM-compatible. |
| *Solana* | Base58 string (32–44 characters) | Non-EVM — some EVM-only features do not apply. |
The same wallet address can appear on multiple chains. If you want to track it on more than one, simply add it once per chain — each entry becomes its own portfolio with its own PnL and display preferences.
---
# Pinning and Hiding Tokens
Source: https://www.maestrobots.com/docs/wallet/pinning-and-hiding-tokens.md
Section: Wallet Bot
> Force a token into the list, or keep dust and airdrops out of your balance view.
**Wallet Bot** picks up every token in a wallet and ranks them by USD value, dropping anything below the dust threshold. Pinning and hiding let you override that default, so the balance screen stays exactly the way you like it.
## Pinning a Token
If a token is not appearing automatically — it might be brand new, below the dust threshold, or sitting outside the 200-position cap — you can pin it manually.
1. From the balance screen, tap **➕ Add Token**.
2. Paste the token's **contract address**, on the same chain as the portfolio.
3. The bot fetches the token's market data and adds it to the list.
Pinned tokens stay in the list regardless of their USD value, and they refresh alongside the rest of the portfolio. Each portfolio has its own pinned-tokens list.
To unpin a token, open its [detail panel](/docs/wallet/token-details) and tap **🗑 Delete**. This removes the pin without touching your wallet on-chain.
> **INFO**
>
> Pinning only works for tokens the bot can enrich with on-chain data. Paste an address the bot cannot look up and it will reply with a short error — the most common causes are the wrong chain or a brand-new deployment that hasn't been indexed yet.
## Hiding a Token
Tokens you would rather not see — spam airdrops, stray dust, tokens you have mentally written off — can be hidden from the balance view.
1. Open the token's [detail panel](/docs/wallet/token-details).
2. Tap **🚫 Hide**.
Hidden tokens are excluded from the balance screen, pagination, and the portfolio total, but they are still in the underlying wallet. They contribute nothing to what you see on screen.
## The Hidden Tokens List
Tap **🚫 Hidden (n)** from the balance screen to open the list of tokens you have hidden. From here you can:
- **Search** for a token by symbol.
- **Un-hide** a token to bring it back into the balance view.
> **NOTE**
>
> Hiding is a per-portfolio preference. If the same token appears in another of your portfolios, its visibility there is unaffected.
---
# PnL Tracking
Source: https://www.maestrobots.com/docs/wallet/pnl-tracking.md
Section: Wallet Bot
> Cost-basis profit and loss at wallet and per-token level, with anchors for custom baselines.
**PnL Tracking** is the heart of **Wallet Bot**. Every portfolio carries a full *cost-basis* profit-and-loss breakdown, computed from the wallet's public trade history — both at the wallet level and for each individual token you hold.
## The PnL Breakdown
From the balance screen, tap **📊 PnL** to open the wallet PnL panel. Scroll down in any token's [detail panel](/docs/wallet/token-details) to see the same breakdown for one token.
### *Total PnL*
*Realized* plus *Unrealized*, shown in USD and as a percentage of *Cost basis*. This is the headline number.
### *Realized*
Profit or loss from positions you have closed — what the wallet sold for, minus what it paid.
### *Unrealized*
Profit or loss on positions still open, valued at current prices.
### *Cost basis*
The total amount invested across all of the wallet's entries into the tokens currently contributing to PnL.
### *Net invested*
*Cost basis* minus proceeds already returned to the wallet through sales — a quick read on how much of your original capital is still on the table.
> **INFO**
>
> The bot displays PnL over a rolling **1-year window**, which keeps the cold-compute time bounded and the numbers focused on recent activity.
## PnL Modes
On the balance screen, the PnL column can be shown in one of four modes, cycled from [Display Settings](/docs/wallet/display-settings):
1. **Percentage** — `+12.3%`
2. **USD** — `+$1,234.56`
3. **Both** — `+12.3% [$1,234.56]` — the sign comes from the percentage; the dollar amount is shown unsigned inside brackets.
4. **None** — hides the column entirely.
## Anchors — Zeroing PnL
An *anchor* lets you measure profit from a moment you choose — handy when you want to see performance since today, or since a market event, instead of since the wallet first moved.
- **⊘ Zero PnL** captures the current values as the anchor.
- From that point on, displayed PnL is `current − anchor`.
- **⊘ Clear Anchor** removes the anchor and restores total PnL since wallet origin.
Anchors exist at two levels:
- **Wallet anchor** — set from the wallet PnL panel, applies to the portfolio's total and every row on the balance screen.
- **Per-token anchor** — set from a token's detail panel. A per-token anchor applies across **every portfolio you own that holds that token**, so the same token's displayed PnL is consistent wherever it appears.
> **NOTE**
>
> If you tap **⊘ Zero PnL** on a token the bot has no PnL values for yet, you will see a short *"no PnL data yet"* toast and no anchor is set. Refresh the portfolio, wait a moment, and try again once the cost-basis calculation has caught up.
---
# Price Alerts
Source: https://www.maestrobots.com/docs/wallet/price-alerts.md
Section: Wallet Bot
> Pick a threshold on any token and the bot sends you a direct message when the price crosses it — up, down, or both.
**Price Alerts** are a light-touch way of keeping an eye on tokens without staring at the balance screen. Choose a threshold, pick a direction, and the bot delivers a direct message the moment the price moves past your number.
## Setting an Alert
1. Open a token's [detail panel](/docs/wallet/token-details).
2. Tap **⏰ Set Alert**.
3. **Choose a threshold.** Pick one of the presets — **5%**, **10%**, **25%**, or **50%** — or tap **Custom** to enter any value between **0.1%** and **1000%**.
4. **Choose a direction:**
- **📈 Up** — fire only when the price rises by the threshold.
- **📉 Down** — fire only when the price drops by the threshold.
- **↕️ Both** — fire in either direction.
5. The alert is set immediately, with the current price captured as the *anchor price*.
## How Alerts Fire
When the token's price moves past your threshold — relative to the anchor — the bot sends you a direct message with the token, chain, new price, and the percentage move. After firing, the alert **re-anchors to the new price** so the next move is measured from there, and the alert stays active.
## Managing Alerts
From the main menu, tap **⏰ Alerts** to open the full list of active alerts, grouped by chain. Each entry shows:
- The token symbol (tap to open its detail panel).
- The direction — **↑**, **↓**, or **↕**.
- The threshold percentage.
- The token's current market cap.
- A **🗑** link to remove just that alert.
You can also remove an alert directly from the token detail panel — setting a fresh alert on a token replaces any existing alert for the same direction.
## Limits
> **INFO**
>
> There is a per-user cap on active alerts. When you reach it, the bot refuses to save a new one until an existing alert is removed. Open your alerts list and prune anything you no longer need.
## Caveats
- Alerts are measured from the **anchor price**, not from the original price you set the alert at — so a token that moves up past your threshold and back down fires once, not twice.
- A **📈 Up** or **📉 Down** alert only fires in its chosen direction. Pick **↕️ Both** if you want symmetric notifications.
- If the bot is temporarily unable to fetch prices (for example, during a provider outage), alert evaluation pauses and resumes once service is back — no alerts are "lost", but a fast round-trip may only fire once on recovery.
---
# Privacy
Source: https://www.maestrobots.com/docs/wallet/privacy.md
Section: Wallet Bot
> What the bot stores, what it never asks for, and what a wallet address lets it do.
**Wallet Bot** works entirely from **public** on-chain data. You give it a wallet address — the same kind of string you would paste into a block explorer — and the bot reads that wallet's balances, token history, and prices. It never has access to your keys, and it cannot move funds.
## What the Bot Stores
For each user, the bot keeps:
- Your Telegram user ID, so the bot can send you messages.
- Your detected or chosen language.
- The *portfolios* you have added: chain, address, nickname.
- Your *display settings* per portfolio — columns, order, *PnL mode*, page size, footer toggles.
- Your **pinned tokens** and your **hidden tokens**.
- Your **price alerts** — token, direction, threshold, and anchor price.
- Your **PnL anchors** — the values captured when you tapped **⊘ Zero PnL**.
## What the Bot Does Not Store
- **Private keys or seed phrases** — the bot never asks for them and never accepts them. If anyone or anything pretending to be the bot ever asks, it is not us.
- **Your Telegram messages** outside of commands sent to this bot.
- **Payment information** — the bot does not take payments.
## What a Wallet Address Allows
With a wallet address, the bot can:
- Read public balances and trade history for that address.
- Compute profit and loss from that public history.
- Watch public price movements and notify you when they cross a threshold you set.
It **cannot**:
- Send transactions, sign messages, or take any action on your wallet.
- Drain funds, approve contracts, or interact with the chain on your behalf.
A wallet address is, and always has been, public information. Giving it to the bot does not expose anything that a block explorer would not already reveal.
> **WARNING: Treat nicknames as metadata you control**
>
> Your portfolio **nickname** is visible only to you inside this bot, but it is stored alongside the wallet address in the bot's database. Avoid real names, email addresses, or anything you would not want kept as metadata — use a short, memorable label instead.
## Where Data Lives
All of the above is stored on the bot's server. It does **not** include anything that could move your funds or authenticate you anywhere other than this bot's own conversation. If you want your data removed, remove the portfolios and alerts through the bot's UI — this clears the per-portfolio records completely.
---
# Token Details
Source: https://www.maestrobots.com/docs/wallet/token-details.md
Section: Wallet Bot
> Everything the bot knows about a single token — price, market cap, liquidity, taxes, honeypot flags, and per-token PnL.
The **token detail panel** is where you zoom in on a single token. It gathers every metric the bot has for the token, alongside every action you can take on it — set an alert, copy the contract, or anchor its PnL — without leaving the chat.
## Opening the Panel
From the balance screen, tap any token row. The panel also opens automatically when you follow a deep link from a price-alert notification or from another of your portfolios.
## What's on the Panel
- **Symbol, name, and chain** — the core identification.
- **Contract address** — shown in full, copyable with **📋 Copy CA**.
- **Price** and **market cap** — at the time of the last refresh.
- **Liquidity** — the on-chain liquidity the bot was able to detect.
- **Buy and sell taxes** — percentage of each swap taken by the token's contract, where applicable.
- **Honeypot risk** — a quick flag when the token exhibits typical scam-contract patterns.
- **Per-token PnL** — *Realized*, *Unrealized*, *Cost basis*, and *Net invested* for this token in this portfolio, where trade history is available.
## Actions
| Button | What it does |
| ----------------- | ----------------------------------------------------------------------------------------- |
| **Refresh** | Pulls fresh data for this token only. |
| **📋 Copy CA** | Copies the token's contract address to your clipboard. |
| **⏰ Set Alert** | Starts the price-alert setup flow. See [Price Alerts](/docs/wallet/price-alerts). |
| **⊘ Zero PnL** | Anchors per-token PnL to the current values. See [PnL Tracking](/docs/wallet/pnl-tracking). |
| **⊘ Clear Anchor**| Removes the per-token anchor and restores total PnL since wallet origin. |
| **🚫 Hide** | Hides the token from the balance view. See [Pinning and Hiding Tokens](/docs/wallet/pinning-and-hiding-tokens). |
| **🗑 Delete** | Removes a manually pinned token (only appears for tokens you pinned). |
| **🤖 Trade** | Opens the token inside **[Maestro](https://t.me/Maestro)** for trading, via a deep link. |
| **✕ Close** | Closes the panel and returns to the balance screen. |
> **WARNING: Taxes and honeypot flags are heuristics**
>
> Buy-tax, sell-tax, and honeypot warnings come from an automated on-chain analysis. They are a useful signal but **not** a guarantee — always do your own research before trading a new token.
## Per-Token Anchors Across Portfolios
When you tap **⊘ Zero PnL** on a token, the anchor applies to **every one of your portfolios that holds that token**. This keeps the numbers consistent whenever the same token appears across multiple wallets. Clear it from any one of those panels and it clears everywhere.
---
# Troubleshooting
Source: https://www.maestrobots.com/docs/wallet/troubleshooting.md
Section: Wallet Bot
> Common symptoms and how to resolve them — stuck onboarding, stale refreshes, missing tokens, silent alerts.
Most issues with **Wallet Bot** come down to a handful of patterns. Work through the symptoms below in order — each one ends with the single action most likely to fix it.
## My Portfolio Is Stuck on "Computing PnL"
The first time a wallet is added, *cost-basis PnL* is computed from the full trade history. For very active wallets this can take up to a minute. Tap **🔄 Refresh** on the onboarding panel after a minute — if it still is not ready, wait another 30 seconds and try once more.
You can also tap **👁 View without PnL** to open the portfolio immediately; the PnL columns fill in automatically on the next successful refresh.
## Refresh Says "Please Wait"
Each portfolio can be refreshed at most once every **60 seconds**. Between refreshes the bot serves a cached snapshot, which is at most a minute old. Wait out the cooldown shown in the message — the data on screen is already current.
## A Token I Own Is Missing From the List
Several reasons this happens, in order of likelihood:
- **It is below the dust threshold.** Positions worth less than **$0.10** are filtered out by default. Pin the token manually to force it back in — see [Pinning and Hiding Tokens](/docs/wallet/pinning-and-hiding-tokens).
- **You hid it earlier.** Open **🚫 Hidden (n)** from the balance screen and un-hide it.
- **The wallet holds more than 200 tokens.** Only the top 200 by USD value are shown. Pin the tokens you care about.
- **The token is brand new.** Some tokens take a few minutes to appear in the data provider. Refresh again in a couple of minutes.
## PnL Shows `$0` or "No Data Yet"
*Cost-basis PnL* needs a full trade history for the token. For very new tokens, or wallets with unusual transaction patterns, the data provider may not have returned a PnL breakdown yet. The `+$0.00` or blank figure is a placeholder that fills in once the data is available — refresh again after a minute.
If you tap **⊘ Zero PnL** on a token with no data yet, the bot replies with a short *"no PnL data yet"* toast and does not set an anchor. Refresh the portfolio, wait a moment, and try again.
## My Price Alert Did Not Fire
Alerts fire only on a **net move past the threshold** from the *anchor price*. Common reasons an alert seems "missed":
- The price went up and came back down within the same window — there was no net move past the threshold.
- The alert was **📈 Up** only or **📉 Down** only, and the move went in the other direction. Use **↕️ Both** if you want symmetric notifications.
- You hit the per-user alert cap at set-time, and the alert was refused. Open the alerts list and check whether it is actually there.
## A Display Change Did Not Take Effect
Display preferences apply on the **next render** of the balance screen. Tap **Refresh** or close and re-open the balance screen, and the change will appear. If it still does not, wait for the 60-second cooldown to expire and refresh once more.
## The Bot Did Not Respond
- Make sure the input is a command (starts with **`/`**) or a button tap — the bot does not respond to free-text messages outside of its setup flows.
- If the bot was briefly offline, send **`/start`** again once it is back. Your portfolios, alerts, pins, and preferences are all persisted; only the in-progress dialog is reset.
## Something Else Is Wrong
Send **`/start`** to reset the conversation. Nothing you have set up is lost — only the current dialog state resets. If a problem reproduces after that, try removing and re-adding the portfolio; the wallet itself is unaffected on-chain.
---
# Viewing Balances
Source: https://www.maestrobots.com/docs/wallet/viewing-balances.md
Section: Wallet Bot
> The balance screen, its columns, pagination, and the refresh cool-down.
The **balance screen** is where you will spend most of your time in **Wallet Bot**. It lays out every token in a *portfolio* as a compact table — one row per token, one column per metric — alongside your *PnL*, market caps, and quick actions.
## Opening the Balance Screen
From the main menu, tap a *portfolio* to open its detail view, then tap **💰 View Balances**. The balance screen also opens automatically once the onboarding PnL computation finishes, if you tapped **📊 View Portfolio** on the onboarding panel.
## The Interface
### *Ticker*
The token symbol. Always the first column, always visible — every other column can be re-ordered or hidden from [Display Settings](/docs/wallet/display-settings).
### *Status*
A small ▲ / ▼ indicator in front of each row, showing whether the token is up or down since its *PnL anchor*.
### *Tokens*
How many units of the token the wallet holds.
### *Price*
Current price per token, in USD.
### *Balance*
USD value of the position, rounded to a readable precision.
### *Market Cap*
Total circulating-supply market cap of the token, in USD. Left blank for tokens the bot cannot yet enrich (typically brand-new or illiquid tokens).
### *PnL*
Profit or loss — as a percentage, a dollar amount, or both, depending on your **PnL mode**. See [PnL Tracking](/docs/wallet/pnl-tracking) for the full breakdown.
## The Footer
Below the table, two optional summary lines:
- **Total** — portfolio total, in USD.
- **Native** — same total, converted to the chain's native currency (*ETH*, *BNB*, or *SOL*).
Toggle either one from [Display Settings](/docs/wallet/display-settings).
## Pagination
Each page holds a configurable number of tokens (5, 8, 10, 15, or 20). Use **« Prev** and **Next »** under the table to move between pages. The chosen page size is saved per portfolio.
## Refresh
Tap **Refresh** to re-fetch balances and PnL for the portfolio. Between refreshes the bot serves a cached snapshot, so opening and closing the balance screen is instant.
> **INFO**
>
> Refresh is limited to once every 60 seconds per portfolio. If you tap it sooner, the bot replies with the time remaining — the snapshot on screen is at most a minute old.
## Limits and Caveats
The token list is capped at the **200 highest-value positions** in the wallet. Positions worth less than **$0.10** are treated as dust and filtered out by default — if you want to keep one of them in view regardless of value, pin it manually. See [Pinning and Hiding Tokens](/docs/wallet/pinning-and-hiding-tokens).
## Opening a Token
Tap any row to open that token's **detail panel** — price, market cap, liquidity, taxes, honeypot flags, per-token PnL, and buttons to set an alert, copy the contract address, or open the token in a trading bot. See [Token Details](/docs/wallet/token-details).
---
# Whale Bot
Source: https://www.maestrobots.com/docs/whale.md
Section: Whale Bot
> Watch big wallets in real time — a direct message on Telegram every time a large transfer moves in or out of an address you track.
**Whale Bot** is a Telegram companion that lets you monitor the wallets that matter in real time while capitalising on the first signs of movement. Point it at any public wallet — a *whale*, an exchange address, a project treasury — and the bot sends you a direct message the moment a transfer crosses the USD threshold you chose. Even if you only intend to track one address, we recommend you go through the entire document — otherwise you'd be missing out on features like per-*watch* thresholds and batched alerts that keep your inbox sane during busy markets.
## Sections
| Section | What it covers |
| ------------------------------------------------------------------- | -------------------------------------------------------------------------------- |
| **[Getting Started](/docs/whale/getting-started)** | Launching the bot on Telegram, verifying your language, and opening the main menu. |
| **[Adding a Watch](/docs/whale/adding-a-watch)** | Picking a chain, pasting an address, and naming your first *watch*. |
| **[Managing Watches](/docs/whale/managing-watches)** | Listing, re-thresholding, renaming, and removing the wallets you watch. |
| **[Alert Notifications](/docs/whale/alert-notifications)** | What an alert looks like, how transfers are batched, and how values are priced. |
| **[Privacy](/docs/whale/privacy)** | What the bot stores, what it never asks for, and what a watched address allows. |
| **[Troubleshooting](/docs/whale/troubleshooting)** | What to try when alerts aren't arriving or a watch won't save. |
| **[FAQ](/docs/whale/faq)** | Quick answers to the questions users ask most often. |
## Supported Networks
| Chain | Address format | Notes |
| -------------- | ---------------------------------- | -------------------------------------------------- |
| *Ethereum* | `0x…` (40 hex characters) | EVM-compatible. Full native + token coverage. |
| *Base* | `0x…` (40 hex characters) | EVM-compatible. Full native + token coverage. |
| *BNB Chain* | `0x…` (40 hex characters) | EVM-compatible. Full native + token coverage. |
| *Solana* | Base58 string (32–44 characters) | Non-EVM. Full native + SPL token coverage. |
> **INFO**
>
> **Whale Bot** only reads public on-chain data. It never has access to your keys, it cannot move funds, and the wallets you watch are not affected in any way — only observed.
---
# Adding a Watch
Source: https://www.maestrobots.com/docs/whale/adding-a-watch.md
Section: Whale Bot
> Pick a chain, paste a wallet address, choose a nickname — and the watch is live.
**Adding a watch** takes three small steps. Once it is in, the bot begins listening to the wallet's on-chain activity immediately, and the next transfer that meets your threshold triggers a direct message.
## The Flow
1. From the main menu, tap **➕ Add Watch**.
2. **Choose the chain** — *Ethereum*, *Base*, *BNB Chain*, or *Solana*.
3. **Paste the wallet address.** The bot validates the format — `0x…` for *EVM-compatible chains*, base58 for *Solana*. If the address is malformed, the bot will ask you to try again.
4. **Choose a nickname**, or send `skip` to use a shortened form of the address as the label.
Once the address is accepted, the bot replies with a confirmation like `Watch added [1/3]` and the watch is live. The default USD threshold is **$10,000** — tune it from the watch's detail panel at any time.
## The Three-Watch Limit
You can have up to **3** active watches at a time. The cap keeps each wallet's real-time subscription fast and reliable.
- The bot shows the running `[n/3]` count in every add confirmation.
- Trying to add a fourth watch returns a short message prompting you to remove one first.
- Removing a watch frees its slot immediately — see [Managing Watches](/docs/whale/managing-watches).
> **INFO**
>
> If the same address holds tokens on more than one chain, add it once per chain. Each one is an independent watch — you can set a different threshold on each to match what actually matters for that chain.
---
# Alert Notifications
Source: https://www.maestrobots.com/docs/whale/alert-notifications.md
Section: Whale Bot
> What an alert looks like, how transfers are batched, and how the USD value is computed.
Whenever a transfer meets or exceeds the USD threshold of one of your *watches*, **Whale Bot** sends you a direct message. Alerts are DMs, not posts — nobody else sees them.
## The Format
Each transfer in an alert shows:
- **🐳 Direction** — **IN** when tokens arrive at the watched wallet, **OUT** when tokens leave it.
- **Token symbol**, or the chain's native currency when it is a native transfer.
- **USD value** of the transfer, at the time it happened.
- **Counterparty address**, shortened — who sent the tokens in, or who they went out to.
- **View TX** link — tap it to open the transaction on the chain's block explorer.
When several transfers arrive close together, they are grouped into a single message so your chat does not get flooded.
## Batching
**Whale Bot** waits a few seconds after the first matching transfer to see whether more are coming, then emits a single combined message. This is ideal for whale wallets that move several tokens in one go — you get one tidy alert instead of a dozen separate pings.
Very large bursts are split across multiple messages so each stays under Telegram's size limit. No transfer is dropped — they simply continue in the next message.
## How the USD Value Is Computed
The bot converts each transfer to USD using the token's current price. For native transfers — *ETH*, *BNB*, *SOL*, or ETH on *Base* — the chain's native price is used.
> **INFO**
>
> Token pricing is best-effort. Illiquid tokens, brand-new tokens, or tokens without a reliable price source may show an approximation or arrive without a dollar figure. Tap **View TX** for the on-chain ground truth whenever a number looks surprising.
## Caveats
- Only **transfer events** produce alerts. Other on-chain activity involving the watched wallet — approvals, contract calls, liquidity events — does not.
- Transfers of tokens the bot cannot price at all are skipped, because there is no reliable way to compare them to your USD threshold.
- Alerts are intentionally **"at-least-once"**. Right after a restart, a transfer already in flight may produce a second alert a few minutes later. The bot is designed to err on the side of alerting too much rather than missing a real event.
---
# FAQ
Source: https://www.maestrobots.com/docs/whale/faq.md
Section: Whale Bot
> Quick answers to the questions users ask most often about Whale Bot.
A short list of the questions that come up most often. If your question is not here, skim the [Troubleshooting](/docs/whale/troubleshooting) page — most operational issues are covered there.
### Do I Have to Own the Wallet I'm Watching?
No. Any public address on a supported chain can be watched. That is the whole point — you can follow large wallets, exchange addresses, or project treasuries that have nothing to do with you.
### Can the Bot Move Funds From a Watched Wallet?
No. It can only read public on-chain activity. It **cannot** sign or send transactions.
### Why the Three-Watch Limit?
Each watch holds an open real-time subscription to the chain. Capping it at **3** keeps the bot fast and reliable for everyone. You can always rotate watches as your interests change.
### Why Is My Alert a Few Seconds Late?
The bot waits briefly (typically under three seconds) to **batch** transfers together. This keeps you from receiving a burst of separate messages when a wallet moves many tokens at once.
### What Chains Are Supported?
Four: *Ethereum*, *Base*, *BNB Chain*, and *Solana*.
### Can I Set Separate Thresholds for Incoming vs Outgoing?
Not currently. The threshold applies to the USD value of a transfer in either direction.
### Can I Watch More Than One Address at a Time?
Yes — up to **3** watches at a time. Each is independent, with its own nickname, chain, and threshold. Rename related watches with similar prefixes and they will visually cluster in the watches list.
### Why Did a Small-Value Token Fire an Alert?
If the token's USD price put the transfer above your threshold at the moment of the trade, the alert fires. Token prices come from public price feeds; illiquid tokens occasionally spike briefly.
### What Happens if I Block the Bot?
No more alerts. You will not receive messages until you unblock and send **`/start`** again. Your watches are preserved in the meantime.
### What Languages Are Supported?
Eight: *English*, *Türkçe*, *中文*, *العربية*, *Русский*, *Français*, *हिन्दी*, and *فارسی*. Language is auto-detected from your Telegram profile and can be changed from **⚙️ Settings → 🌐 Language**.
---
# Getting Started
Source: https://www.maestrobots.com/docs/whale/getting-started.md
Section: Whale Bot
> Launch Whale Bot on Telegram, set your language, and open the main menu.
This section walks you through opening **Whale Bot** for the first time, so that you can add your first *watch* and start receiving transfer alerts within a minute.
## Launching the Bot
To begin, find **Whale Bot** on Telegram and tap **Start** (or send **`/start`**). The bot will reply with a welcome message and the main menu.
On first contact the bot picks up your language automatically from your Telegram profile. It supports *English*, *Türkçe*, *中文*, *العربية*, *Русский*, *Français*, *हिन्दी*, and *فارسی*. You can switch at any time from **⚙️ Settings → 🌐 Language**.
> **INFO**
>
> If the bot is ever unresponsive after an update or outage, send **`/start`** again — your watches, thresholds, and nicknames are all persisted, and only the in-progress dialog is reset.
## The Main Menu
The main menu is the hub for every interaction. From here you can tap:
- **🐋 My Watches** — open the paginated list of wallets you are watching. Tap any entry for details.
- **➕ Add Watch** — start watching a new wallet. See [Adding a Watch](/docs/whale/adding-a-watch).
- **⚙️ Settings** — change your language.
When the list is empty, the bot nudges you toward **➕ Add Watch**. Once the first watch is live, every future session opens into the populated list.
## Supported Chains
| Chain | Address format | Notes |
| ------------- | --------------------------------------------- | -------------------------------------------- |
| *Ethereum* | `0x…` (40 hex characters) | EVM-compatible. |
| *Base* | `0x…` (40 hex characters) | EVM-compatible. |
| *BNB Chain* | `0x…` (40 hex characters) | EVM-compatible. |
| *Solana* | Base58 string (32–44 characters) | Non-EVM — includes SPL tokens. |
The same address can be watched on multiple chains — add it once per chain. Each becomes its own watch and counts separately toward the three-watch limit.
---
# Managing Watches
Source: https://www.maestrobots.com/docs/whale/managing-watches.md
Section: Whale Bot
> List, re-threshold, rename, and remove the wallets you watch.
Every watch has a detail panel with three actions — **💰 Threshold**, **✏️ Rename**, and **🗑 Remove**. Open it from **🐋 My Watches** in the main menu.
## The Watches List
**🐋 My Watches** shows every active watch, three per page, with:
- The nickname (or the shortened address if you sent `skip` at setup).
- The chain.
- The current USD alert threshold.
Tap any entry to open its details.
## The Watch Detail Panel
The detail panel shows the full (shortened) address, the chain, and the current threshold, alongside the management buttons below.
### 💰 Threshold
Tap **💰 Threshold** and enter a new USD floor. Any transfer below this amount is silently ignored. A few sensible starting points:
- **$10,000** — the default. A reasonable signal-to-noise floor for most whales.
- **$100** — for a cold-storage wallet where even a small move is news.
- **$100,000** or more — for a high-volume exchange wallet, to cut routine churn.
The change applies immediately — the next transfer is compared against the new threshold.
### ✏️ Rename
Tap **✏️ Rename** to change the nickname. The old nickname is replaced everywhere it appears.
### 🗑 Remove
Tap **🗑 Remove** and confirm. The watch is deleted, the real-time subscription is torn down, and the `[n/3]` count in the watches list drops — freeing a slot for a new watch.
> **NOTE**
>
> Removing a watch also stops any pending batched alerts for that wallet — you will not receive messages about transfers that happened in the few seconds between the last batch and the removal.
---
# Privacy
Source: https://www.maestrobots.com/docs/whale/privacy.md
Section: Whale Bot
> What the bot stores, what it never asks for, and what a watched address lets it do.
**Whale Bot** works exclusively from **public** on-chain data. Adding a wallet to a *watch* is no different, in principle, from looking that wallet up on a block explorer — the bot simply does it continuously and pings you the moment something interesting happens.
## What the Bot Stores
For each user, the bot keeps:
- Your Telegram user ID, so the bot can send you messages.
- Your detected or chosen language.
- The up-to-3 *watches* you have added: chain, address, nickname, USD threshold.
- A log of recent transfer events that have already triggered alerts, so restarts do not cause the same transfer to be alerted twice.
## What the Bot Does Not Store
- **Private keys or seed phrases** — the bot never asks for them and never accepts them. If anyone or anything pretending to be the bot ever asks, it is not us.
- **Your Telegram messages** outside of the commands you send to this bot.
- **Any authority over the watched wallets.** The bot cannot send transactions, sign messages, or move funds.
## What a Watched Address Allows
With a watched address, the bot can:
- Read **public transfer events** involving that address.
- Look up the USD value of each transfer against public price sources.
- Alert you when a transfer's value crosses your threshold.
It **cannot** sign anything, move anything, or observe any private activity — there is no private activity on a public chain.
> **WARNING: Treat nicknames as metadata you control**
>
> The nickname you give a watch is visible only to you inside this bot, but it is stored alongside the wallet address in the bot's database. Avoid real names, account numbers, or anything you would not want kept as metadata — use a short, memorable label instead.
## Where Data Lives
All of the above is stored on the bot's server. It does **not** include anything that could authenticate you anywhere other than this bot's own conversation. If you want your data removed, remove your watches through the bot's UI — this clears the per-watch records completely.
---
# Troubleshooting
Source: https://www.maestrobots.com/docs/whale/troubleshooting.md
Section: Whale Bot
> Common symptoms and how to resolve them — no alerts arriving, duplicate alerts, suspect USD values.
Most issues with **Whale Bot** come down to a handful of patterns. Work through the symptoms below in order — each one ends with the single action most likely to fix it.
## I Added a Watch but I'm Not Getting Alerts
Check in this order:
- **Threshold.** The default is **$10,000**. If the wallet mostly moves smaller amounts, no alert will fire. Open the watch and tap **💰 Threshold** to lower it.
- **Transfer events only.** Alerts fire on transfers **in** or **out** of the address. On-chain activity that is not a transfer — approvals, contract calls, governance votes — does not generate alerts.
- **Token pricing.** Tokens without a reliable USD price are skipped, because the bot cannot compare them to your threshold.
- **Chain activity.** If the wallet genuinely has not moved anything since you added the watch, you will not hear from the bot. Look the address up on a block explorer to confirm.
## The Same Transfer Arrived Twice
This can happen right after the bot restarts if a transfer was in flight across the restart boundary. The design errs on the side of **"alert once too many"** rather than missing a real event — if this is a concern, cross-reference the **View TX** link on each alert.
## I'm at 3/3 but Only Use Two Watches
Every watch — active or not — counts toward the cap. Open the one you no longer want, tap **🗑 Remove**, and you are back to two free slots.
## A Small-Value Token Fired an Alert
If the token's USD price pushed the transfer value above your threshold at the moment of the trade, the alert fires. Illiquid tokens occasionally spike briefly against their usual reference price.
## I'm Seeing USD Values That Look Wrong
The bot prices tokens against public price feeds, which can be noisy for illiquid or brand-new tokens. Use **View TX** on any alert to see the exact on-chain amount and verify against the chain's explorer for the authoritative number.
## The Bot Did Not Respond
- Make sure the input is a command (starts with **`/`**) or a button tap — the bot does not respond to free-text messages outside of its setup flows.
- If the bot was briefly offline, send **`/start`** again once it is back. Your watches, thresholds, and nicknames are persisted; only the in-progress dialog is reset.
## Something Else Is Wrong
Send **`/start`** to reset the conversation. Nothing you have set up is lost — only the current dialog state resets. If a problem reproduces after that, try removing and re-adding the watch; the wallet itself is unaffected on-chain.